2010 Dodge Journey 3.5 Serpentine Belt Diagram
The serpentine belt on your 2010 Dodge Journey with the 3.5L engine is a critical component, responsible for driving several vital accessories. Understanding its routing and function is crucial for preventative maintenance, troubleshooting, and repairs. This article will provide a detailed explanation of the serpentine belt diagram, empowering you to confidently tackle related tasks.
Purpose of the Serpentine Belt Diagram
The serpentine belt diagram is your roadmap for understanding the belt's routing around the various pulleys on the front of your engine. Why is this important? Several reasons:
- Belt Replacement: The most common use is for replacing a worn or broken serpentine belt. Without the diagram, correctly routing the new belt can be a frustrating and potentially damaging experience.
- Troubleshooting: Squealing or slipping belts can indicate problems with the belt itself, a pulley, or an accessory. The diagram helps you visually inspect each component involved in the belt system.
- Accessory Replacement: Replacing components like the alternator, power steering pump, or air conditioning compressor requires removing the serpentine belt. The diagram allows for proper reinstallation.
- Learning and Understanding: Even if you don't plan to work on your car immediately, understanding the serpentine belt system helps you appreciate how your engine works and potentially diagnose issues early.
Key Specs and Main Parts
Let's break down the key components and some relevant specifications:
- Engine: 3.5L V6 (specifically the EGG engine code)
- Belt Type: Multi-ribbed serpentine belt (typically a 6-rib belt, but verify the specific part number for your vehicle).
- Belt Length: The belt length will vary slightly depending on the manufacturer, but it’s crucial to get the correct length for proper tension and accessory function. Consult your owner's manual or a parts supplier for the exact length.
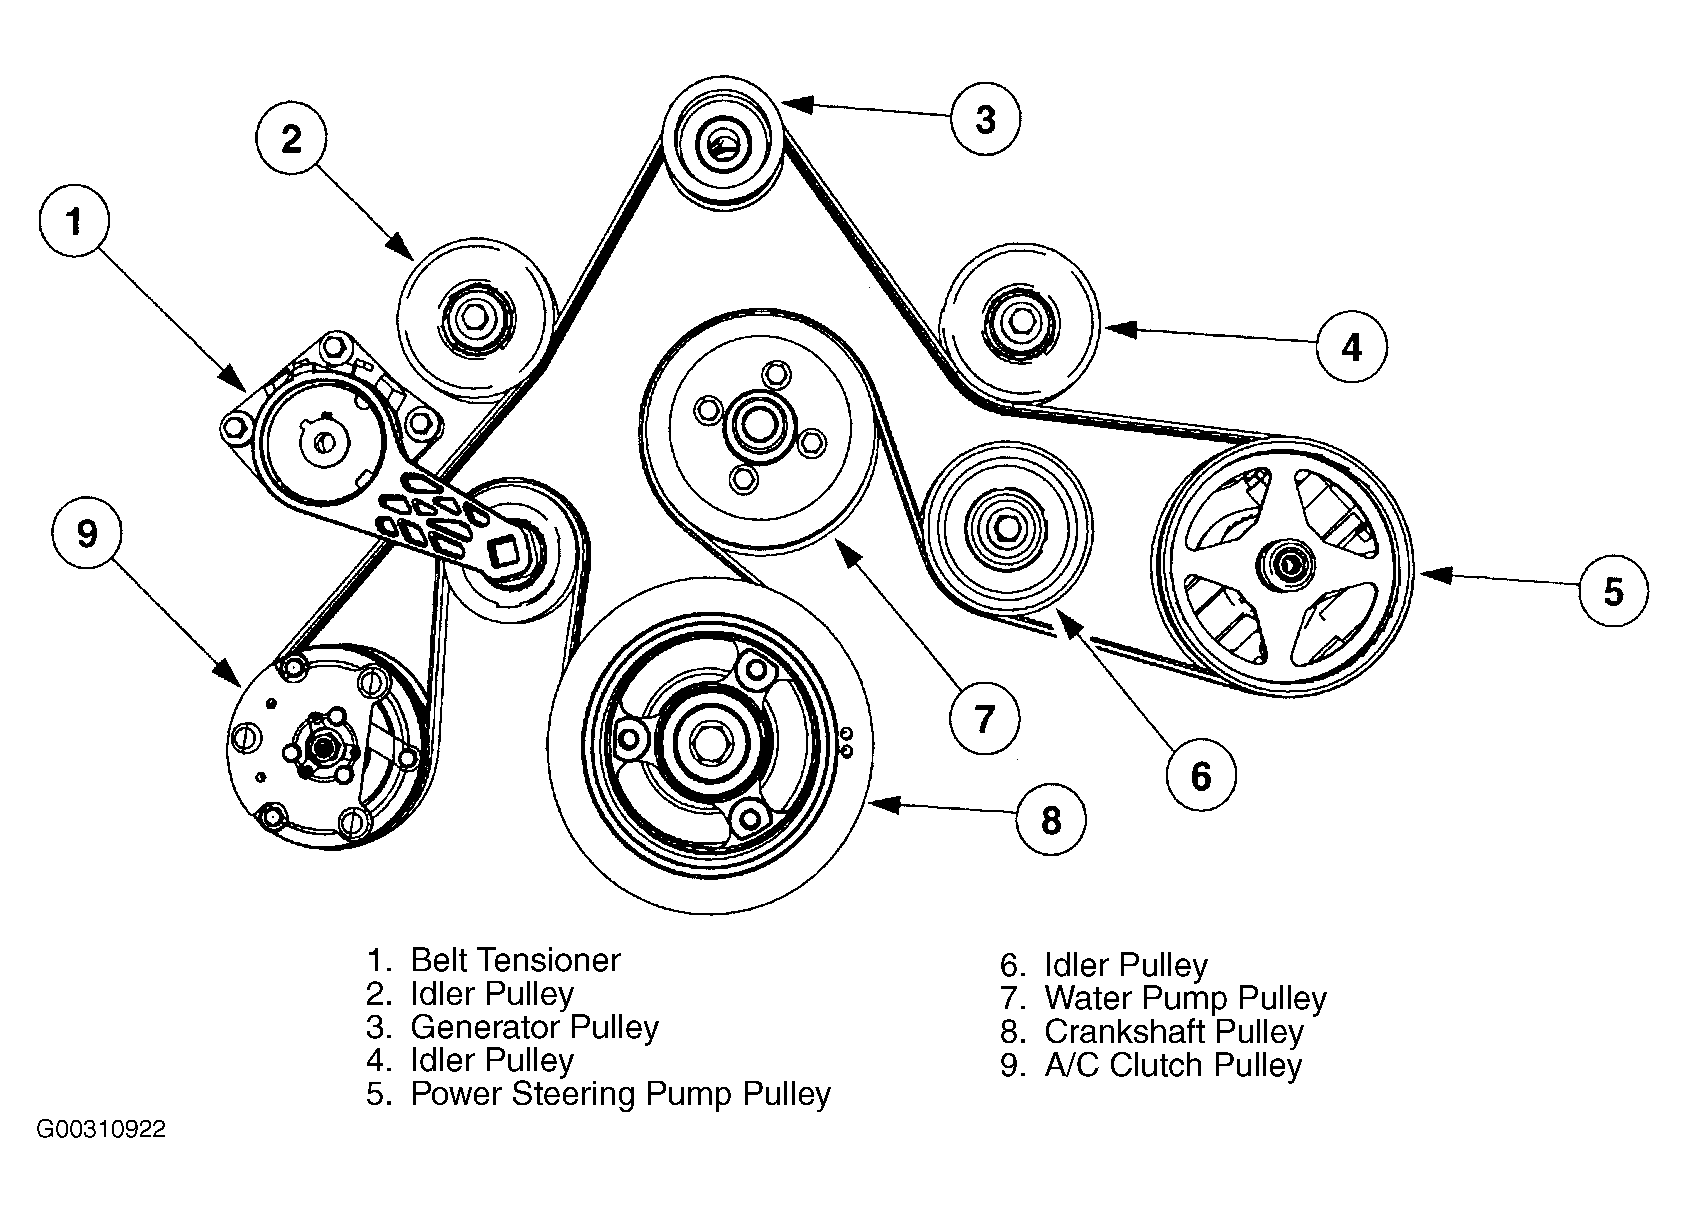
The main components driven by the serpentine belt on the 2010 Dodge Journey 3.5L include:
- Crankshaft Pulley (or Harmonic Balancer): This pulley is directly connected to the engine's crankshaft and provides the driving force for the serpentine belt.
- Alternator: The alternator generates electricity to charge the battery and power the electrical system.
- Power Steering Pump: The power steering pump provides hydraulic pressure to assist steering.
- Air Conditioning Compressor: The A/C compressor circulates refrigerant in the air conditioning system.
- Water Pump: Circulates coolant through the engine to regulate temperature.
- Tensioner Pulley: This spring-loaded pulley maintains proper tension on the serpentine belt. It's crucial for preventing slippage and ensuring proper accessory function. A failing tensioner is a common cause of belt noise.
- Idler Pulley (if equipped): Some configurations may include an idler pulley, which is a smooth pulley that simply guides the belt around other components.
Symbols and Diagram Interpretation
Understanding the symbols used in the serpentine belt diagram is essential for proper interpretation. Here's a breakdown of common symbols:
- Solid Line: Represents the path of the serpentine belt itself. The thickness of the line doesn't typically represent the belt's thickness.
- Pulleys: Illustrated as circles. They may have a "v" shape inside to indicate a grooved pulley, or a smooth surface to represent a smooth idler pulley. The size of the circle doesn't represent the actual pulley size.
- Arrows: Indicate the direction of belt travel. Follow the arrows to trace the belt's path.
- Tensioner: Usually depicted with a spring symbol or a curved arrow indicating the direction of tensioner movement. The tensioner is critical, and its proper function is key to belt longevity.
- Accessory Names/Abbreviations: Common abbreviations include ALT (alternator), P/S (power steering), A/C (air conditioning), W/P (water pump), and CRANK (crankshaft).
The diagram often uses a simplified representation, so focus on the relative positions of the pulleys and the direction of the belt's wrap around each pulley. Note whether the smooth side or the ribbed side of the belt contacts each pulley. This is vital for correct routing.
How It Works
The serpentine belt system operates on a simple principle: the rotational force of the engine's crankshaft is transferred to various accessories via the belt. The crankshaft pulley, connected directly to the crankshaft, spins the serpentine belt. The belt, in turn, wraps around and drives the pulleys of the alternator, power steering pump, A/C compressor, and water pump. The tensioner pulley maintains the correct amount of tension on the belt, preventing slippage and ensuring efficient power transfer. If the belt is too loose, it will slip, causing reduced performance of the accessories and potentially leading to overheating (due to a non-functioning water pump) or a discharged battery (due to a non-charging alternator). If the belt is too tight, it can put excessive strain on the accessory bearings, leading to premature failure.
Real-World Use: Basic Troubleshooting
Here are some basic troubleshooting tips when dealing with the serpentine belt on your 2010 Dodge Journey 3.5L:
- Squealing Noise: A common symptom of a slipping belt. Check the belt for wear, cracks, or glazing. Also, inspect the tensioner for proper function. A worn tensioner might not be providing enough tension. Sometimes a small spray of belt dressing (sparingly!) can temporarily alleviate squealing, but it's usually a sign of an underlying problem.
- Belt Shredding or Cracking: Indicates a worn belt, misaligned pulleys, or a seized accessory. Inspect all pulleys for damage and ensure they are properly aligned. Replace the belt immediately. Misalignment can destroy a new belt quickly.
- Accessory Malfunction: If an accessory like the alternator or A/C compressor stops working, check the serpentine belt first. A broken belt will prevent the accessory from functioning.
- Visual Inspection: Regularly inspect the belt for signs of wear and tear. Look for cracks, fraying, missing ribs, and glazing. Replace the belt if you see any of these signs.
When replacing the belt, pay close attention to the routing. It's a good idea to take a picture of the old belt's routing *before* removing it. This will serve as a visual reference during reinstallation. A mirror can be helpful for viewing the routing behind the engine or other components.
Safety Considerations
Working on the serpentine belt system can be dangerous if proper precautions are not taken.
- Engine Off: Always ensure the engine is turned off and the ignition key is removed *before* working on the serpentine belt system.
- Battery Disconnect: Disconnecting the negative battery cable is a good practice to prevent accidental starting.
- Hot Surfaces: Be aware that engine components, especially the exhaust manifold, can be extremely hot. Allow the engine to cool down completely before working on it.
- Moving Parts: Keep your hands and clothing away from the serpentine belt and pulleys while the engine is running. The crankshaft pulley is a particularly dangerous area.
- Tensioner Tool: Use the correct tool to release the tension on the tensioner pulley when removing or installing the serpentine belt. Do not attempt to pry or force the tensioner. The tensioner spring can exert a lot of force and cause injury if released improperly.
Remember to use proper personal protective equipment (PPE), including safety glasses and gloves, when working on your vehicle.
By understanding the serpentine belt diagram and following these guidelines, you can confidently maintain and repair this essential system on your 2010 Dodge Journey 3.5L. A well-maintained serpentine belt system ensures reliable accessory function and prevents costly breakdowns.
We have access to a detailed PDF file of the specific serpentine belt diagram for your 2010 Dodge Journey 3.5L. This file includes a high-resolution image and may include additional technical notes. Contact us directly to receive a copy of the diagram.