2010 Dodge Journey Blend Door Actuator Diagram
Alright, let's dive into the 2010 Dodge Journey's blend door actuator diagram. Whether you're chasing down temperature control issues, trying to understand your HVAC system better, or just expanding your automotive know-how, this diagram is your roadmap. We're assuming you're comfortable with basic automotive repair – this isn't a guide for changing your oil, but it will get you comfortable with a deeper understanding of climate control.
Purpose of the Blend Door Actuator Diagram
Why bother with this diagram? Simple: accurate climate control. The blend door actuator is a crucial component in your vehicle's Heating, Ventilation, and Air Conditioning (HVAC) system. Its job is to regulate the mixture of hot and cold air flowing into the cabin, directly impacting the temperature you set on your dashboard. Understanding the diagram empowers you to:
- Diagnose HVAC Problems: Is one side blowing hot while the other blows cold? The actuator could be the culprit. The diagram helps pinpoint the actuator's location and connections.
- Perform Repairs/Replacements: Replacing a faulty blend door actuator is often a DIY-able project, but only if you know what you're doing. The diagram ensures you disconnect and reconnect everything correctly.
- Understand the System: Automotive knowledge is power. The diagram provides a visual representation of how the blend door actuator interacts with other HVAC components.
Key Specs and Main Parts
Before we dissect the diagram, let's familiarize ourselves with the key players:
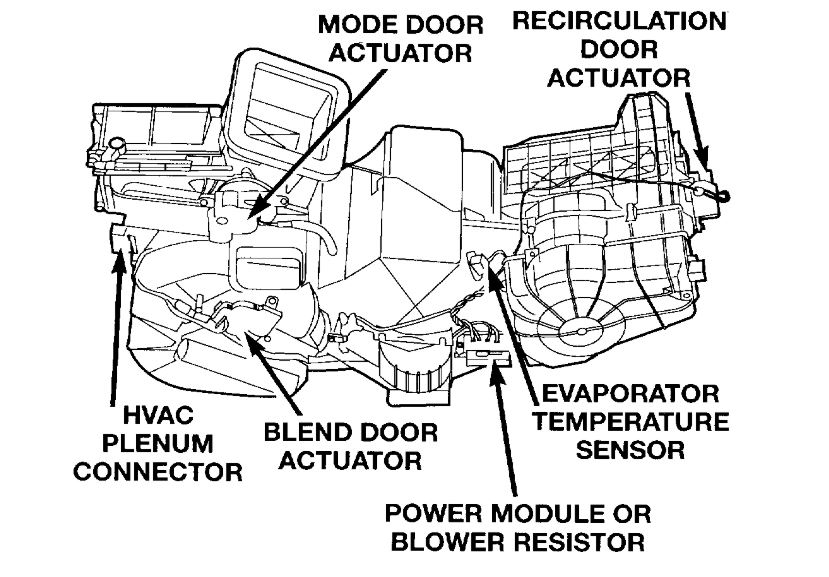
- Blend Door Actuator: This is the star of the show. It's a small electric motor that moves the blend door, controlling the airflow.
- Blend Door: A flap inside the HVAC box that directs air either through the heater core (for hot air) or around it (for cold air).
- HVAC Control Module: The "brain" of the HVAC system. It receives your temperature settings and sends signals to the blend door actuator.
- Wiring Harness: The network of wires that connect the actuator to the control module and power source.
- Connectors: The plugs that physically connect the wiring harness to the actuator and other components.
The 2010 Dodge Journey typically uses a direct current (DC) motor blend door actuator, usually operating at 12V DC. Resistance readings across the motor terminals are a common diagnostic check, but these values vary depending on the specific actuator. Checking the service manual is critical for accurate resistance values. Torque output is also important; the actuator must be strong enough to move the blend door against varying air pressures within the HVAC box. Specific torque figures aren't typically listed on the diagram but are crucial for selecting a replacement actuator.
Symbols and Diagram Conventions
Automotive wiring diagrams adhere to a standardized set of symbols. Decoding these symbols is key to understanding the diagram. Here's a breakdown:
- Solid Lines: Represent wires. The thickness of the line doesn't necessarily indicate wire gauge (although some diagrams may). It's mostly for visual clarity.
- Dashed Lines: Often indicate a ground connection or a shielded wire. Shielded wires are used to prevent electrical interference.
- Circles/Dots: Where wires connect or split (splice). A dot indicates a connection, while a line crossing another without a dot usually signifies no connection.
- Rectangles: Represent components like the HVAC control module or the actuator itself. Labels inside the rectangle identify the component.
- Resistor Symbol (Zig-zag line): Represents a resistor, which limits current flow. Some actuators have internal resistors for position feedback.
- Ground Symbol (Upside-down triangle or series of horizontal lines): Indicates a connection to the vehicle's chassis ground.
- Colors: Wires are typically color-coded. The diagram will usually have a key listing the color abbreviations (e.g., BLK for black, RED for red, WHT for white, GRN for green, BLU for blue).
A typical blend door actuator diagram will show the actuator as a rectangle with lines representing the wires connected to it. These wires will then lead to other components, such as the HVAC control module and power source. The diagram will also show any connectors involved, often labeled with connector numbers for easy identification.
How It Works
The 2010 Dodge Journey's blend door actuator operates on a closed-loop feedback system. Here's a simplified explanation:
- You set the desired temperature on the HVAC control module.
- The control module interprets this setting and sends a voltage signal to the blend door actuator.
- The actuator's motor rotates, moving the blend door.
- A potentiometer or other sensor inside the actuator sends a feedback signal back to the control module, indicating the blend door's position.
- The control module compares the actual door position to the desired position. If they don't match, the control module adjusts the voltage signal to the actuator until the desired position is reached.
This feedback loop ensures precise temperature control. Without it, the blend door would simply move to one extreme or the other, resulting in either full hot or full cold air.
Real-World Use: Basic Troubleshooting Tips
So, you suspect your blend door actuator is malfunctioning. Here are a few basic troubleshooting steps:
- Listen for Clicking: A rapid clicking sound coming from behind the dashboard (usually on the driver's or passenger's side) is a common symptom of a failing actuator. This clicking is often the sound of stripped gears inside the actuator.
- Check for Uneven Temperatures: As mentioned earlier, one side blowing hot while the other blows cold is a classic sign of a blend door issue.
- Scan for Diagnostic Trouble Codes (DTCs): Use an OBD-II scanner to check for HVAC-related DTCs. Codes related to the blend door actuator (e.g., B1481) can provide valuable clues.
- Inspect the Actuator Wiring: Visually inspect the wiring harness and connectors for any signs of damage, corrosion, or loose connections. Use a multimeter to check for voltage at the actuator connector when the HVAC system is turned on. Refer to the diagram to identify the correct pins for voltage testing.
- Perform Actuator Calibration (if applicable): Some vehicles require the blend door actuator to be calibrated after replacement. This involves using a scan tool or performing a specific procedure to teach the control module the actuator's range of motion. Consult your vehicle's service manual for specific calibration instructions.
Warning: Disconnecting and reconnecting electrical connectors without proper grounding can damage sensitive electronic components. Always disconnect the negative battery terminal before working on any electrical system.
Safety Considerations
Working on automotive electrical systems carries inherent risks. Here are some key safety precautions:
- Disconnect the Battery: Always disconnect the negative battery terminal before working on any electrical components. This prevents accidental shorts and electrical shocks.
- Use Proper Tools: Use insulated tools designed for automotive electrical work.
- Avoid Working in Wet Conditions: Water conducts electricity, increasing the risk of electric shock.
- Understand Wiring Diagrams: Don't guess! Always refer to the wiring diagram to ensure you're connecting wires correctly.
- Be Careful with Airbag Systems: Some HVAC components are located near airbag sensors. Accidentally triggering an airbag can cause serious injury. Consult your vehicle's service manual for instructions on disabling the airbag system before working in these areas.
The HVAC control module itself can be sensitive to static electricity. Ground yourself properly before handling it to prevent damage. Additionally, the heater core contains hot coolant, which can cause severe burns. Allow the engine to cool completely before working on any components near the heater core.
Conclusion
Understanding the 2010 Dodge Journey's blend door actuator diagram is a valuable skill for any DIY mechanic. It empowers you to diagnose and repair HVAC problems with greater confidence. Remember to always prioritize safety and consult your vehicle's service manual for specific instructions and precautions. By understanding the diagram and applying basic troubleshooting techniques, you can keep your Journey's climate control system running smoothly.
We have the full resolution file of the 2010 Dodge Journey Blend Door Actuator Diagram, please Click Here to Download!