2010 Dodge Ram 1500 Blend Door Actuator Diagram
For the DIY mechanic tackling HVAC issues in a 2010 Dodge Ram 1500, understanding the blend door actuator system is crucial. This article serves as a deep dive into the blend door actuator diagram, empowering you to diagnose and potentially fix temperature control problems yourself. We'll cover the key components, how the system works, real-world troubleshooting, and important safety considerations.
Purpose of the Blend Door Actuator Diagram
The blend door actuator diagram is more than just a collection of lines and symbols; it's your roadmap to understanding the intricate workings of your Ram's HVAC system. Having this diagram is essential for several reasons:
- Diagnostic Efficiency: It allows you to pinpoint the exact location of components, trace wiring, and identify potential failure points quickly. No more guessing!
- Targeted Repairs: Instead of replacing the entire HVAC unit, you can isolate the problem to the blend door actuator, its wiring, or the control module, saving time and money.
- System Understanding: The diagram provides a visual representation of how the various components interact, giving you a deeper understanding of the system's operation. This is invaluable for both repairs and general automotive knowledge.
- Modification and Customization: If you're planning any modifications to your HVAC system, such as adding a dual-zone climate control, the diagram will be essential for proper wiring and integration.
Key Specs and Main Parts
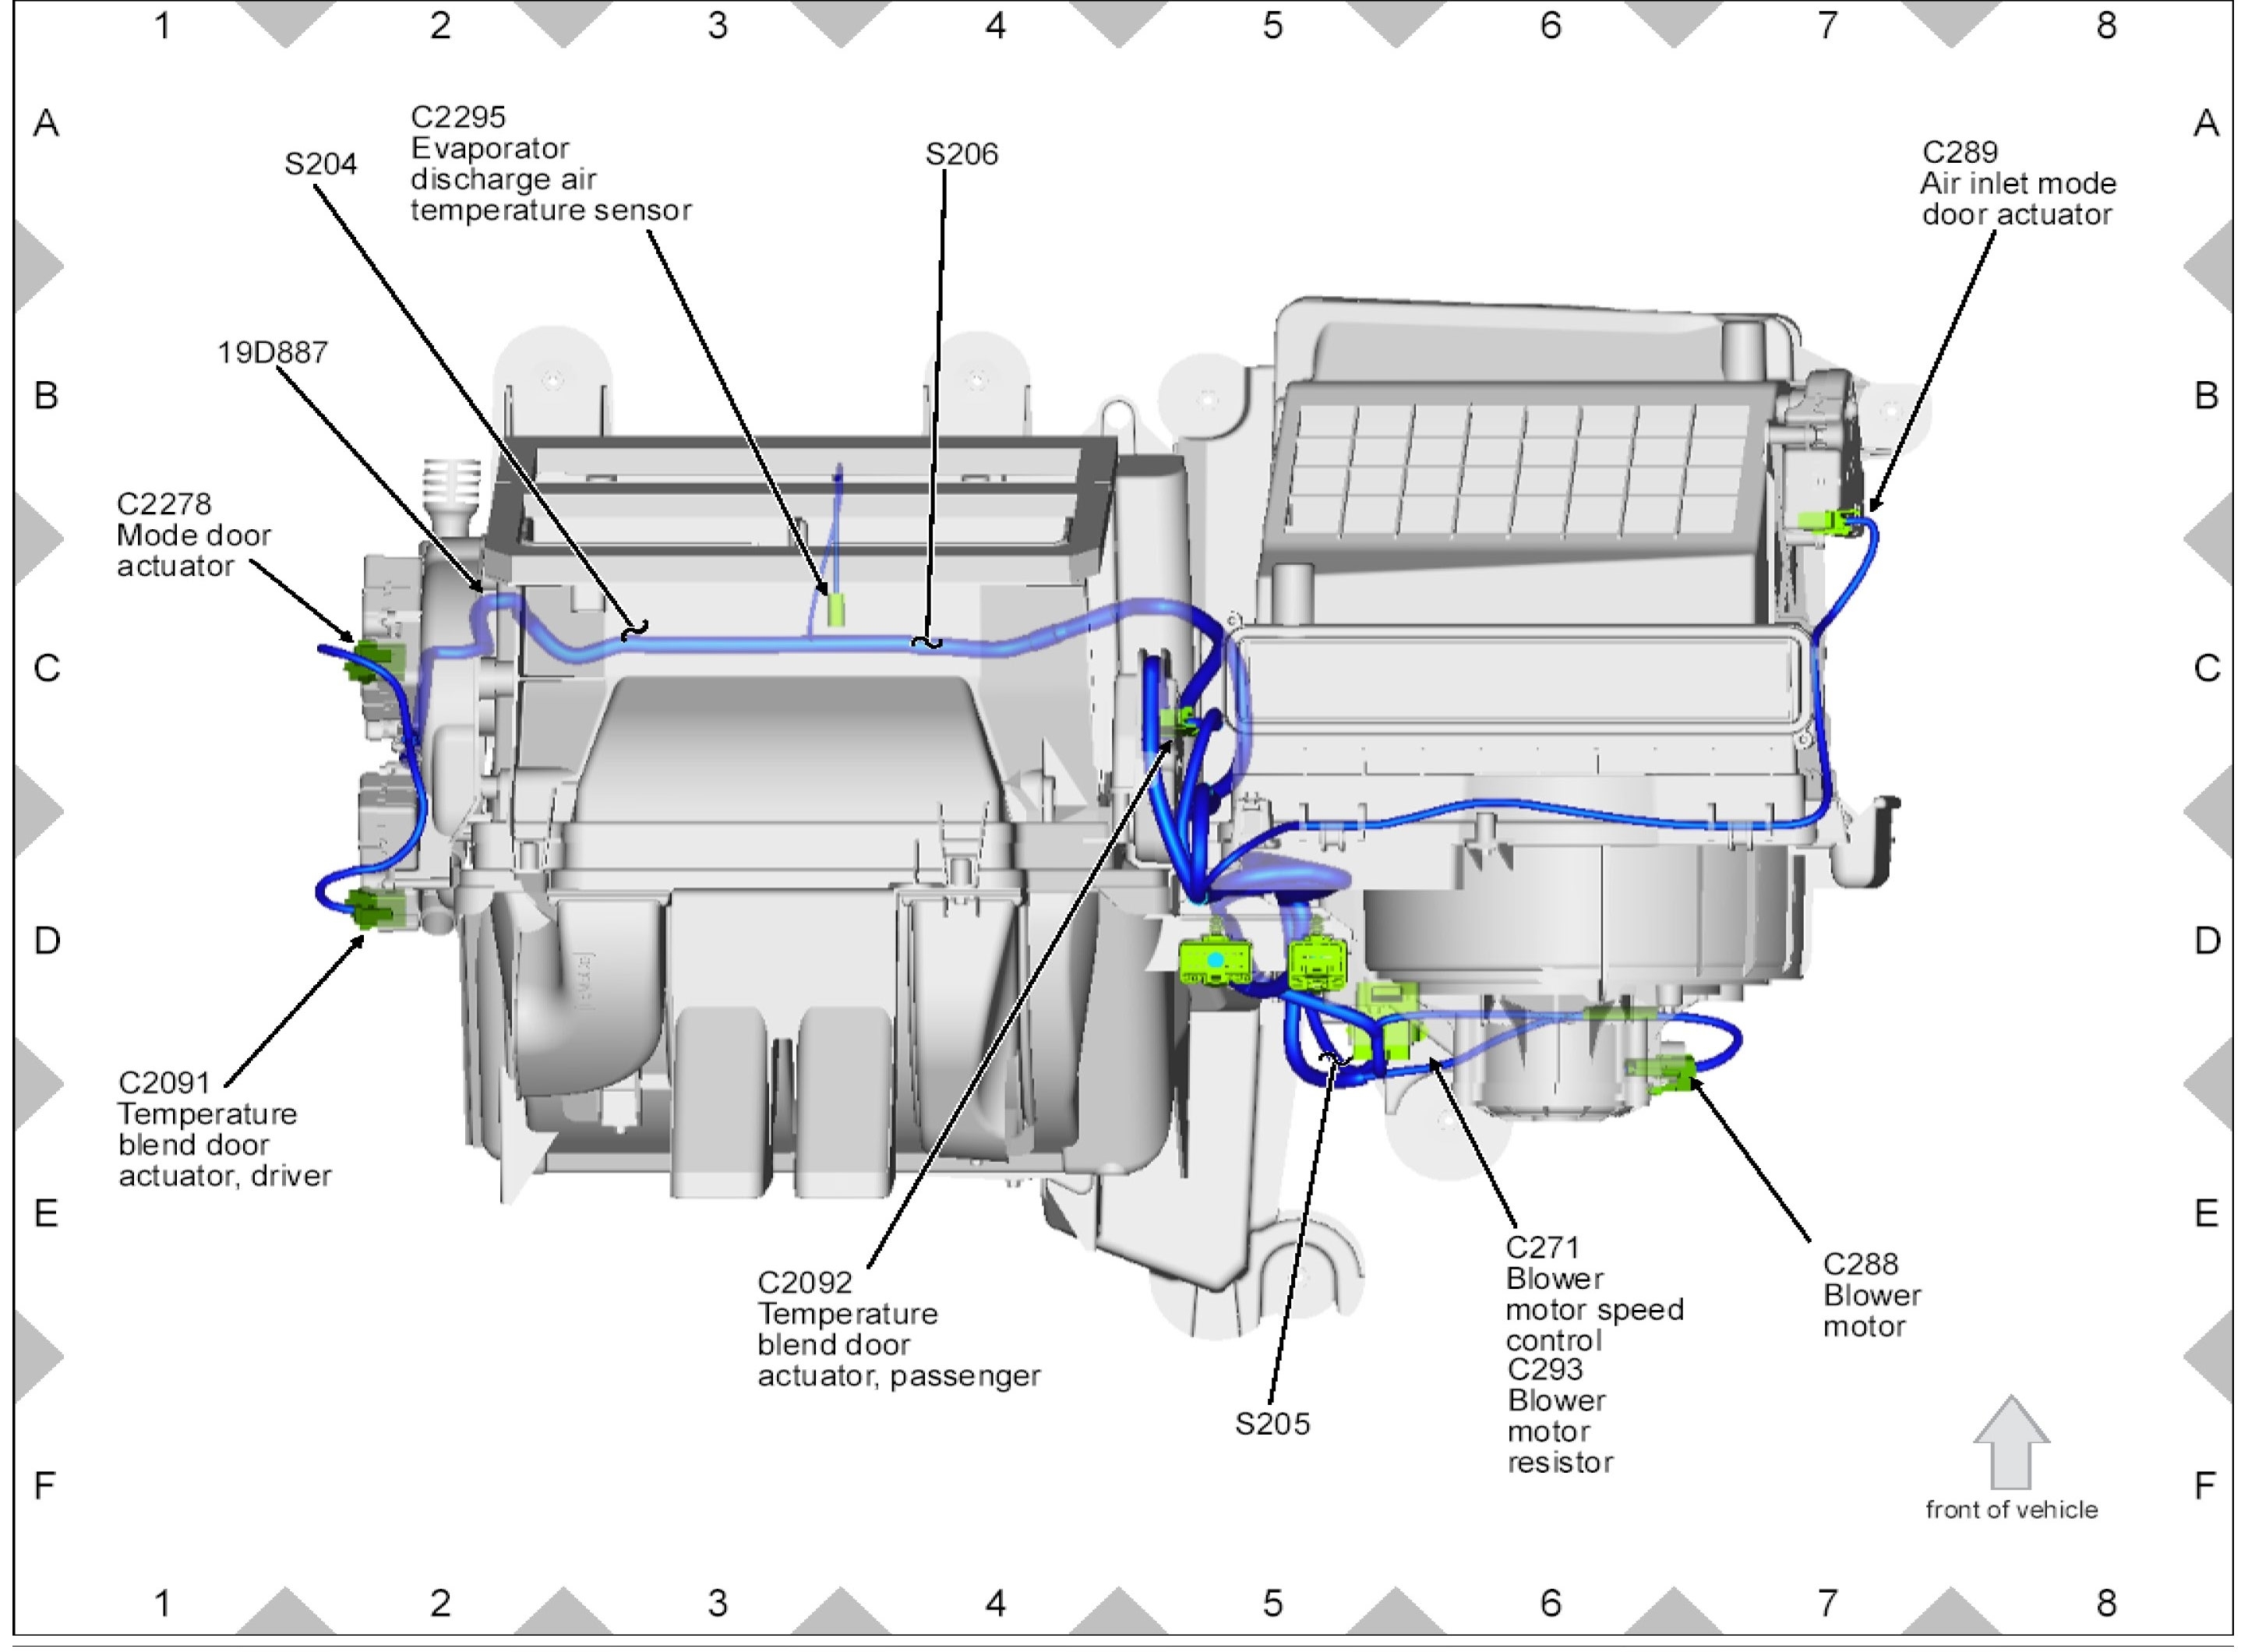
The 2010 Dodge Ram 1500 blend door actuator system consists of several key components, all interconnected and working in harmony. Understanding these parts is fundamental to interpreting the diagram:
- Blend Door Actuator: This is the heart of the system. It's a small electric motor that physically moves the blend door inside the HVAC housing. The blend door regulates the ratio of hot and cold air flowing into the cabin. A faulty actuator is a common cause of temperature control problems.
- Blend Door: A flap inside the HVAC box that redirects airflow. By changing the position of this flap, the system can mix hot air from the heater core with cold air from the evaporator to achieve the desired temperature.
- HVAC Control Module (Heater Control Panel): This is the user interface. It allows you to select the desired temperature and airflow settings. The module sends signals to the blend door actuator to adjust the blend door accordingly.
- Temperature Sensors: These sensors, located throughout the cabin and potentially within the HVAC ductwork, provide feedback to the HVAC control module about the actual temperature. This feedback loop allows the system to maintain a consistent temperature.
- Wiring Harness: This is the network of wires that connects all the components. Damaged or corroded wiring can disrupt the flow of signals and cause the system to malfunction. The diagram precisely illustrates all these wires.
- Connectors: These are the points where wires connect to components. Corrosion or loose connections can cause intermittent problems.
Understanding the Diagram's Symbols and Conventions
The blend door actuator diagram uses standardized symbols and conventions to represent electrical components and connections. Let's break down some of the common elements:
- Solid Lines: Typically represent wires. The thickness of the line may indicate the gauge (thickness) of the wire.
- Dashed Lines: May represent signal paths or connections to ground (chassis ground).
- Arrows: Indicate the direction of current flow or the direction of mechanical movement (e.g., the rotation of the blend door actuator).
- Resistors: Depicted as a jagged line. Resistors limit the flow of current in a circuit.
- Capacitors: Shown as two parallel lines. Capacitors store electrical energy.
- Diodes: Represented by a triangle with a line at the pointed end. Diodes allow current to flow in only one direction.
- Ground Symbol: Usually a series of horizontal lines getting progressively shorter. Indicates a connection to the vehicle's chassis, providing a common reference point for voltage.
- Component Symbols: Each component (actuator, sensor, module) has a specific symbol. These symbols are usually labeled with a code or identifier, allowing you to cross-reference them with the parts list.
- Color Coding: Wires are often color-coded (e.g., red, black, blue, yellow). The diagram will typically include a legend that explains the color coding scheme. This is crucial for tracing wires and identifying the correct connections.
- Connector Identification: Connectors are usually labeled with a code or number. The diagram will show which wires are connected to each pin in the connector.
How the Blend Door Actuator System Works
The system operates on a closed-loop feedback mechanism. Here's a simplified explanation:
- You select a desired temperature on the HVAC control module.
- The HVAC control module sends a signal (voltage) to the blend door actuator. The voltage level corresponds to the desired blend door position.
- The blend door actuator's motor rotates, moving the blend door to the commanded position.
- The temperature sensors within the cabin and ductwork monitor the actual temperature.
- These sensors send feedback signals back to the HVAC control module.
- The HVAC control module compares the actual temperature to the desired temperature. If there's a difference, it adjusts the voltage sent to the blend door actuator to fine-tune the blend door position.
This continuous feedback loop ensures that the cabin temperature remains consistent with your desired setting. The diagram reveals the specific wiring pathways for these signals, the location of the sensors, and the internal workings of the actuator.
Real-World Use: Basic Troubleshooting Tips
Here are some basic troubleshooting tips using the diagram as your guide:
- No Heat or AC: Check the blend door actuator itself. Use a multimeter to test if it's receiving power. The diagram will show you which wires to test and what voltage you should expect. If there's no power, trace the wiring back to the HVAC control module, checking for breaks or corrosion along the way.
- Temperature Stays the Same Regardless of Setting: This often indicates a stuck or malfunctioning blend door actuator. Use the diagram to locate the actuator and visually inspect it. You might hear a clicking sound if the actuator's gears are stripped. You can also try manually moving the blend door (after disconnecting the actuator) to see if it's binding.
- Intermittent Temperature Problems: This could be caused by loose connections or corroded wiring. Use the diagram to identify the connectors in the blend door actuator circuit and check for corrosion or loose pins. Applying dielectric grease to the connectors can help prevent future corrosion.
- Error Codes: If your Ram has a diagnostic code reader (or you use an OBD-II scanner), it might give you specific error codes related to the blend door actuator or the HVAC control module. The diagram can help you understand which circuits are associated with those codes.
Safety Considerations
Working on electrical systems in a vehicle can be dangerous. Here are some important safety precautions:
- Disconnect the Battery: Always disconnect the negative battery terminal before working on any electrical components. This will prevent accidental shorts and electrical shocks. Failure to do so could result in serious injury or death.
- Work in a Well-Ventilated Area: Some automotive chemicals can be harmful if inhaled.
- Use Proper Tools: Use insulated tools designed for automotive electrical work.
- Avoid Working on Live Circuits: Whenever possible, test circuits with the power off. If you need to test a live circuit, use extreme caution and avoid touching any exposed wires or metal parts.
- Airbag Systems: Be aware that the HVAC system is often located near airbag components. Improper handling of these components can trigger accidental deployment, causing serious injury. Consult the service manual for proper airbag deactivation procedures before working in these areas.
- Refrigerant: The HVAC system contains refrigerant, which can be harmful if released into the atmosphere. If you suspect a refrigerant leak, take your vehicle to a qualified technician for repair. Do not attempt to handle refrigerant yourself.
By understanding the blend door actuator diagram and following safe practices, you can successfully diagnose and repair temperature control problems in your 2010 Dodge Ram 1500. This empowers you to save money on repair costs and gain valuable experience in automotive maintenance.
We have the full blend door actuator diagram available for download. This resource will be invaluable as you tackle your HVAC repairs. Good luck!