2010 Dodge Ram 1500 Serpentine Belt Diagram
The serpentine belt in your 2010 Dodge Ram 1500 is a crucial component responsible for powering several essential engine accessories. Knowing its layout, how it works, and how to troubleshoot it can save you time, money, and potential headaches down the road. Whether you're performing routine maintenance, diagnosing a squealing noise, or replacing a worn-out belt, a reliable diagram is indispensable. This article will provide a detailed breakdown of the 2010 Dodge Ram 1500 serpentine belt diagram, empowering you to confidently tackle related repairs and maintenance tasks.
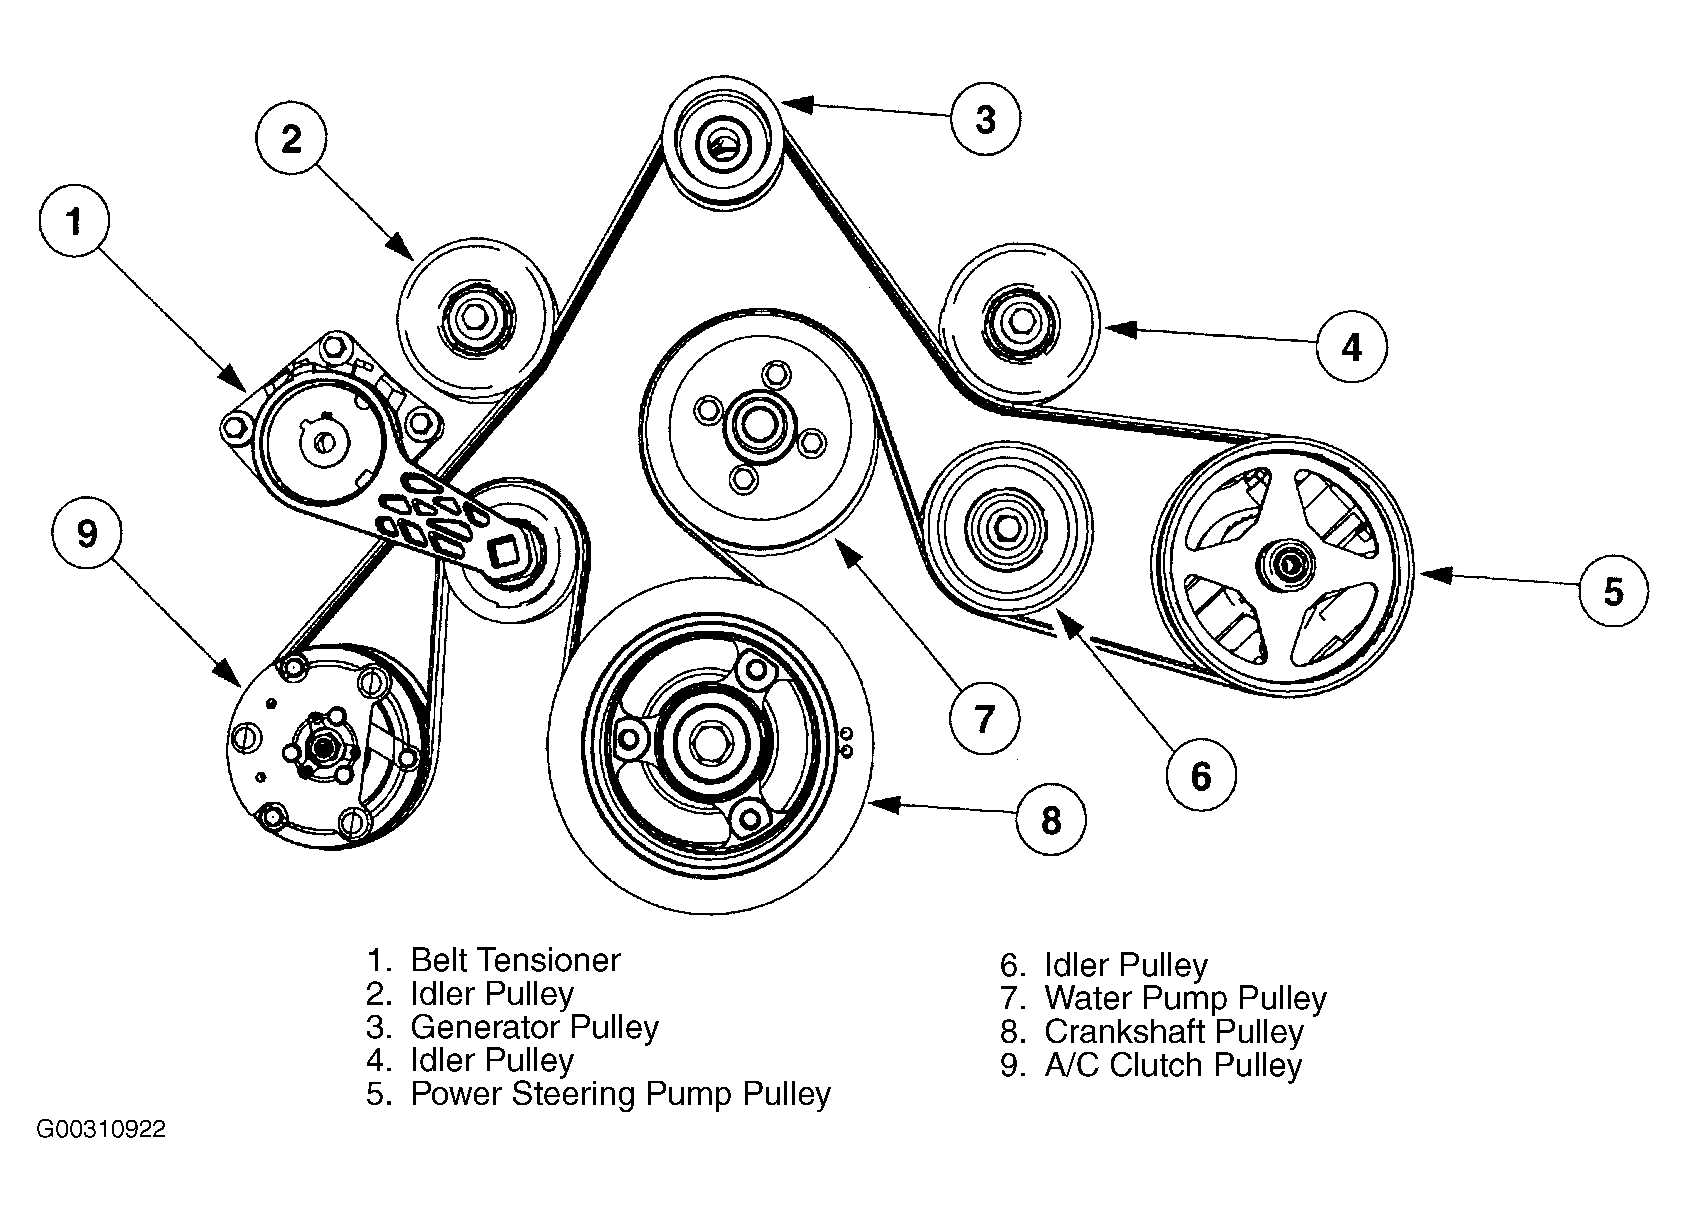
Purpose of the Serpentine Belt Diagram
The serpentine belt diagram serves several vital purposes:
- Repair and Replacement: It provides a visual guide for routing the new belt correctly when replacing a worn or damaged one. Incorrect routing can lead to serious damage to the engine and accessories.
- Troubleshooting: The diagram helps in identifying which accessory is causing problems based on the belt's condition and associated symptoms. A slipping belt, for instance, might indicate a failing pulley or bearing on a specific component.
- Understanding System Operation: Studying the diagram enhances your understanding of how the various engine accessories are interconnected and driven by a single belt.
- Preventive Maintenance: Familiarity with the belt's routing allows you to inspect it effectively for signs of wear and tear, such as cracks, fraying, or glazing, enabling timely replacement and preventing potential breakdowns.
Key Specs and Main Parts
The 2010 Dodge Ram 1500 came with several engine options, each potentially having a slightly different serpentine belt configuration. The most common engines and associated key information are:
- 3.7L V6: Generally uses a shorter belt compared to the V8 engines. The routing will be simpler, typically driving the alternator, power steering pump, and sometimes the AC compressor.
- 4.7L V8: A more complex routing than the V6, as it needs to drive additional accessories.
- 5.7L HEMI V8: This engine option often incorporates a more robust belt and tensioner to handle the increased power demands of the accessories. Note that some models might include variations based on whether or not they have an auxiliary cooler or other optional equipment.
Main Components Driven by the Serpentine Belt:
- Alternator: Charges the battery and powers the vehicle's electrical system.
- Power Steering Pump: Provides hydraulic pressure to assist with steering.
- Air Conditioning (A/C) Compressor: Compresses refrigerant to cool the cabin.
- Water Pump: Circulates coolant throughout the engine to regulate temperature.
- Idler Pulley(s): Smooth, unpowered pulleys that guide the belt and maintain proper tension.
- Tensioner Pulley: A spring-loaded pulley that automatically adjusts belt tension to compensate for wear and stretching. This is a critical component. A failing tensioner can cause belt slippage and premature wear.
It's crucial to identify your specific engine before consulting a diagram. The correct belt routing is engine-specific, and using the wrong diagram can lead to misrouting and potential damage.
Symbols and Diagram Interpretation
Serpentine belt diagrams use a standard set of symbols and conventions to represent the belt routing. Understanding these symbols is essential for proper interpretation:
- Solid Line: Represents the belt itself. The thickness of the line doesn't usually signify anything specific.
- Pulleys: Circular shapes represent pulleys. They are typically labeled with abbreviations indicating the component they drive (e.g., ALT for alternator, P/S for power steering).
- Arrows: Indicate the direction of rotation of the pulley. This is crucial for ensuring the belt is routed correctly.
- Tensioner: Usually depicted as a pulley with an arrow showing the direction of its spring-loaded movement. Sometimes a small spring symbol is included.
- Idler Pulley: Shown as a smooth pulley, often with the label "IDLER".
- Ribbed Side: Some diagrams differentiate between the ribbed (grooved) side of the belt, which engages with the grooved pulleys, and the smooth side, which engages with the smooth idler pulleys. This may be indicated with shading or text.
Pay close attention to the direction of the arrows. The belt must wrap around the pulleys in the correct orientation to ensure proper operation. Incorrect routing can cause the belt to run backwards on the accessory. Make a mental note of the belt's routing before removing the old belt.
How It Works
The serpentine belt's function is relatively straightforward: it transfers rotational power from the engine's crankshaft to various engine accessories. The crankshaft pulley, driven by the engine, rotates the serpentine belt. The belt, in turn, wraps around and drives the pulleys of the alternator, power steering pump, A/C compressor, water pump, and other components. The tensioner pulley maintains the correct amount of tension on the belt, ensuring adequate grip and preventing slippage.
The tensioner pulley is crucial for optimal system performance. It automatically adjusts belt tension, compensating for stretching due to wear and temperature changes. A malfunctioning tensioner can lead to belt slippage, reduced accessory performance, and accelerated belt wear.
Real-World Use: Basic Troubleshooting Tips
Here are some common problems associated with serpentine belts and how the diagram can help you diagnose them:
- Squealing Noise: A squealing noise, especially when the engine is cold or under load, is often a sign of a slipping belt. Use the diagram to inspect the belt's condition, paying close attention to the ribbed surfaces. Check for cracks, glazing, or missing ribs. Also, inspect the tensioner pulley for proper operation. A weak or seized tensioner can cause belt slippage.
- Accessory Malfunction: If a specific accessory, such as the alternator or power steering pump, is not functioning correctly, the diagram can help you determine if the belt is the culprit. Check the belt routing to that accessory and ensure the belt is properly engaged with the pulley. If the belt is loose or damaged, it may not be providing sufficient power to that accessory.
- Belt Breakage: A broken serpentine belt can leave you stranded. Inspect the belt regularly for signs of wear and tear. The diagram will help you identify the correct belt length and routing for replacement.
- Visual Inspection: Use the diagram as a guide to inspect the belt and pulleys. Look for signs of misalignment, excessive wear on one side of the belt, or debris lodged in the pulley grooves. Misalignment can be caused by bent brackets or worn pulley bearings.
Before replacing any components, double-check the belt routing against the diagram to ensure proper installation. Incorrect routing can damage the belt and accessories.
Safety Considerations
Working around the serpentine belt and its associated components can be dangerous. Here are some key safety precautions:
- Disconnect the Battery: Always disconnect the negative battery cable before working on the serpentine belt or any other electrical components. This prevents accidental shorts and electrical shocks.
- Engine Off and Cool: Ensure the engine is completely off and cool before working on the serpentine belt. The belt and pulleys can be very hot after the engine has been running.
- Moving Parts: Be extremely cautious around the serpentine belt when the engine is running. Keep your hands, clothing, and tools away from the belt and pulleys to prevent injury.
- Tensioner Spring: The tensioner pulley is spring-loaded and can snap back forcefully when released. Use the appropriate tool to relieve tension on the belt and avoid injury. Wear safety glasses to protect your eyes from flying debris.
Specifically, the tensioner presents a pinch hazard. Always use the correct tool to carefully release the tension on the belt before attempting to remove or install it. Never attempt to force the tensioner with your bare hands.
By understanding the 2010 Dodge Ram 1500 serpentine belt diagram and following these guidelines, you can confidently perform maintenance and repairs on your vehicle. We have the original file available for download. This will provide a high-resolution version you can print out or view on your computer or tablet while you're working on your truck.