2010 Ford Escape 2.5 L Serpentine Belt Diagram
The serpentine belt on your 2010 Ford Escape with the 2.5L engine is a critical component responsible for driving numerous engine accessories. Knowing its routing is essential for various maintenance and repair tasks. This article provides a comprehensive guide to understanding the serpentine belt diagram, its function, and how to troubleshoot common issues.
Purpose of the Serpentine Belt Diagram
The serpentine belt diagram is more than just a pretty picture; it's a vital reference for several reasons:
- Belt Replacement: When replacing a worn or damaged belt, the diagram ensures you route the new belt correctly. Incorrect routing can lead to accessory malfunction and potential engine damage.
- Accessory Repair: If you're working on any of the accessories driven by the belt (e.g., alternator, power steering pump), understanding the belt path is crucial for accessing and removing these components.
- Troubleshooting: A squealing belt or malfunctioning accessory can often be traced back to incorrect belt tension or routing. The diagram allows you to quickly verify the belt's configuration.
- Learning: For the aspiring DIY mechanic, studying the serpentine belt system provides valuable insight into engine accessory drives and overall engine operation.
Key Specs and Main Parts
Let's break down the key components and specifications associated with the 2010 Ford Escape 2.5L serpentine belt system:
- Engine: 2.5L Duratec I4
- Belt Type: Multi-ribbed serpentine belt (typically 6 ribs)
- Belt Length: Approximately 90-92 inches (the exact length depends on the manufacturer; always check the part number for your specific vehicle).
The main parts involved in the serpentine belt system include:
- Crankshaft Pulley: The primary driving pulley connected directly to the engine's crankshaft. It's usually the largest pulley in the system.
- Alternator Pulley: Drives the alternator, which charges the battery and powers the electrical system.
- Power Steering Pump Pulley: Drives the power steering pump, providing hydraulic assistance for steering.
- Air Conditioning Compressor Pulley: Drives the air conditioning compressor, responsible for cooling the cabin.
- Idler Pulley(s): Smooth pulleys used to guide the belt around the various accessories and maintain proper belt wrap (the amount of contact the belt has with each pulley). They do not drive any accessories.
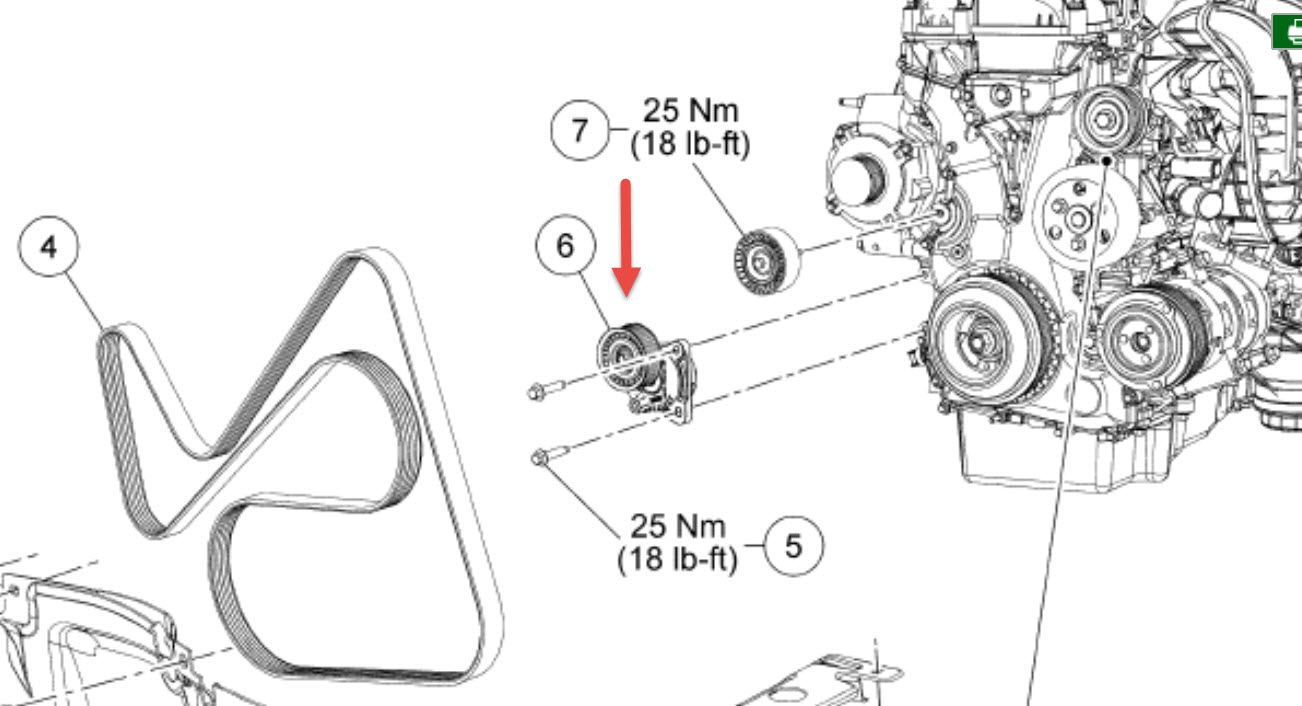
- Tensioner Pulley: A spring-loaded pulley that automatically maintains the correct tension on the serpentine belt. This is a *critical* component.
Symbols and Diagram Interpretation
Serpentine belt diagrams typically use a standardized set of symbols and conventions. Understanding these will allow you to quickly decipher the belt routing:
- Solid Lines: Represent the path of the serpentine belt. The direction of the line indicates which way the belt travels.
- Pulleys: Circles represent pulleys. Some diagrams may differentiate between grooved pulleys (driving accessories) and smooth pulleys (idler pulleys).
- Arrows: Indicate the direction of rotation of each pulley. This is essential for ensuring the belt is routed correctly. If the direction is wrong, the accessory won't function, and you could damage components.
- Tensioner Icon: A symbol specifically identifying the tensioner pulley. This often shows the spring-loaded mechanism.
- Component Labels: Each pulley is typically labeled with its corresponding accessory (e.g., ALT for Alternator, P/S for Power Steering, A/C for Air Conditioning).
- Color Coding (Less Common): Some diagrams might use color coding to differentiate between different sections of the belt path or to highlight specific components. Consult the legend if colors are used.
The diagram shows the *relative* position of the accessories. It's important to note that the actual layout might vary slightly depending on the specific year and trim level of your Escape.
How It Works
The serpentine belt system works on the principle of rotational power transfer. The engine's crankshaft rotates, driving the crankshaft pulley. This pulley, in turn, drives the serpentine belt. The belt wraps around the various accessory pulleys, transferring the rotational force to each component. The tensioner pulley maintains consistent belt tension, preventing slippage and ensuring efficient power transfer. The belt's friction against each pulley is what allows it to transfer this power.
The tensioner is a crucial component because it automatically adjusts for belt wear and stretching over time. Without a properly functioning tensioner, the belt would become loose, leading to slippage, noise, and reduced accessory performance. A failing tensioner can also cause the belt to jump off the pulleys, resulting in complete accessory failure and potential engine damage.
Real-World Use: Troubleshooting Tips
Here are some common issues and how the serpentine belt diagram can help:
- Squealing Belt: A squealing belt often indicates slippage. Check the belt tensioner for proper operation. Is it moving freely? Is the belt routed correctly according to the diagram? Also, inspect the belt for signs of wear, cracking, or glazing.
- Accessory Malfunction: If an accessory (e.g., alternator, power steering) isn't working correctly, verify that the belt is properly routed and has adequate tension. A loose belt may not provide enough power to drive the accessory effectively.
- Belt Jumping Off: A belt that repeatedly jumps off the pulleys can indicate a misaligned pulley or a faulty tensioner. Use the diagram to check the belt routing and inspect the pulleys for damage or misalignment.
- Visual Inspection: Use the diagram as a reference when visually inspecting the belt system. Look for cracks, fraying, missing ribs, or any other signs of damage. Pay close attention to the areas where the belt bends sharply around pulleys.
Safety Considerations
Working on the serpentine belt system involves some inherent risks. Here are some crucial safety precautions:
- Disconnect the Battery: Always disconnect the negative battery terminal before working on any electrical components, including the alternator. This prevents accidental shorts and potential electric shock.
- Engine Off and Cool: Ensure the engine is completely off and cooled down before working on the belt system. The engine compartment can get very hot, and moving parts can cause serious injury.
- Avoid Loose Clothing and Jewelry: Keep loose clothing and jewelry away from the moving parts of the engine. These can get caught in the belt or pulleys, leading to severe injury.
- Proper Tools: Use the correct tools for the job. Attempting to pry or force components can damage them or cause injury. Specific tools may be needed to release the belt tensioner.
- Keep Hands Clear: When releasing the belt tensioner, keep your hands clear of the belt and pulleys. The tensioner can snap back forcefully. The spring in the tensioner holds significant potential energy.
Working on a vehicle can be inherently dangerous. If you are uncomfortable performing any of these procedures, it is best to consult a qualified mechanic.
We have a high-resolution PDF file of the 2010 Ford Escape 2.5L Serpentine Belt Diagram available for download. This file provides a clear and detailed visual reference for your maintenance and repair needs.