2010 Ford F150 4.6 Serpentine Belt Diagram
Let's dive into the serpentine belt system on a 2010 Ford F150 with the 4.6L engine. Understanding this system is crucial for several reasons. Maybe you're planning to replace a worn belt, diagnose a squealing noise, or simply want to deepen your understanding of how your truck works. Whatever the reason, a solid grasp of the serpentine belt diagram is invaluable. We'll break down the diagram, explain its components, and equip you with the knowledge to tackle common issues.
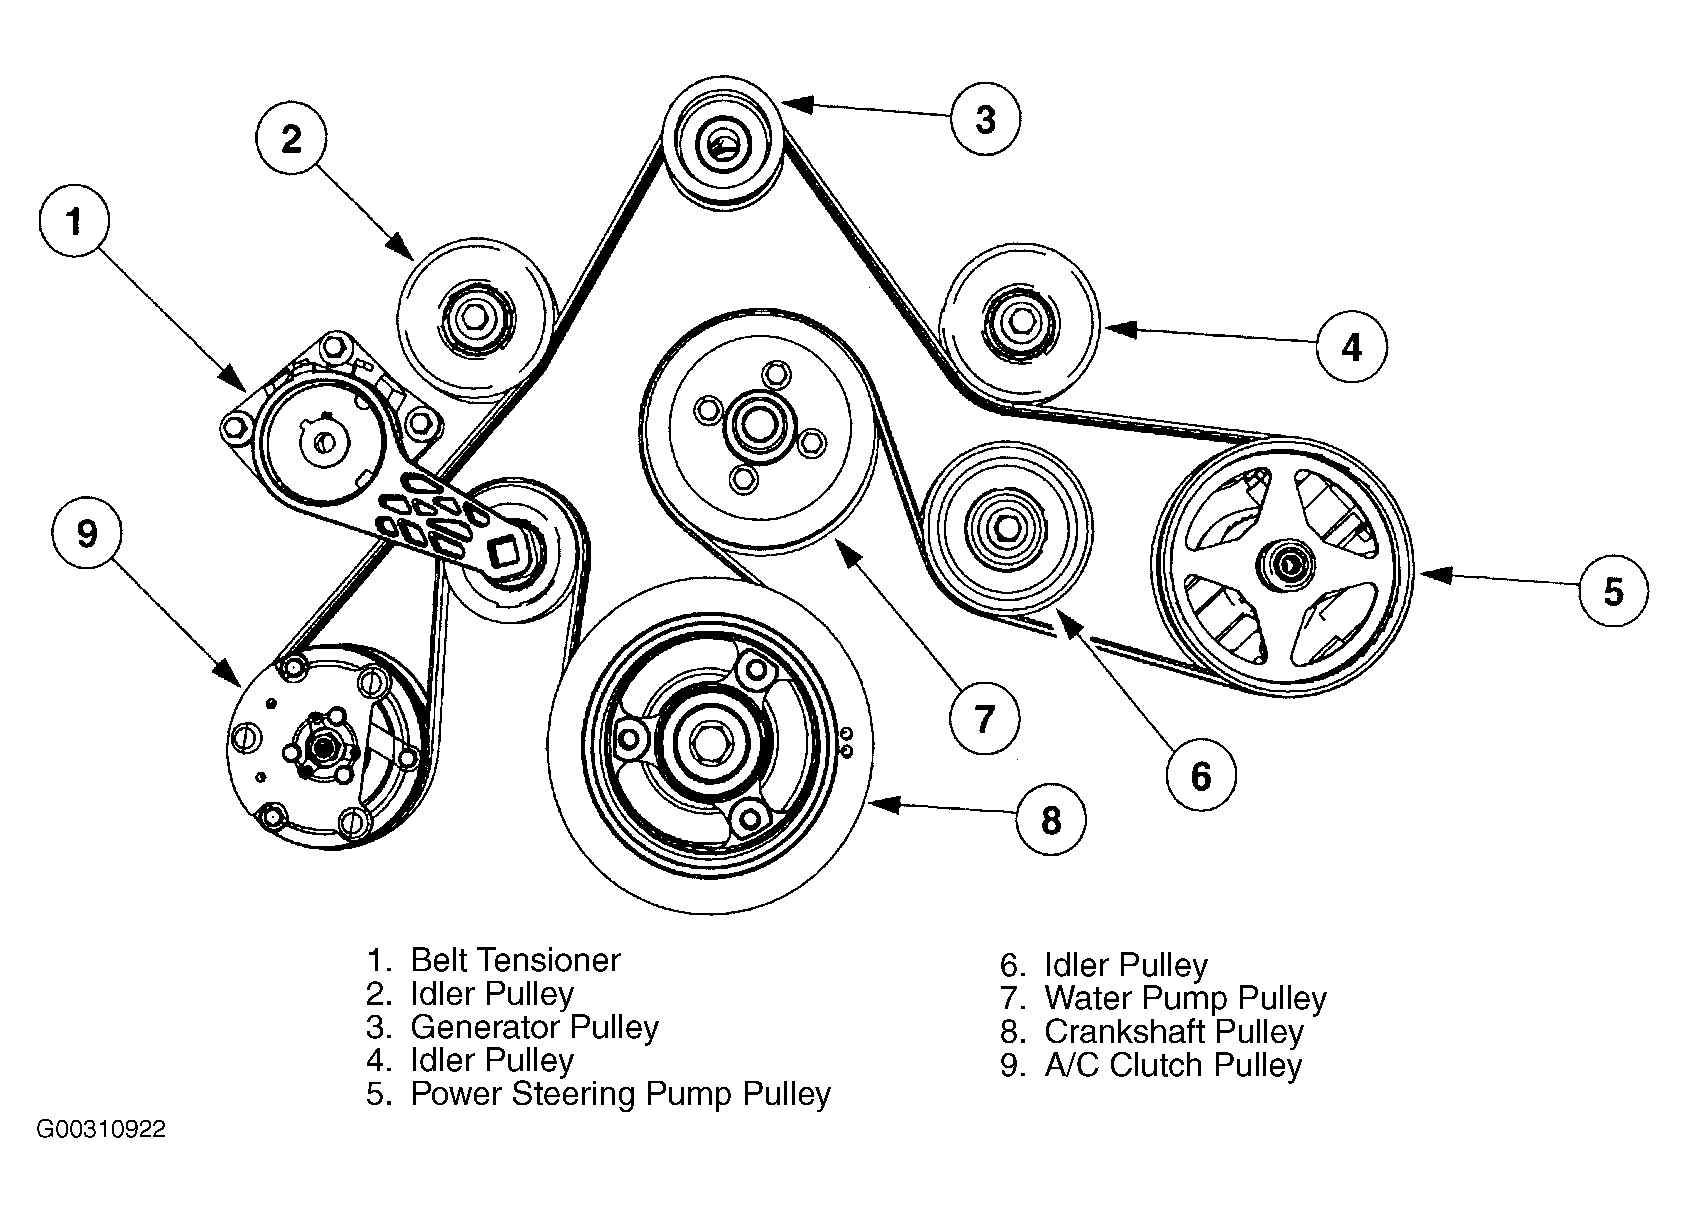
Purpose of the Serpentine Belt Diagram
The serpentine belt diagram serves as a visual roadmap for the belt's routing around various engine components. It's not just a pretty picture; it's an essential tool for several tasks:
- Belt Replacement: The most common use. Ensuring the new belt is routed correctly is paramount to prevent damage to components and ensure proper operation. A misrouted belt can lead to immediate failure and potential engine damage.
- Troubleshooting: A visual reference helps identify if the belt is correctly installed or if a component (like a pulley) is out of alignment. Squealing, slipping, or belt wear can often be traced back to incorrect routing or failing components.
- Component Identification: The diagram clearly labels each component driven by the belt, helping you understand their function and location within the engine bay.
- Learning and Understanding: For DIY mechanics, the diagram is a great learning tool to familiarize yourself with the engine layout and the belt's role in powering essential systems.
Key Specs and Main Parts
The 2010 F150 4.6L engine's serpentine belt system comprises several key components, each playing a critical role:
- Serpentine Belt: The main component, a long, continuous belt made of rubber or synthetic materials. It transmits power from the crankshaft to various accessories.
- Crankshaft Pulley: Driven directly by the engine's crankshaft, this pulley is the starting point for power transfer to the serpentine belt.
- Alternator Pulley: The alternator generates electrical power for the truck. The serpentine belt spins the alternator pulley to drive this process.
- Power Steering Pump Pulley: This pulley drives the power steering pump, providing hydraulic assistance for steering.
- Air Conditioning Compressor Pulley: The A/C compressor cools the truck's cabin. The belt spins this pulley to drive the compressor.
- Idler Pulley(s): Smooth, bearing-mounted pulleys that guide the belt and maintain proper tension without directly driving any component. They are critical for routing the belt around other components.
- Tensioner Pulley: This spring-loaded pulley automatically adjusts belt tension. It's crucial for maintaining optimal belt performance and preventing slippage. The tensioner includes an arm and a pulley; the arm is spring-loaded to maintain proper tension. A malfunctioning tensioner is a common cause of belt squeal.
Important Specification: It's critical to use the correct belt length for your specific engine configuration. The belt length is usually specified on the belt itself. Incorrect length can lead to improper tension and damage to the system.
Symbols in the Serpentine Belt Diagram
Serpentine belt diagrams typically use standardized symbols to represent components and the belt's path. Understanding these symbols is key to interpreting the diagram correctly:
- Solid Line: Represents the section of the serpentine belt in contact with a pulley or idler. This indicates the belt is actively transferring power or being guided along this section.
- Dashed Line: Often represents the back of the belt. This section of the belt is not in direct contact with a pulley groove.
- Arrows: Indicate the direction of belt travel. Following the arrows around the diagram helps you visualize the belt's path.
- Circles: Represent pulleys. Different types of pulleys (e.g., idler, driven) might be indicated by slightly different shading or markings within the circle.
- Component Labels: Abbreviations or full names are used to identify each component (e.g., ALT for alternator, P/S for power steering).
Colors can vary slightly between diagrams, but the general principle remains the same: clear, visual representation of the belt's routing. Many diagrams will also include a parts list, sometimes labeled, for quick reference.
How the Serpentine Belt System Works
The serpentine belt system is relatively straightforward in principle: the crankshaft's rotational energy is transferred to various engine accessories via the serpentine belt. Here's a breakdown:
- The engine's crankshaft rotates the crankshaft pulley.
- The serpentine belt is wrapped around the crankshaft pulley and other accessory pulleys.
- As the crankshaft pulley turns, it drives the serpentine belt, which in turn spins the pulleys of the alternator, power steering pump, A/C compressor, and other components.
- The tensioner pulley maintains consistent belt tension, preventing slippage and ensuring efficient power transfer.
- Idler pulleys guide the belt around the engine, optimizing its path and preventing interference with other components.
The correct belt tension is critical. Too little tension causes slippage, leading to reduced accessory performance and potential overheating of the belt. Too much tension puts excessive strain on the accessory bearings, leading to premature failure.
Real-World Use: Basic Troubleshooting Tips
Knowing the serpentine belt diagram can help you diagnose and address common issues:
- Squealing Noise: Often indicates a loose or worn belt. Check the belt tensioner for proper function. If the tensioner seems weak, it may need replacement. Also, inspect the belt for cracks, glazing, or missing ribs. A glazed belt may slip easily.
- Belt Slipping: Can be caused by a loose belt, worn pulleys, or a malfunctioning tensioner. Inspect the pulleys for damage or debris.
- Accessory Malfunction: If one of the accessories (e.g., alternator, power steering pump) isn't working correctly, check the serpentine belt to ensure it's properly routed and tensioned. Also, check that the affected pulley is turning when the engine is running. If the pulley is turning, the problem lies with the accessory itself.
- Visual Inspection: Regularly inspect the serpentine belt for signs of wear, such as cracks, fraying, or missing chunks. Replace the belt if any of these conditions are present. Don't wait for it to break; preventative maintenance is key.
When troubleshooting, it's helpful to use a serpentine belt tool, sometimes referred to as a belt installation wrench. This tool makes it easier to release tension on the tensioner pulley, allowing you to remove and install the belt safely. Also, take pictures of the belt routing before you remove it. It is very easy to get confused about the path of the belt when you are replacing it.
Safety Considerations
Working around the serpentine belt system involves certain risks. Always prioritize safety:
- Disconnect the Battery: Before working on any part of the engine, disconnect the negative battery terminal to prevent accidental starting.
- Hot Engine: Allow the engine to cool completely before working on the serpentine belt system. The engine components can be extremely hot and cause burns.
- Moving Parts: Never attempt to inspect or work on the serpentine belt system while the engine is running. The moving belt and pulleys can cause serious injury.
- Tensioner Spring: The tensioner pulley is spring-loaded and can snap back with considerable force. Use appropriate tools to release tension and prevent injury.
Pay close attention to the radiator fan. It's often located very close to the serpentine belt. Accidental contact with the fan while it's running can cause severe injury. The fan can start unexpectedly even if the engine is not running.
Understanding the 2010 Ford F150 4.6L serpentine belt diagram is an important step in maintaining your vehicle. By understanding the system's components, how it works, and how to troubleshoot common issues, you'll be better equipped to handle repairs and keep your truck running smoothly.
We have a high-resolution version of the serpentine belt diagram available for download. This detailed diagram will provide an even clearer visual reference for your work.