2010 Ford Fusion 2.5 L Serpentine Belt Diagram
The serpentine belt on your 2010 Ford Fusion with the 2.5L engine is a critical component, responsible for driving several vital engine accessories. Understanding its layout and condition is essential for proper maintenance, troubleshooting, and even some performance modifications. This article provides a comprehensive guide to the serpentine belt diagram, enabling you, the experienced DIYer, to confidently tackle belt-related tasks.
Purpose: Why Understand the Serpentine Belt Diagram?
A serpentine belt diagram isn't just a pretty picture; it's your roadmap to diagnosing and repairing issues related to the belt system. Here's why it's crucial:
- Belt Replacement: Knowing the belt's routing is essential for proper installation of a new belt. An incorrectly installed belt will cause accessories to malfunction and could damage the belt itself.
- Troubleshooting: Squealing noises, power steering failure, or alternator problems can often be traced back to a worn, cracked, or misaligned serpentine belt. The diagram helps you identify which accessory might be causing the issue.
- Component Diagnosis: If an accessory, like the A/C compressor, isn't working, the diagram allows you to isolate the problem. Is the belt turning the pulley? Is the pulley damaged?
- Preventative Maintenance: Regular inspection of the belt, along with understanding its route, helps you catch potential problems before they lead to costly repairs.
- Modifications: If you're considering underdrive pulleys or other performance modifications, the diagram helps you understand the impact on the accessory drive system.
Key Specs and Main Parts
Let's break down the essential components involved in the 2010 Ford Fusion 2.5L serpentine belt system:
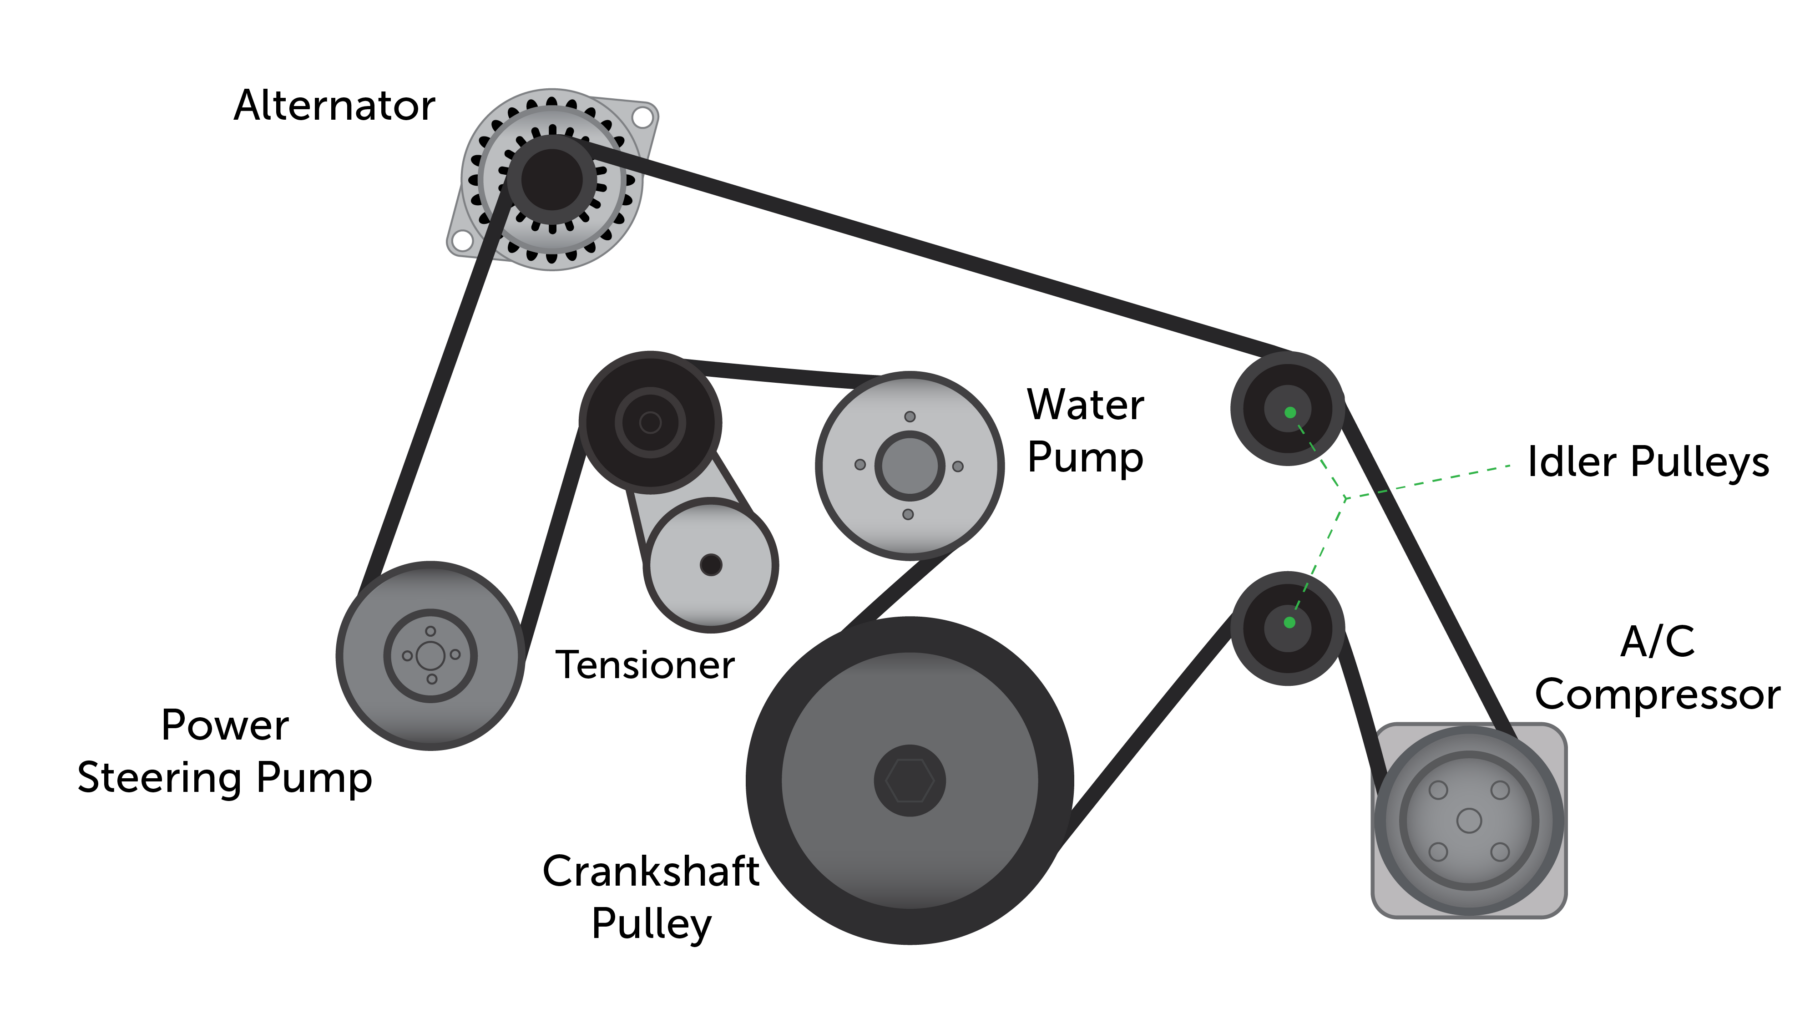
- Serpentine Belt: The main component – a long, continuous belt made of rubber or synthetic materials that transmits power from the crankshaft to the accessories. For the 2010 Fusion 2.5L, a typical belt length will be in the range of 80-82 inches, but always verify the correct part number for your specific application.
- Crankshaft Pulley (Harmonic Balancer): Located at the bottom of the engine, this pulley is directly connected to the crankshaft and provides the driving force for the serpentine belt.
- Alternator Pulley: The alternator charges the battery and powers the electrical system.
- Power Steering Pump Pulley: Provides hydraulic assistance for steering.
- Air Conditioning (A/C) Compressor Pulley: Circulates refrigerant to cool the cabin.
- Idler Pulley(s): Smooth, bearing-mounted pulleys that guide the belt and maintain proper tension. They are not directly driven.
- Tensioner Pulley: A spring-loaded pulley that automatically adjusts the belt tension to compensate for wear and thermal expansion. The tensioner is crucial for preventing belt slippage and extending belt life.
Symbols: Understanding the Diagram
Serpentine belt diagrams use specific symbols to represent the various components and the belt's routing. Knowing these symbols is critical for interpreting the diagram correctly:
- Solid Line: Represents the section of the belt that is making direct contact with a pulley and transferring power.
- Dotted Line (or Dashed Line): Represents the section of the belt that is not in contact with a pulley (the back side of the belt). This often indicates the routing between pulleys.
- Circles: Represent pulleys. The size and shading can sometimes indicate the size of the pulley.
- Arrows: Indicate the direction of belt travel. This is extremely important for ensuring correct installation.
- Text Labels: Abbreviations like "ALT" (Alternator), "P/S" (Power Steering), "A/C" (Air Conditioning), "CRANK" (Crankshaft), "IDLER," and "TENSIONER" identify each component.
- Component Icons: Some diagrams use simplified icons to visually represent each accessory (e.g., a battery symbol for the alternator).
How It Works: The Serpentine Belt System
The serpentine belt system is elegantly simple yet highly efficient. The crankshaft pulley, driven by the engine's rotation, turns the serpentine belt. This belt then wraps around the various accessory pulleys, transferring rotational energy to each component. The tensioner pulley maintains the correct belt tension, preventing slippage and ensuring optimal performance. The idler pulleys guide the belt along the optimal path, preventing interference and maximizing belt life.
The order in which the belt wraps around the pulleys is carefully engineered to ensure proper load distribution and efficient power transfer. The tensioner pulley's spring-loaded mechanism allows it to automatically compensate for belt stretch and thermal expansion, maintaining consistent tension throughout the belt's lifespan.
Real-World Use: Basic Troubleshooting Tips
Here are some common problems and how the serpentine belt diagram can help you diagnose them:
- Squealing Noise: A squealing noise, especially when the engine is cold or under load, often indicates a slipping belt. Use the diagram to inspect the belt for cracks, fraying, or glazing. Check the tensioner pulley for proper operation; it should move freely but maintain adequate tension. Also, inspect the pulleys for any signs of damage or misalignment.
- Accessory Malfunction: If the A/C isn't blowing cold air, or the power steering is difficult, use the diagram to verify that the belt is turning the corresponding pulley. If the pulley isn't turning, the belt may be broken or severely damaged. If the pulley is turning, but the accessory still isn't functioning, the problem likely lies within the accessory itself.
- Belt Damage: Regularly inspect the belt for signs of wear and tear. Cracks, fraying, and missing chunks of rubber are all indicators that the belt needs to be replaced. Pay particular attention to the inner ribs of the belt. The diagram helps you locate the areas of the belt that are most susceptible to wear, such as those that wrap tightly around small pulleys.
- Tensioner Issues: A failing tensioner can cause belt slippage, noise, and premature belt wear. Observe the tensioner pulley while the engine is running. Excessive movement or noise from the tensioner indicates that it needs to be replaced.
Safety: Highlighting Risky Components
Working on the serpentine belt system involves inherent risks. Always disconnect the negative battery terminal before starting any work to prevent accidental starting of the engine.
- Rotating Components: The crankshaft pulley, alternator pulley, and other accessory pulleys are rotating at high speeds when the engine is running. Keep your hands, tools, and clothing away from these components.
- Tensioner Spring: The tensioner pulley is spring-loaded and can snap back with considerable force if released improperly. Use the correct tools and techniques to relieve the tension before removing the belt. Many tensioners require a special wrench or socket to release the tension.
- Hot Engine: Allow the engine to cool down completely before working on the serpentine belt system. Exhaust manifolds and other engine components can remain hot for a considerable time after the engine is shut off.
Always consult your vehicle's repair manual for specific instructions and torque specifications.
We have a high-resolution PDF file of the 2010 Ford Fusion 2.5L serpentine belt diagram available for download. This detailed diagram will be an invaluable resource for your DIY projects.