2010 Honda Crosstour Serpentine Belt Diagram
Alright, let's dive into the serpentine belt diagram for your 2010 Honda Crosstour. Understanding this diagram is crucial whether you're tackling a routine maintenance task, diagnosing a squealing noise, or simply want to expand your automotive knowledge. This isn't just about knowing which way the belt goes; it's about understanding the entire system driven by that single, hardworking component.
Purpose: The Why of the Diagram
The serpentine belt diagram is your roadmap to properly routing the serpentine belt. Its primary purpose is to illustrate the correct path the belt takes around various engine accessories. Why is this important? Consider these scenarios:
- Belt Replacement: The old belt broke, or you're doing preventative maintenance. The diagram ensures you route the new belt correctly. An incorrectly routed belt won't function properly and can quickly damage the new belt or, worse, the accessories it's supposed to drive.
- Troubleshooting: A slipping or squealing belt often indicates a problem. The diagram helps you identify which components the belt drives, aiding in diagnosing issues like a seized pulley or a malfunctioning tensioner.
- General Understanding: Even if you're not actively working on your Crosstour, understanding the serpentine belt system enhances your overall knowledge of how your engine functions.
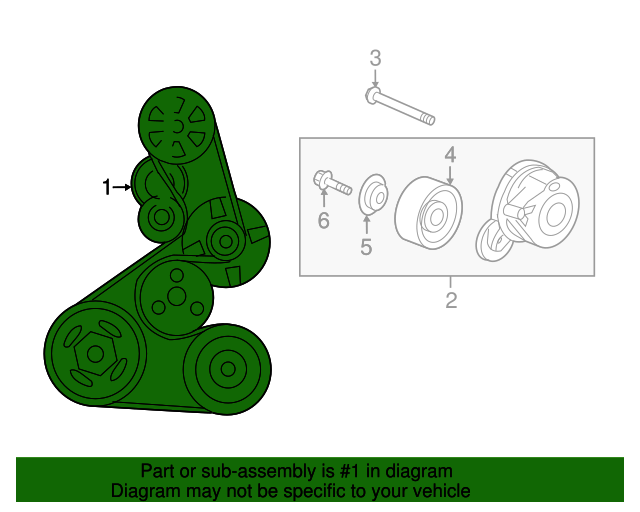
Key Specs and Main Parts
The 2010 Honda Crosstour utilizes a single serpentine belt to drive multiple engine accessories. The specific belt length varies depending on the engine (2.4L 4-cylinder or 3.5L V6), so always verify the correct part number for your particular model. A typical serpentine belt is made of reinforced rubber, designed for flexibility and durability under high tension and operating temperatures.
Here are the key components driven by the serpentine belt:
- Crankshaft Pulley: The driving force of the system. This pulley, connected to the crankshaft, transfers engine power to the belt.
- Alternator: Charges the battery and powers the electrical system when the engine is running.
- Power Steering Pump: Provides hydraulic pressure to assist steering.
- Air Conditioning Compressor: Circulates refrigerant to cool the cabin.
- Tensioner Pulley: Maintains proper belt tension. This is crucial for preventing slippage and ensuring all accessories are driven effectively. It can be either spring-loaded or hydraulic.
- Idler Pulley: A smooth pulley that guides the belt and provides additional wrap around other pulleys. It doesn't drive any accessories but plays a vital role in belt routing.
Symbols: Deciphering the Diagram
Serpentine belt diagrams use a standardized set of symbols, but variations exist. Here's a breakdown:
- Solid Lines: These indicate the belt itself. The thickness of the line doesn't usually represent anything significant.
- Circles: Represent pulleys. Larger circles generally indicate larger pulleys.
- Arrows: Show the direction of belt rotation. This is critical! Following the arrows ensures you route the belt correctly.
- Text Labels: Each pulley is labeled with its corresponding component (e.g., ALT for alternator, P/S for power steering, A/C for air conditioning).
- Tensioner Symbol: This is often a pulley symbol with an arrow indicating the direction to move the tensioner to release belt tension for removal and installation. The tensioner may also be indicated with a spring or hydraulic symbol.
- Routing Marks: Some diagrams include marks that indicate where the ribbed side or smooth side of the belt needs to be in contact with each pulley.
Often the tensioner will have an indicator, a mark and a pointer or two marks. The pointer needs to be within those marks for correct tension. If it is outside the marks, the tensioner may be failing or the belt is stretched.
How It Works: The Serpentine Dance
The serpentine belt system is a marvel of efficiency. The crankshaft pulley, driven by the engine, sets the belt in motion. This belt then snakes its way around the various accessory pulleys, transferring rotational force to power the alternator, power steering pump, and air conditioning compressor. The tensioner pulley maintains optimal belt tension, preventing slippage and ensuring efficient power transfer.
The correct routing of the belt is essential. An incorrect route can cause:
- Accessory Malfunction: If the belt doesn't fully engage a pulley, that accessory won't function correctly (e.g., weak power steering, no air conditioning, battery not charging).
- Belt Slippage: A loose or incorrectly routed belt will slip, causing a squealing noise and reduced accessory performance.
- Belt Damage: Misalignment or excessive stress can cause the belt to wear prematurely or even break.
Real-World Use: Troubleshooting Tips
Here are some common issues and troubleshooting tips related to the serpentine belt:
- Squealing Noise: This is often the first sign of a problem. It can be caused by a loose belt, a worn belt, a glazed belt, a misaligned pulley, or a failing tensioner. Inspect the belt for cracks, wear, and glazing. Check the tensioner for smooth operation. Use a belt dressing to temporarily eliminate the noise, but remember this is only a temporary fix.
- Belt Slippage: Reduced accessory performance accompanied by a squealing noise indicates belt slippage. Check the belt tension and condition. Look for oil or coolant contamination, which can reduce belt grip.
- Belt Breakage: A broken belt is usually caused by excessive wear, misalignment, or a seized accessory pulley. Before replacing the belt, inspect all pulleys for proper rotation and ensure they are free from obstruction.
- Tensioner Problems: If the tensioner is weak or seized, it won't maintain proper belt tension. Replace the tensioner as a unit.
If you suspect a pulley is failing, use a mechanic's stethoscope to listen for abnormal noises while the engine is running. Exercise extreme caution when working around a running engine.
Safety: Handle with Care
The serpentine belt system involves several potential hazards:
- Moving Parts: Never work on the serpentine belt system with the engine running unless absolutely necessary for diagnosis (and even then, exercise extreme caution). The belt and pulleys can cause serious injury.
- Hot Surfaces: The engine and exhaust components can be very hot. Allow the engine to cool completely before working on the serpentine belt system.
- Battery: Disconnect the negative battery cable before beginning any work to prevent electrical shorts.
- Spring Tension: The tensioner pulley is under significant spring tension. Always use the correct tools and procedures to release the tension safely.
Always wear safety glasses and gloves when working on the serpentine belt system.
Remember this guide can provide a lot of great information but is not meant to substitute real professional assistance. Whenever in doubt consult a professional mechanic.