2010 Honda Odyssey 3.5 Serpentine Belt Diagram
So, you're tackling a serpentine belt replacement on your 2010 Honda Odyssey 3.5L? Smart move. It's a job that can save you a pretty penny if you're comfortable wrenching. A clear serpentine belt diagram is absolutely crucial for ensuring you route the new belt correctly. Incorrect routing can lead to belt slippage, overheating, and potentially serious damage to your accessories. Let's dive into understanding that diagram and how to use it effectively.
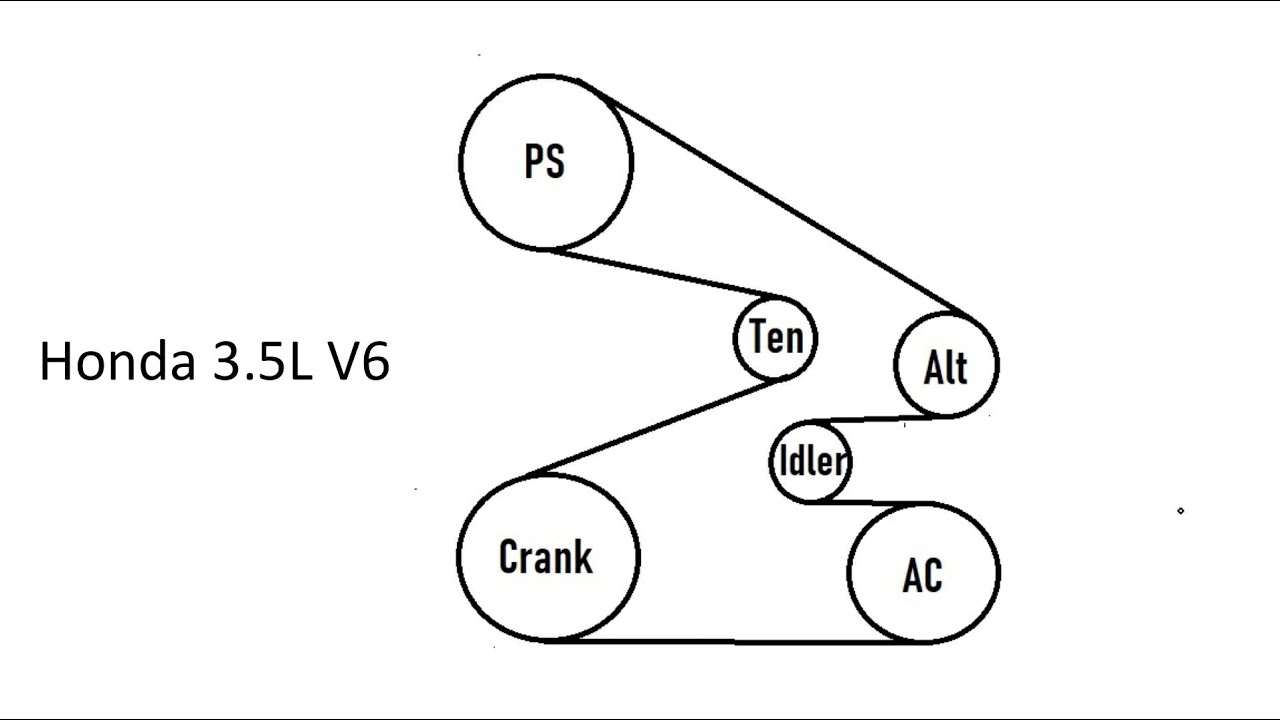
Purpose of the Serpentine Belt Diagram
The serpentine belt diagram is your roadmap for installing or inspecting the serpentine belt. Its primary purpose is to show you the correct path the belt should follow around various engine components. This is critical because:
- Correct Installation: Ensures all accessories (alternator, power steering pump, AC compressor, etc.) are driven at the correct speed.
- Troubleshooting: Helps identify if the belt is incorrectly routed, which is a common mistake after a replacement.
- Inspection: Aids in identifying potential issues like misaligned pulleys or a failing tensioner.
- Maintenance: Essential for verifying the condition of the belt and other components during routine maintenance.
Think of it like this: the serpentine belt is the lifeline to your Odyssey's accessories. The diagram ensures that lifeline is connected properly.
Key Specs and Main Parts of the 2010 Honda Odyssey 3.5L Serpentine Belt System
Before we delve into the diagram itself, let's cover the main components involved in the serpentine belt system for your 2010 Odyssey 3.5L. Knowing these parts will make interpreting the diagram much easier.
- Serpentine Belt: The primary rubber belt that transmits power from the crankshaft to the accessories. A typical belt for this model is a multi-ribbed belt, designed to maximize grip.
- Crankshaft Pulley: Driven directly by the engine's crankshaft. It's the driving force behind the entire serpentine belt system.
- Alternator Pulley: Drives the alternator, which charges the battery and powers the electrical system.
- Power Steering Pump Pulley: Operates the power steering pump, providing hydraulic assistance for steering.
- AC Compressor Pulley: Engages to drive the air conditioning compressor, cooling the cabin.
- Tensioner Pulley: A spring-loaded pulley that maintains the correct tension on the serpentine belt. This is critical for preventing slippage and extending belt life. A failing tensioner is a common cause of squealing belts.
- Idler Pulley(s): Smooth, non-driven pulleys that guide the belt around the engine and prevent interference with other components. Your Odyssey may have one or more idler pulleys.
Key Spec: The belt length is important for the serpentine belt. While it's best to check the exact length recommended for your specific model year and engine configuration, a typical replacement belt length for the 2010 Honda Odyssey 3.5L falls around 90-91 inches. Always verify the correct part number with your local auto parts store.
Understanding the Serpentine Belt Diagram Symbols
The diagram itself is a simplified representation of the engine bay, focusing on the belt path. Here's how to decipher it:
- Solid Lines: Represent the front (grooved) side of the serpentine belt. This is the side that makes contact with the grooved pulleys (crankshaft, alternator, power steering pump, AC compressor).
- Dashed Lines: Represent the back (smooth) side of the serpentine belt. This side makes contact with the smooth pulleys (tensioner and idler pulleys).
- Pulleys: Circles represent the pulleys. The diagram usually labels them with abbreviations like "ALT" for alternator, "P/S" for power steering, "A/C" for air conditioning, "CRANK" for crankshaft, "TENSIONER," and "IDLER."
- Arrows: Show the direction of rotation for each pulley. This is important for visualizing how the belt drives each component.
- Tensioner Symbol: The tensioner pulley is often depicted with a spring symbol next to it, visually indicating its function in maintaining belt tension.
Some diagrams may use color coding, but this is less common. If present, the color key will be explained separately on the diagram itself. Usually, color coding isn't essential as the solid/dashed line convention is the primary method for indicating belt routing.
How the Serpentine Belt System Works
The crankshaft pulley, driven by the engine, initiates the entire process. As it rotates, it drives the serpentine belt. The belt's path is carefully designed to wrap around each accessory pulley, transferring rotational force to them. The tensioner pulley maintains constant pressure on the belt, preventing slippage and ensuring consistent power delivery. Idler pulleys act as guides, optimizing the belt's routing and preventing it from contacting other engine components.
In essence, the serpentine belt system is a brilliantly efficient way to power multiple accessories simultaneously using a single belt. The clever design of the routing, coupled with the tensioner, allows for a compact and reliable system.
Real-World Use: Basic Troubleshooting
Here's how you can use the serpentine belt diagram for basic troubleshooting:
- Squealing Belt: If your belt is squealing, first check the tensioner. Is it moving freely? Is the belt routed correctly according to the diagram? Misrouting is a common cause of squealing, especially after a belt replacement. Also, inspect the belt itself for cracks, glazing, or missing ribs.
- Overheating: A slipping serpentine belt can prevent the water pump from functioning correctly, leading to overheating. Verify the belt is properly routed and the tensioner is applying adequate pressure.
- Accessory Malfunction: If your alternator isn't charging, power steering isn't working, or AC isn't cooling, a broken or slipping serpentine belt is a prime suspect. Check the belt's condition and routing against the diagram.
- Visual Inspection: Regularly compare the actual belt routing in your engine bay to the diagram. Look for any deviations or signs of wear on the belt or pulleys.
If you suspect a misaligned pulley, use a straight edge to check alignment. A misaligned pulley will cause premature belt wear and potential component failure.
Safety Considerations
Working on the serpentine belt system can be hazardous. Here are some key safety points:
- Disconnect the Battery: Always disconnect the negative battery terminal before working on any electrical components. This prevents accidental shorts and potential injury.
- Hot Engine: Never work on the serpentine belt system when the engine is hot. Allow it to cool completely to avoid burns.
- Moving Parts: Be extremely cautious of moving parts when the engine is running. Keep your hands and clothing clear of the belt and pulleys.
- Tensioner Spring: The tensioner pulley is spring-loaded and can snap back forcefully when released. Use the correct tools (usually a wrench or socket) to relieve the tension before removing the belt. Failure to do so could result in injury.
- Proper Tools: Use the correct tools for the job. Don't try to force things. Using the wrong tool can damage components or cause injury.
The tensioner pulley is a component with significant stored energy. Always use caution when releasing the tension.
By understanding the serpentine belt diagram and following safe work practices, you can confidently tackle serpentine belt replacement or inspection on your 2010 Honda Odyssey 3.5L. It's a rewarding DIY project that can save you money and give you a deeper understanding of your vehicle.
We have the full, high-resolution diagram available for download. This will provide you with a clear and detailed visual aid for your project. Contact us, and we can provide the file.