2010 Hyundai Santa Fe Serpentine Belt Diagram
The serpentine belt in your 2010 Hyundai Santa Fe is a critical component, responsible for powering several essential accessories. Understanding its routing, tension, and condition is vital for preventative maintenance and timely repairs. This article delves into the serpentine belt diagram for the 2010 Santa Fe, offering a detailed guide for experienced DIYers who want to tackle belt replacement, diagnose issues, or simply enhance their understanding of their vehicle.
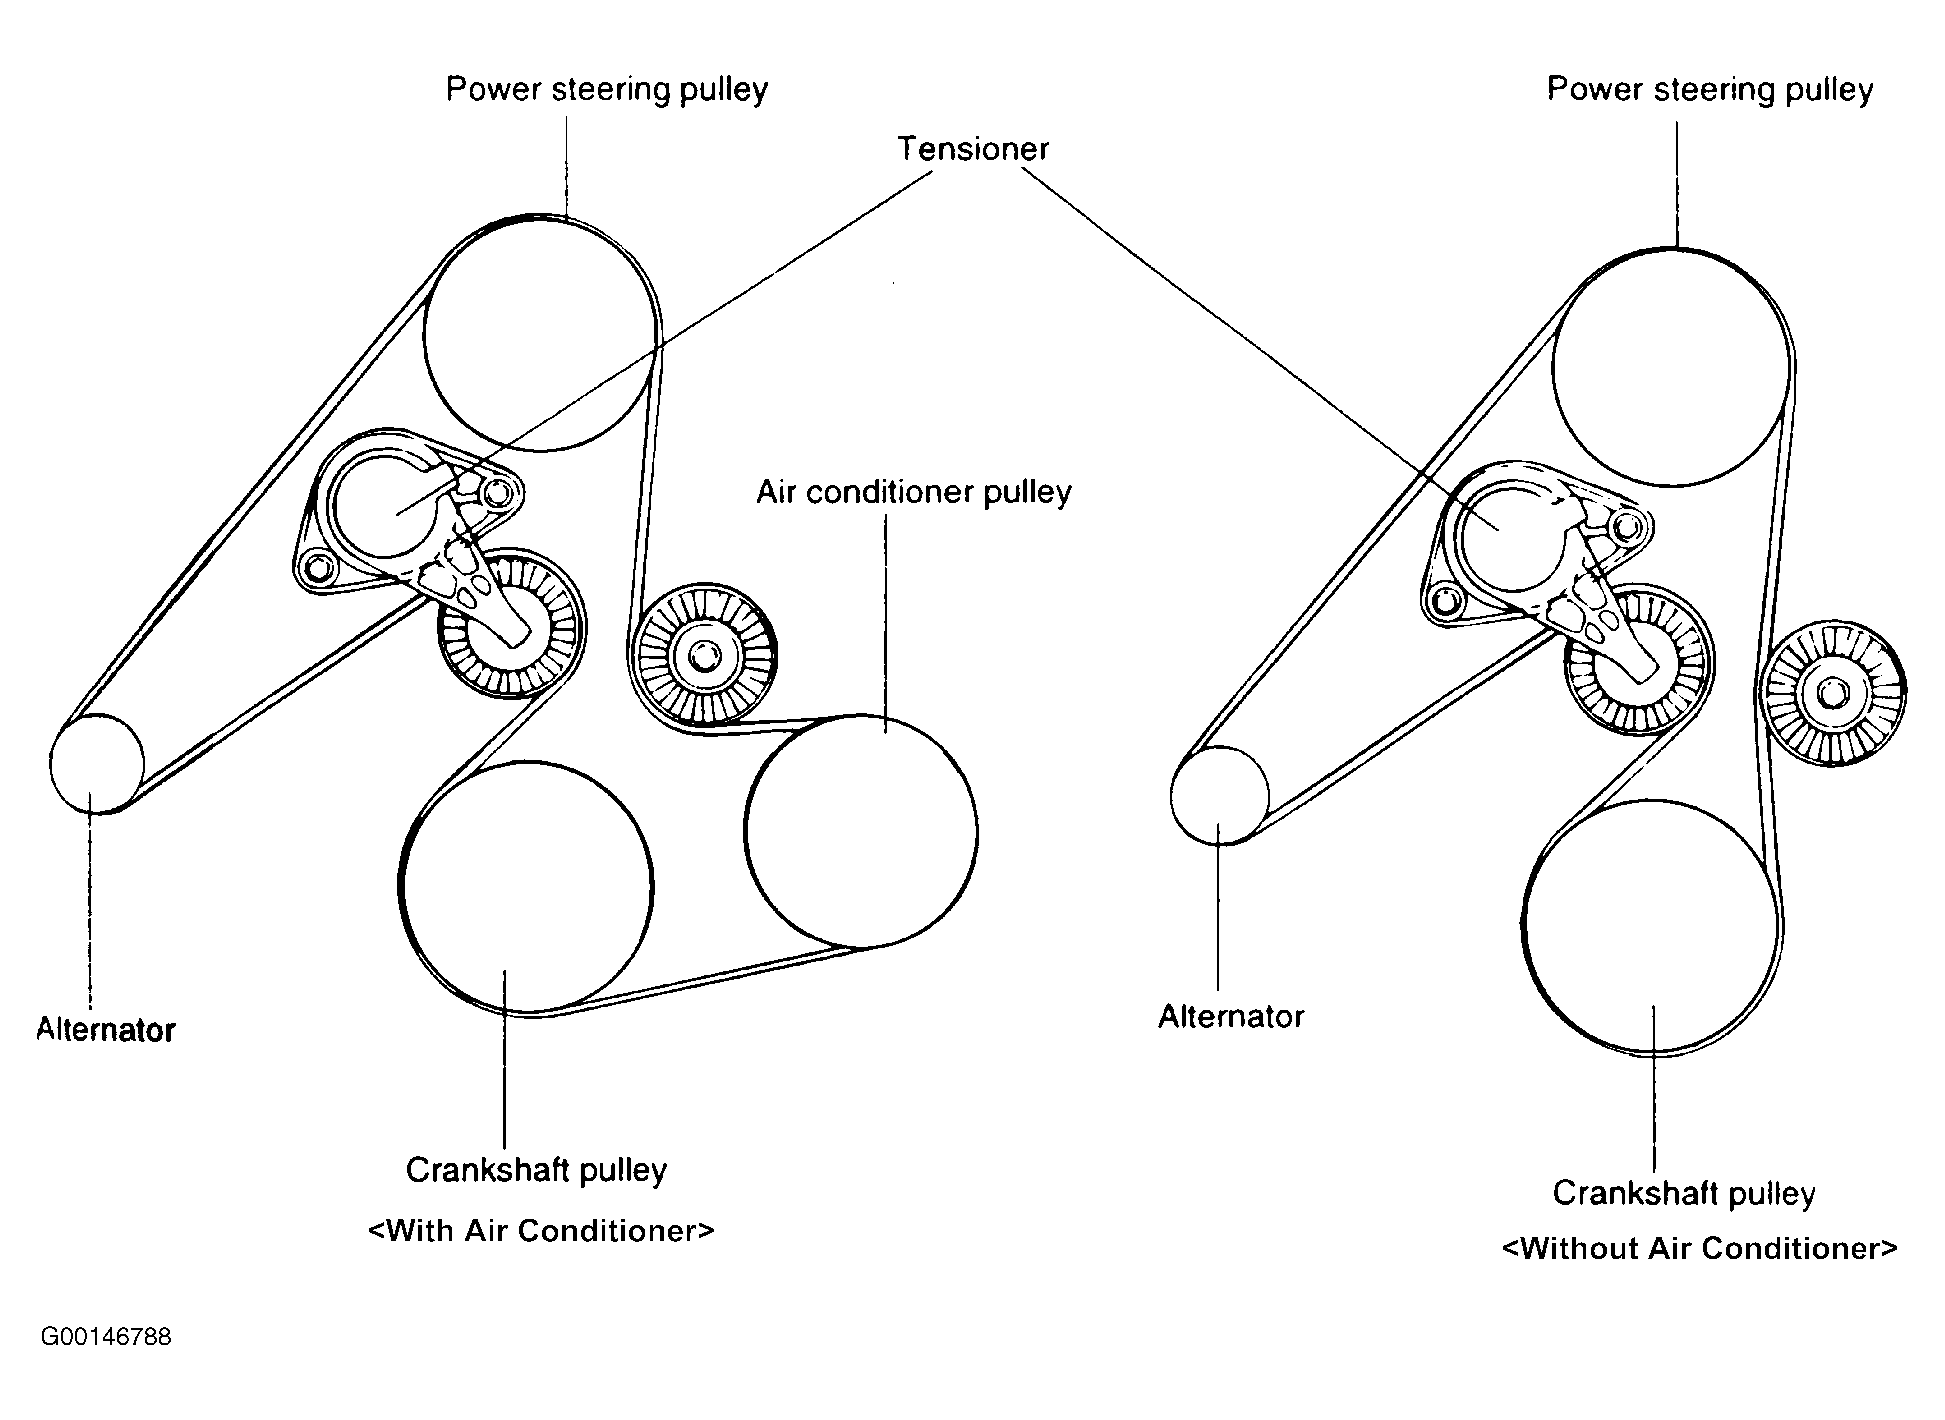
Purpose of the Serpentine Belt Diagram
The serpentine belt diagram serves several crucial purposes:
- Repair and Replacement: The most common use is for guiding the correct installation of a new serpentine belt. Incorrect routing can lead to accessory malfunctions or even belt failure.
- Troubleshooting: The diagram helps identify which accessories are powered by the belt. This is essential for diagnosing problems like a non-charging alternator, loss of power steering, or a non-functional AC compressor.
- Preventative Maintenance: Regularly inspecting the belt for wear and tear is a key part of vehicle upkeep. The diagram helps you locate and inspect the entire belt length and associated pulleys.
- General Knowledge: Understanding the belt's path provides a deeper understanding of how your vehicle's engine operates.
Key Specs and Main Parts
Before diving into the diagram, it's important to understand the main components involved:
- Serpentine Belt: A single, long belt made of reinforced rubber that wraps around multiple pulleys.
- Crankshaft Pulley: Powered directly by the engine's crankshaft, this pulley drives the serpentine belt.
- Alternator Pulley: The alternator generates electrical power for the vehicle. Its pulley is driven by the serpentine belt.
- Power Steering Pump Pulley: The power steering pump provides hydraulic assistance to the steering system.
- Air Conditioning Compressor Pulley: The AC compressor circulates refrigerant, enabling the air conditioning system.
- Idler Pulley(s): Smooth pulleys used to guide the belt and maintain the correct wrap angle around other pulleys.
- Tensioner Pulley: A spring-loaded pulley that automatically maintains the correct tension on the serpentine belt. This is a critical component.
The 2010 Hyundai Santa Fe typically uses a 6PK or 7PK (PK stands for Poly-V K profile) serpentine belt. The exact length will depend on the engine variant (2.4L, 2.7L, or 3.5L). Always consult your vehicle's owner's manual or a reputable auto parts store to determine the correct belt size.
Symbols in the Diagram
Serpentine belt diagrams use a simplified visual language to represent the belt's routing:
- Solid Lines: Represent the path of the serpentine belt.
- Arrows: Indicate the direction of belt rotation. Pay close attention to these!
- Circles/Ovals: Represent pulleys. The diagram usually labels them with abbreviations (e.g., ALT for alternator, PS for power steering, AC for air conditioning).
- Dotted Lines (Sometimes): Might indicate the backside of the belt running against a pulley.
- Color Coding (Less Common): Some diagrams use color to differentiate between different parts of the system, but this is not standard.
The tensioner pulley is usually represented with a spring symbol or an arrow indicating the direction of tension. Identifying the tensioner is crucial because you'll need to relieve the tension to remove and install the belt.
How It Works: The Serpentine Belt System
The serpentine belt system is a relatively simple but highly efficient power transmission system. The engine's crankshaft turns, rotating the crankshaft pulley. This pulley drives the serpentine belt, which in turn rotates the pulleys of the alternator, power steering pump, and AC compressor.
The tensioner pulley plays a vital role in maintaining the correct belt tension. As the belt stretches or wears, the tensioner automatically adjusts its position to compensate, preventing belt slippage and ensuring optimal performance of the accessories. Without proper tension, the belt can slip, causing reduced performance of the accessories and potentially leading to overheating or other problems.
Real-World Use: Basic Troubleshooting
Here are a few troubleshooting tips using the serpentine belt diagram:
- Squealing Noise: Often indicates a loose or worn belt. Check the tensioner and belt condition. Refer to the diagram to ensure the belt is properly routed.
- Charging Problems: If the alternator isn't charging the battery, the belt may be slipping on the alternator pulley. Inspect the belt and tensioner.
- Loss of Power Steering: If the power steering is not working, the belt may be slipping on the power steering pump pulley. Check the belt and tensioner.
- AC Not Working: If the AC compressor is not engaging, the belt may be slipping on the AC compressor pulley. Check the belt and tensioner.
- Visual Inspection: Look for cracks, fraying, glazing, or missing chunks on the belt. Any of these indicate that the belt needs replacement. Using the diagram, check the alignment of each pulley with the belt. Misalignment can cause premature wear.
Important: Before diagnosing any serpentine belt issue, ensure the engine is off and the key is removed. Allow the engine to cool down completely.
Safety Considerations
Working around the serpentine belt system can be dangerous due to the rotating parts and the potential for the belt to suddenly snap. Here are some safety precautions:
- Disconnect the Battery: Always disconnect the negative battery terminal before working on the serpentine belt system. This prevents accidental starting of the engine.
- Wear Safety Glasses: Protect your eyes from debris.
- Keep Hands Clear: Keep your hands, clothing, and tools clear of the rotating pulleys and belt.
- Use the Correct Tools: Use the correct tools for releasing the tension on the tensioner pulley. Using improvised tools can be dangerous and damage the tensioner.
- Hot Engine: Be extremely careful working on or near a hot engine. Allow the engine to cool completely before starting any work.
The tensioner pulley spring is under considerable pressure. When releasing the tension, ensure you have a firm grip on the tool and that the tool is properly engaged. A sudden release of tension can cause injury.
Replacing the serpentine belt on a 2010 Hyundai Santa Fe is a manageable task for experienced DIYers. By understanding the serpentine belt diagram, you can confidently diagnose problems, replace the belt correctly, and keep your vehicle running smoothly. Remember to always prioritize safety and use the correct tools and procedures.
For your convenience, we have the complete 2010 Hyundai Santa Fe Serpentine Belt Diagram available for download. This detailed diagram will provide you with all the information you need to tackle your next belt replacement or maintenance project. Don't hesitate to consult with a professional mechanic if you're unsure about any aspect of the repair. We encourage you to explore the diagram and use this information to confidently care for your vehicle.