2010 Hyundai Sonata 2.4 Serpentine Belt Diagram
The serpentine belt, also known as a drive belt, in your 2010 Hyundai Sonata with the 2.4L engine is a critical component responsible for powering several essential accessories. Understanding its routing and proper tension is crucial for maintaining your vehicle's reliability and avoiding costly repairs. This article will provide a detailed breakdown of the 2010 Sonata 2.4L serpentine belt diagram, empowering you to diagnose issues, perform replacements, and keep your ride running smoothly.
Purpose of the Serpentine Belt Diagram
Why bother with a diagram? Simply put, it's your roadmap for the serpentine belt. Without it, replacing the belt or diagnosing a squealing noise can become a frustrating and potentially damaging experience. The diagram:
- Guides proper belt routing around various pulleys.
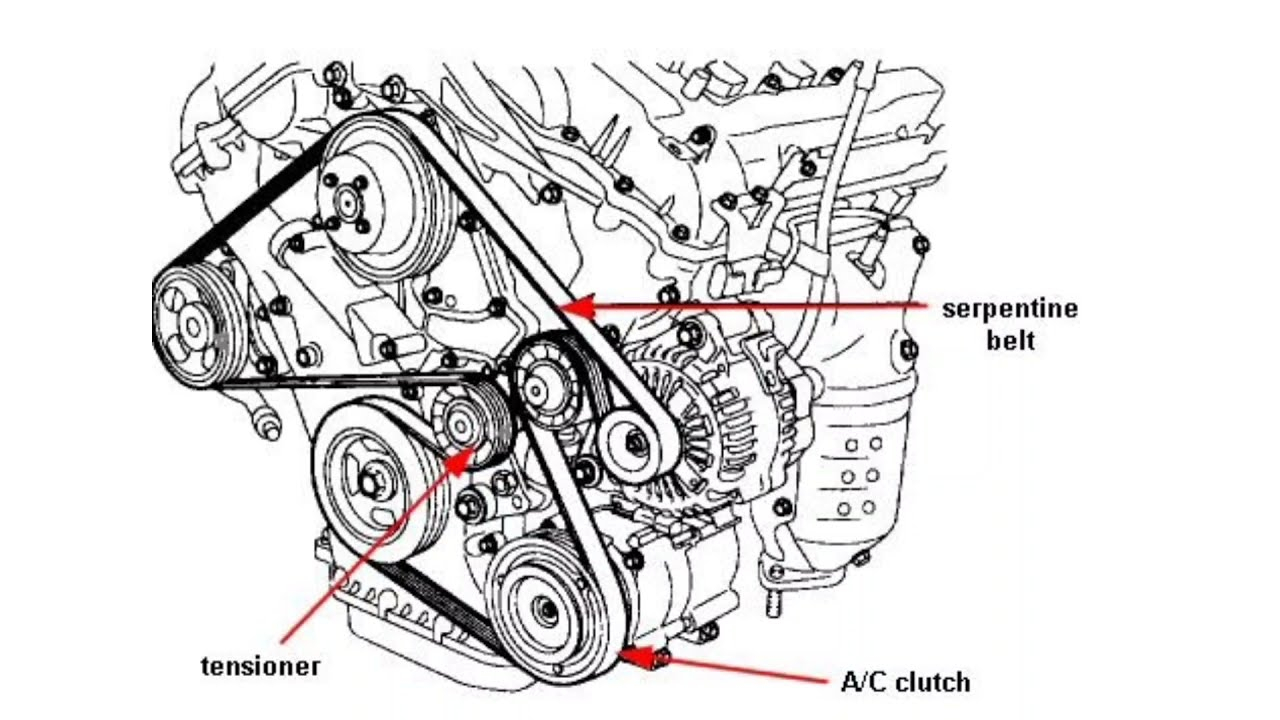
- Helps identify the location of the tensioner, which is essential for removing and installing the belt.
- Facilitates troubleshooting by showing the relationship between the belt and powered accessories.
Whether you're performing routine maintenance, replacing a worn belt, or diagnosing an accessory malfunction, a clear understanding of the belt's path is indispensable. We have a high-resolution version of the diagram available for download, linked at the end of this article.
Key Specs and Main Parts
Before diving into the diagram, let's establish some key specs and identify the main components involved:
- Engine: 2.4L Theta II inline-4
- Belt Length (Approximate): Varies slightly depending on specific accessory configurations (e.g., with or without A/C). Consult your owner's manual or a reputable parts supplier for the exact length.
- Main Components:
- Crankshaft Pulley: The main driver, connected directly to the engine's crankshaft.
- Alternator Pulley: Powers the electrical system, charging the battery and supplying power to the car's accessories.
- Power Steering Pump Pulley: Provides hydraulic pressure for power-assisted steering.
- Air Conditioning Compressor Pulley: Compresses refrigerant for the A/C system.
- Idler Pulley(s): Smooth, unpowered pulleys that guide the belt and maintain proper tension.
- Tensioner Pulley: Spring-loaded pulley that automatically adjusts belt tension. Crucially, this is what you interact with to remove and install the belt.
Understanding Diagram Symbols
The serpentine belt diagram isn't just a picture; it's a coded map. Here's a breakdown of common symbols:
- Solid Lines: Represent the belt itself, showing its path around the pulleys.
- Arrows: Indicate the direction of belt travel around each pulley. This is critical for ensuring the belt is routed correctly.
- Circles: Represent the various pulleys. The diagram should label each pulley (e.g., "ALT" for alternator, "P/S" for power steering).
- Tensioner Symbol: Often depicted as a pulley with an arrow indicating its direction of movement, sometimes including a spring symbol.
- Component Abbreviations: Common abbreviations include: ALT (Alternator), A/C (Air Conditioning Compressor), P/S (Power Steering), CK/CRK (Crankshaft), IDL (Idler).
Colors are sometimes used to differentiate sections of the belt path, but they are not standard. Always rely on the labels and arrows for accurate routing.
How It Works: The Power Transfer
The serpentine belt system is a marvel of efficient power transfer. The engine's crankshaft turns the crankshaft pulley. This, in turn, drives the serpentine belt, which wraps around all the other pulleys. As the crankshaft pulley spins, it forces the belt to rotate, transferring power to the alternator, power steering pump, and air conditioning compressor. The idler pulleys ensure the belt maintains proper contact with each pulley, preventing slippage. The tensioner pulley applies constant pressure to the belt, compensating for stretching and wear, ensuring consistent power delivery to all accessories. Without proper tension, the belt will slip, leading to reduced performance, noise, and potential damage to the accessories.
Real-World Use: Basic Troubleshooting
The serpentine belt diagram isn't just for replacements; it's a diagnostic tool. Here are some common issues and how the diagram can help:
- Squealing Noise: Often caused by a slipping belt. Check the diagram to ensure the belt is properly routed and the tensioner is functioning correctly. A worn or glazed belt can also cause squealing.
- Accessory Malfunction (e.g., No Power Steering, No A/C, Battery Not Charging): If an accessory fails, consult the diagram to see if it's powered by the serpentine belt. A broken or missing belt is an obvious culprit. If the belt is intact, investigate the accessory itself.
- Visible Belt Damage: Cracks, fraying, or missing chunks of the belt are signs of wear and tear. Use the diagram to order the correct replacement belt.
- Tensioner Issues: The tensioner should move smoothly and maintain consistent tension. If it's seized, loose, or rattling, it needs replacement. The diagram shows its location, making replacement easier.
To visually inspect the belt, you may need to remove the splash shield located under the engine. This provides better access to the belt and pulleys.
Safety First: Risky Components
Working around a running engine is inherently dangerous. Always disconnect the negative battery terminal before working on the serpentine belt system. This prevents accidental starting of the engine while your hands are near moving parts.
The most significant hazard is the spinning crankshaft pulley. Never put your hands near the belt or pulleys while the engine is running. Also, hot exhaust components are nearby and present a burn hazard.
When releasing the tension on the belt, be cautious. The tensioner is spring-loaded and can snap back forcefully if not handled properly. Use the correct tool (usually a wrench or socket) to carefully relieve the tension.
Final Thoughts
The 2010 Hyundai Sonata 2.4L serpentine belt system is a vital part of your vehicle. By understanding the diagram and the components involved, you can confidently diagnose issues, perform replacements, and ensure your Sonata runs smoothly for years to come. Remember to always prioritize safety and consult a professional mechanic if you're uncomfortable performing any of these procedures. If you take your time, follow the diagram, and prioritize safety, you can save money and gain valuable experience maintaining your vehicle.
We have the high-resolution version of the serpentine belt diagram available for you. It includes all the details discussed in this article and is formatted for easy printing. Click here to download the file.