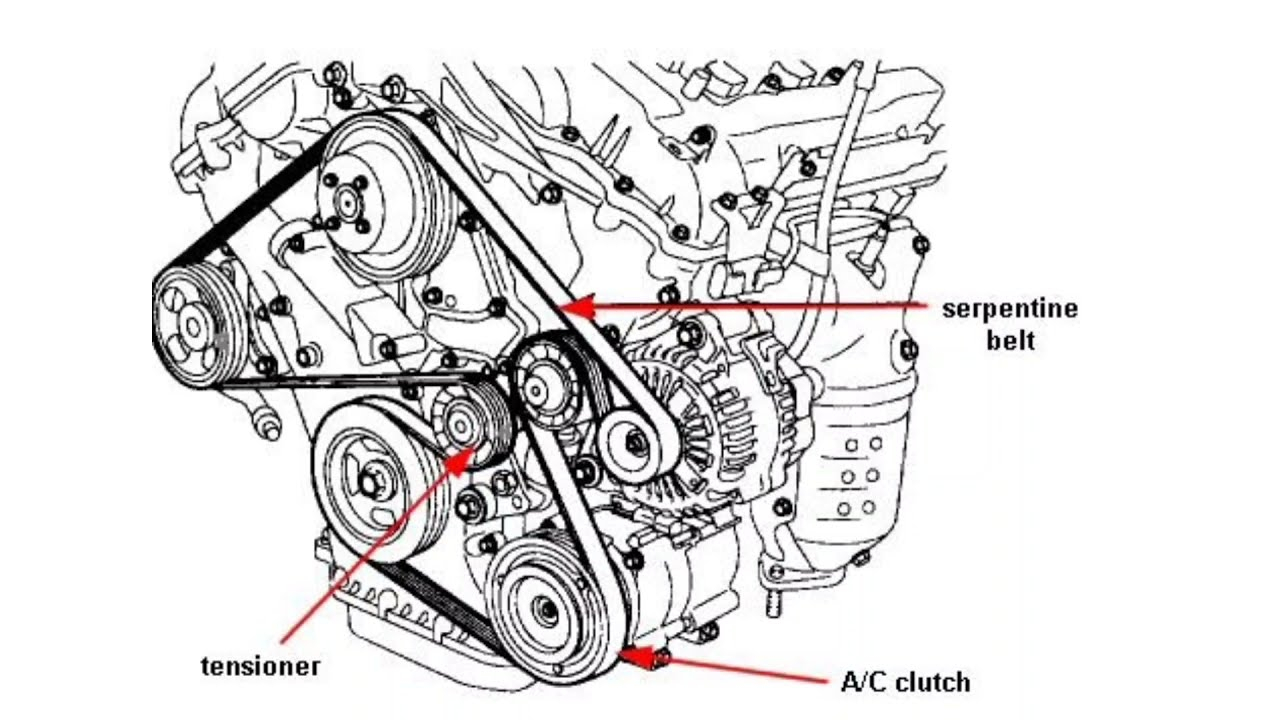
2010 Hyundai Sonata Serpentine Belt Diagram
The 2010 Hyundai Sonata is a reliable vehicle, but like all cars, it requires regular maintenance. One critical component to understand is the serpentine belt system. This article provides a detailed breakdown of the 2010 Hyundai Sonata serpentine belt diagram, offering insights into its function, components, and how to interpret the diagram for DIY repairs and maintenance.
Purpose of the Serpentine Belt Diagram
The serpentine belt diagram is essentially a roadmap for your engine's accessory drive system. It illustrates the routing of the serpentine belt around various engine components. Knowing this routing is crucial for several reasons:
- Replacing a worn or broken belt: The diagram shows you the exact path the new belt needs to follow, preventing incorrect installation, which can lead to component damage.
- Diagnosing accessory issues: If your power steering, air conditioning, or alternator isn't working, the diagram helps you visualize how the serpentine belt powers these components, aiding in identifying potential causes.
- General Maintenance and Learning: Understanding the belt's path and associated components provides valuable insight into the engine's overall operation.
Key Specs and Main Parts
The serpentine belt system on the 2010 Sonata (depending on the engine - either the 2.4L inline-4 or the 3.3L V6) typically drives the following components:
- Crankshaft Pulley: This is the main driver, connected directly to the engine's crankshaft. It's usually the largest pulley in the system.
- Alternator: The alternator generates electricity to charge the battery and power the car's electrical systems.
- Power Steering Pump: Provides hydraulic pressure to assist steering.
- Air Conditioning Compressor: Compresses refrigerant for the air conditioning system.
- Water Pump: Circulates coolant throughout the engine to regulate temperature.
- Tensioner Pulley: This spring-loaded pulley maintains proper tension on the serpentine belt. It is *critical* for proper system operation.
- Idler Pulley (Optional): Some systems may include an idler pulley to guide the belt and increase its wrap angle around other pulleys.
The specific belt length and number of ribs will depend on the engine type. Always consult your vehicle's owner's manual or a reliable parts catalog (like those offered by Gates or Dayco) to determine the correct belt for your application. Incorrect belt length can lead to component damage or premature belt failure.
Diagram Symbols and Conventions
Serpentine belt diagrams typically use standardized symbols and conventions to represent components and the belt's path. Understanding these symbols is crucial for accurate interpretation:
- Solid Lines: Represent the serpentine belt itself. The thickness of the line often indicates the belt's width.
- Circles/Ovals: Represent pulleys. The diameter of the circle roughly corresponds to the pulley's size.
- Arrows: Indicate the direction of rotation for each pulley. This is important for ensuring the belt is routed correctly.
- Component Labels: Each pulley is labeled with an abbreviation or full name indicating the component it drives (e.g., ALT for alternator, P/S for power steering).
- Tensioner Symbol: The tensioner pulley is typically represented with a spring symbol or a curved arrow indicating its tensioning action.
- Dotted Lines (Sometimes): May indicate the back (smooth side) of the belt contacting a pulley.
While color coding isn't universally used in serpentine belt diagrams, some may employ it to differentiate between the belt's front and back sides, or to highlight specific components. Always refer to the diagram's legend or notes to understand any color-coding used.
How the Serpentine Belt System Works
The serpentine belt system's operation is relatively straightforward. The crankshaft pulley, driven by the engine, provides the rotational force that drives the entire system. The serpentine belt wraps around each accessory pulley, transferring this rotational force to the alternator, power steering pump, air conditioning compressor, and water pump. The tensioner pulley maintains consistent tension on the belt, preventing slippage and ensuring efficient power transfer.
Proper belt tension is *essential*. Too little tension results in belt slippage, reduced accessory performance, and accelerated belt wear. Too much tension can overload bearings and shorten the lifespan of the accessories. This is why the tensioner is so critical. As the belt stretches naturally over time, the tensioner automatically compensates, maintaining the correct tension.
Real-World Use: Basic Troubleshooting
The serpentine belt diagram is an invaluable tool for troubleshooting accessory-related problems. Here are a few examples:
- Squealing Noise: A squealing noise, especially when the engine is cold or under load, often indicates a slipping serpentine belt. Use the diagram to check the belt's condition, tensioner functionality, and pulley alignment. Look for signs of wear, cracks, or glazing on the belt.
- Accessory Malfunction: If your power steering, air conditioning, or alternator stops working, consult the diagram to see if the serpentine belt drives that particular component. A broken belt is an obvious cause, but even a slipping belt can prevent the accessory from functioning correctly.
- Belt Wear Issues: Uneven wear on the belt can indicate misaligned pulleys. Use the diagram to visually inspect the alignment of each pulley. A straight edge can be helpful for confirming alignment.
Remember: a visual inspection of the belt should be part of your routine maintenance. A cracked or frayed belt is a sign it needs to be replaced soon.
Safety Precautions
Working on the serpentine belt system can be hazardous. Always observe the following safety precautions:
- Disconnect the Battery: Before working on any electrical components, disconnect the negative battery cable to prevent electrical shock.
- Engine Off and Cool: Never work on the serpentine belt system while the engine is running or hot. Allow the engine to cool completely before starting any repairs.
- Moving Parts: Keep your hands, clothing, and tools clear of the serpentine belt and pulleys while the engine is running. The rotating components can cause serious injury.
- Tensioner Spring: The tensioner pulley is spring-loaded and can snap back with considerable force. Use the correct tools and techniques to release the tension safely. If unsure, consult a repair manual or seek professional assistance.
The alternator can output a significant electrical current even with the engine off. Disconnecting the battery is critical before working near it.
By understanding the serpentine belt diagram and following proper safety precautions, you can confidently tackle basic maintenance and repairs on your 2010 Hyundai Sonata's serpentine belt system. This knowledge will not only save you money but also provide a deeper understanding of your vehicle's engine.
We have a detailed serpentine belt diagram file specifically for the 2010 Hyundai Sonata. Please reach out and we will gladly share it with you.