
2010 Kia Soul Serpentine Belt Diagram
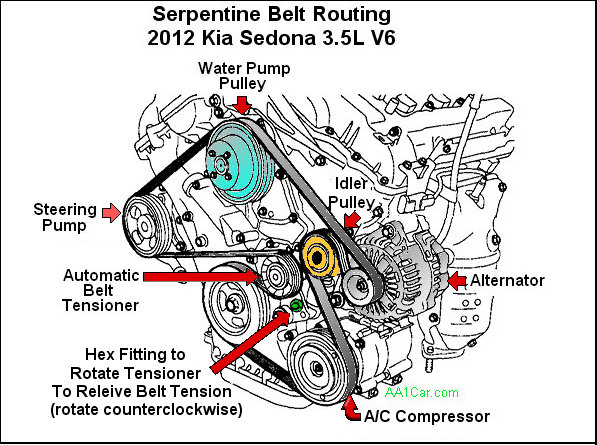
The serpentine belt in your 2010 Kia Soul is a critical component, responsible for powering several essential engine accessories. Understanding its routing and condition is paramount for preventative maintenance, repairs, and diagnosing potential issues. This article provides a detailed breakdown of the 2010 Kia Soul serpentine belt diagram, equipping you with the knowledge to confidently tackle related DIY tasks.
Purpose of Understanding the Serpentine Belt Diagram
The serpentine belt diagram is essentially a roadmap for your engine's accessory drive system. It serves several vital purposes:
- Maintenance and Replacement: When replacing a worn or damaged serpentine belt, the diagram is crucial to ensure proper routing. Incorrect routing can lead to accessory malfunction or belt failure.
- Troubleshooting: The diagram helps diagnose issues related to belt slippage, noise, or accessory failure. By knowing the belt's path, you can identify potential points of tensioner failure or pulley misalignment.
- Learning and Understanding: Even if you're not actively working on your car, understanding the serpentine belt system provides a deeper understanding of how your engine operates and the interdependence of its components.
Having this knowledge empowers you to make informed decisions about your vehicle's maintenance and repair.
Key Specs and Main Parts
Let's break down the essential components associated with the 2010 Kia Soul's serpentine belt system. While specific dimensions (belt length, width, and number of ribs) vary depending on the engine (1.6L or 2.0L), the underlying principles remain consistent.
Main Components:
- Serpentine Belt: The continuous belt, usually made of reinforced rubber, that transmits power from the crankshaft to the accessories.
- Crankshaft Pulley (Damper): Connected directly to the crankshaft, this pulley is the driving force behind the entire system.
- Alternator Pulley: The alternator generates electricity to power the car's electrical system and charge the battery.
- Power Steering Pump Pulley: The power steering pump provides hydraulic assistance for steering.
- Air Conditioning Compressor Pulley: The A/C compressor circulates refrigerant to cool the cabin air.
- Idler Pulley(s): Smooth pulleys that guide the belt and maintain proper tension. They do not drive any accessories.
- Tensioner Pulley (Automatic Belt Tensioner): A spring-loaded device that maintains consistent tension on the belt, preventing slippage and premature wear. This is a crucial component. A faulty tensioner is a common cause of serpentine belt problems.
Key Specifications:
Consult your vehicle's owner's manual or a reputable auto parts store for the specific serpentine belt length and rib count for your 2010 Kia Soul's engine (1.6L or 2.0L). Using the correct belt is crucial for proper operation and avoiding damage.
Typical serpentine belts are made of EPDM rubber (Ethylene Propylene Diene Monomer), known for its durability and resistance to heat and wear.
Symbols and Diagram Interpretation
Understanding the symbols on the serpentine belt diagram is key to correctly interpreting it. Here's a breakdown:
- Solid Lines: Represent the serpentine belt itself. The thickness of the line doesn't usually indicate anything specific; it's purely for visual clarity.
- Circles: Represent pulleys. The circles might have abbreviations or symbols inside to identify the component (e.g., ALT for Alternator, P/S for Power Steering).
- Arrows: Indicate the direction of belt travel around each pulley. Following the arrows is critical for correct routing.
- Shaded or Patterned Areas: Sometimes used to highlight the grooved (ribbed) side of the belt, which should be in contact with grooved pulleys. The smooth side of the belt typically contacts smooth idler pulleys.
- Tensioner Symbol: Usually depicted as a pulley with an arrow indicating the direction of its spring-loaded movement. This is a crucial reference point for releasing tension when removing or installing the belt.
The diagram usually shows the engine as viewed from the front (radiator side). This helps you orient yourself when working on the car.
How It Works
The serpentine belt system is a simple but effective way to transfer power from the engine to various accessories. The crankshaft pulley, driven directly by the engine's rotation, turns the serpentine belt. The belt then wraps around the pulleys of the alternator, power steering pump, air conditioning compressor, and idler pulleys. As the crankshaft pulley rotates, it forces the belt to move, turning the other pulleys and driving the corresponding accessories.
The tensioner pulley plays a vital role in maintaining optimal belt tension. As the belt stretches or wears, the tensioner automatically adjusts to keep the belt tight enough to prevent slippage but not so tight that it puts undue stress on the bearings of the accessory components.
The order in which the belt wraps around the pulleys is critical for the system to function correctly. The diagram clearly illustrates this routing, ensuring that each accessory receives the necessary power.
Real-World Use and Troubleshooting
Here are some common scenarios where the serpentine belt diagram proves invaluable:
- Belt Replacement: Use the diagram to ensure the new belt is routed exactly like the old one. Before removing the old belt, take a picture or make a sketch of its path for reference.
- Squealing Noise: A squealing noise often indicates a slipping belt. Check the belt for cracks, glazing, or wear. Inspect the tensioner for proper operation. Use the diagram to verify correct routing, as an improperly routed belt can cause slippage.
- Accessory Malfunction: If an accessory (e.g., alternator, power steering) stops working, check the serpentine belt for damage or breakage. If the belt is intact, the problem likely lies within the accessory itself.
- Tensioner Issues: A failing tensioner can cause belt slippage, noise, and premature wear. Check the tensioner for smooth movement and proper tension. If the tensioner is weak or binding, replace it.
Troubleshooting Tips:
- Visually inspect the belt regularly for cracks, wear, and glazing.
- Listen for unusual noises (squealing, chirping) that could indicate a problem.
- Check the tensioner for proper operation and range of motion.
Safety Precautions
Working on the serpentine belt system can be dangerous if proper precautions are not taken. Here are some critical safety considerations:
- Disconnect the negative battery cable before working on the engine. This prevents accidental starting of the engine.
- Allow the engine to cool completely before working on the serpentine belt. Components can get extremely hot.
- Be aware of moving parts. The serpentine belt and pulleys can cause serious injury if they are engaged while you are working on them.
- Use appropriate tools. A serpentine belt tool or breaker bar is usually required to release the tension on the tensioner pulley. Do not use makeshift tools that could slip and cause injury.
- The automatic belt tensioner stores a large amount of spring energy. Improper handling can lead to personal injury. Always relieve the tension slowly and carefully.
- Keep hands and fingers clear of the belt and pulleys when releasing the tensioner.
High-Risk Components: The automatic belt tensioner is the riskiest component due to its stored spring energy. Handle it with extreme care.
By understanding the 2010 Kia Soul serpentine belt diagram and following proper safety procedures, you can confidently perform maintenance and repairs on your vehicle's accessory drive system. Remember to consult your vehicle's service manual for specific instructions and torque specifications.
We have the complete 2010 Kia Soul Serpentine Belt Diagram file available for download. This detailed visual aid can be an invaluable asset for your maintenance and repair endeavors. Happy wrenching!