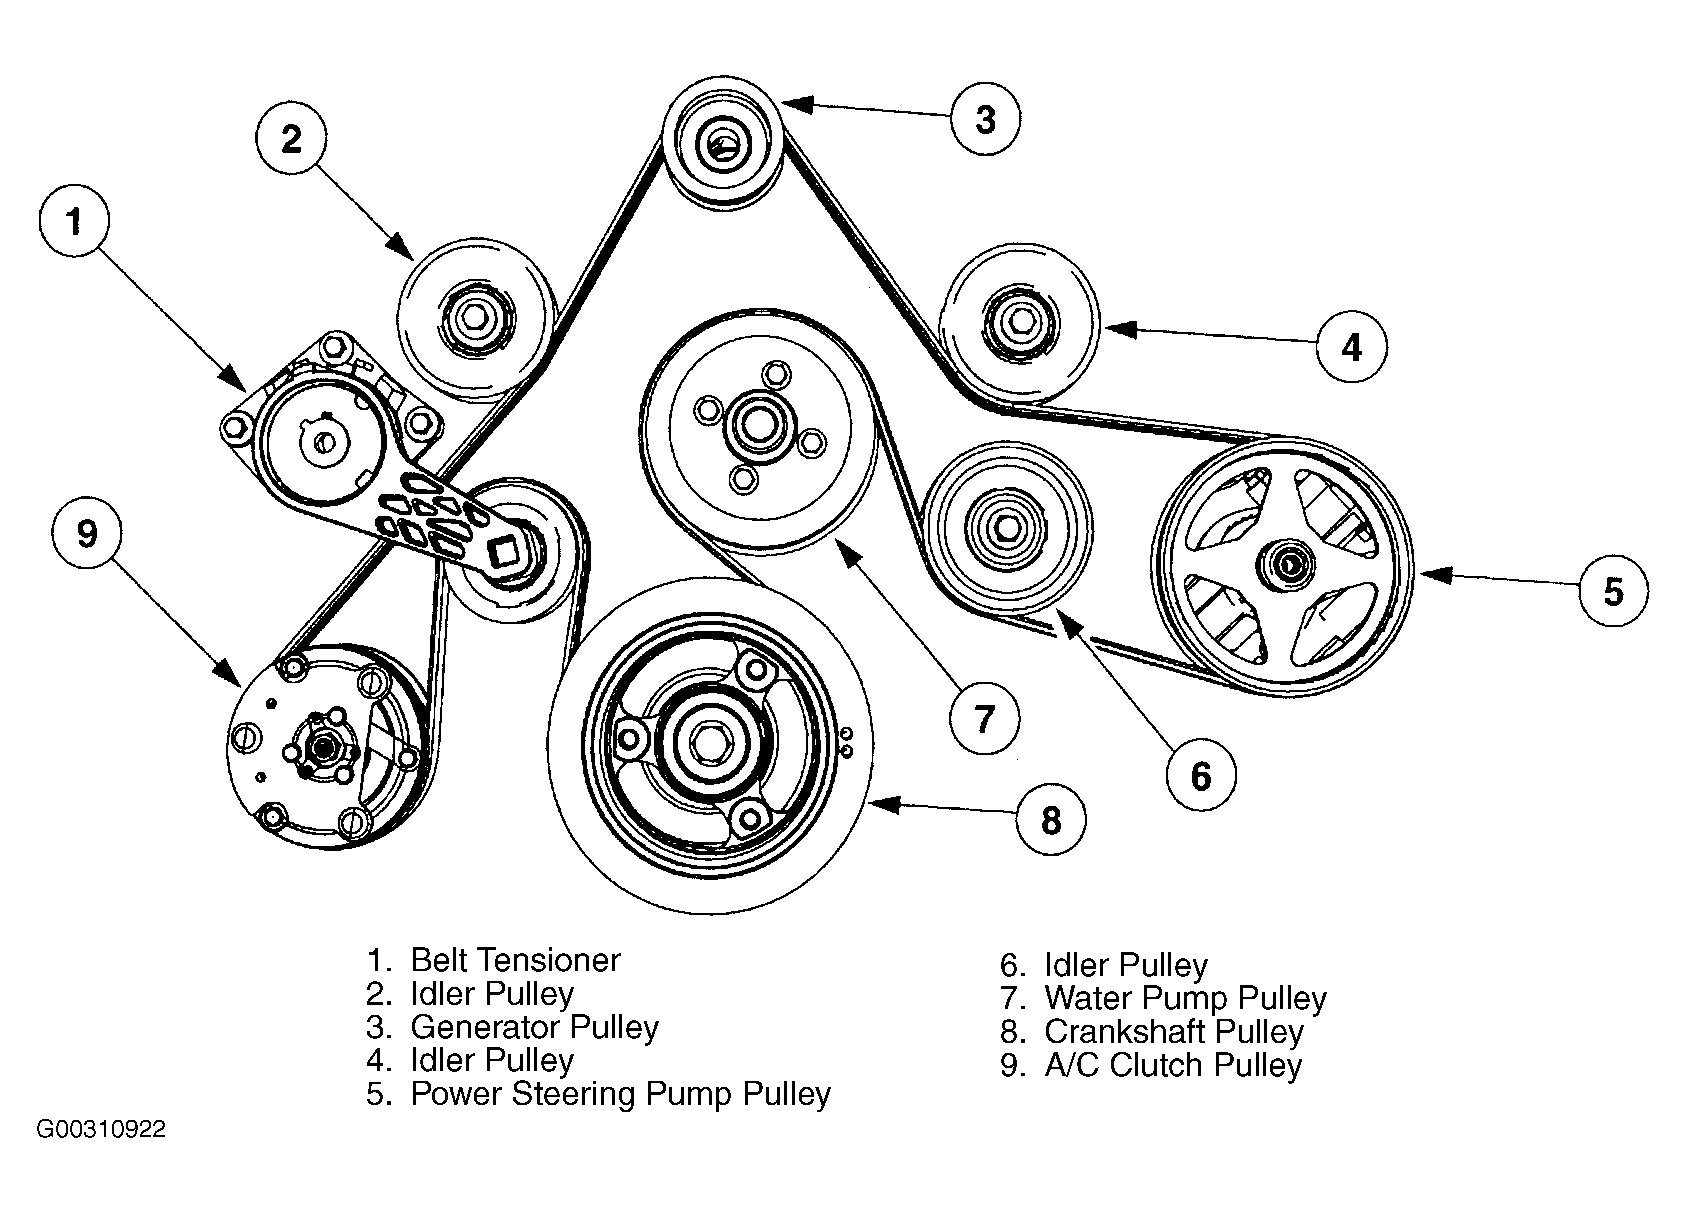
2010 Mazda 3 Serpentine Belt Diagram
For the intermediate car enthusiast or seasoned DIY mechanic tackling repairs or modifications on a 2010 Mazda 3, understanding the serpentine belt system is crucial. This article will delve into the 2010 Mazda 3 serpentine belt diagram, breaking down its components, operation, and troubleshooting, equipping you with the knowledge to confidently handle belt-related issues.
Why This Diagram Matters
The serpentine belt diagram is more than just a pretty picture; it's your roadmap to diagnosing and fixing problems within your car's accessory drive system. Specifically, having the correct diagram is essential for:
- Belt Replacement: Ensuring the new belt is routed correctly is paramount. An incorrectly routed belt will lead to immediate failure, potentially damaging other components.
- Identifying Component Issues: Understanding the belt's path helps pinpoint malfunctioning pulleys or accessories causing premature belt wear or noises.
- Accessory Repair/Replacement: When removing or installing components like the alternator, power steering pump, or AC compressor, the belt needs to be properly tensioned and routed.
- Preventative Maintenance: Inspecting the belt and pulleys regularly, guided by the diagram, can prevent catastrophic failures and costly repairs.
Key Specs and Main Parts
The 2010 Mazda 3 typically came with one of two engines: a 2.0L or a 2.5L. While the underlying principles are the same, the exact routing of the serpentine belt can differ slightly. Therefore, consulting the correct diagram for your specific engine is vital. Common to both configurations are these key components:
- Crankshaft Pulley (Harmonic Balancer): Located at the bottom of the engine, this pulley is driven directly by the engine and powers all the accessories via the serpentine belt. It also dampens torsional vibrations from the engine.
- Alternator Pulley: The alternator generates electricity to power the car's electrical system and charge the battery.
- Power Steering Pump Pulley: This pulley drives the power steering pump, which provides hydraulic assistance for steering.
- Air Conditioning (AC) Compressor Pulley: The AC compressor circulates refrigerant in the AC system.
- Idler Pulleys: These pulleys provide belt support and guide the belt around the various components. They do not drive any accessories.
- Tensioner Pulley: The most critical component! The tensioner maintains the correct tension on the serpentine belt. It usually consists of a spring-loaded arm with a pulley. A worn or failing tensioner is a common cause of belt slippage and noise.
- Serpentine Belt: A single, continuous belt made of rubber and reinforced fibers. It transmits power from the crankshaft pulley to all the accessory pulleys.
Diagram Symbols Explained
Understanding the symbols on the serpentine belt diagram is crucial for interpreting it correctly. Here's a breakdown:
- Solid Lines: Indicate the routing of the belt. Follow these lines carefully when installing or inspecting the belt.
- Arrows: Show the direction of belt travel around each pulley.
- Component Symbols: Each accessory (alternator, power steering pump, etc.) is represented by a specific symbol. Familiarize yourself with these symbols to quickly identify each component. Common symbols resemble the shape of the pulley or the component itself.
- Pulley Hatching/Shading: Hatching or shading may indicate the pulley surface that the belt engages with (e.g., ribbed or smooth).
- Tensioner Indicator: The tensioner pulley is often labeled with an arrow indicating the direction to move it to release tension for belt removal and installation.
How It Works
The serpentine belt system operates on a simple principle: rotational force. The crankshaft pulley, directly connected to the engine, rotates when the engine is running. This rotation is transferred to the serpentine belt, which, in turn, drives all the accessory pulleys. The tensioner ensures the belt maintains the correct tension to prevent slippage. Without proper tension, the accessories won't function efficiently, leading to problems like a weak battery (alternator not charging), hard steering (power steering pump not working), or no air conditioning (AC compressor not functioning).
Real-World Use – Basic Troubleshooting Tips
Here are some common issues you might encounter and how the serpentine belt diagram can help you troubleshoot:
- Squealing Noise: Often indicates a loose or worn belt. Check the tensioner and the belt condition. The diagram will help you locate the tensioner and ensure the belt is routed correctly. If the noise persists after tension adjustment, the belt likely needs replacement. Also check if any pulleys are misaligned, which the diagram will not show but knowing the locations of all pulleys will help to isolate the culprit.
- Belt Slippage: Manifests as a loss of power steering, charging issues, or AC problems. Inspect the belt for cracks, wear, or glazing. Ensure the tensioner is functioning correctly. The diagram helps you visualize the entire belt path, making it easier to spot potential problem areas.
- Belt Breakage: A broken belt is a serious issue. Before replacing the belt, identify the cause of the breakage. Common causes include a seized accessory pulley, a worn tensioner, or a misaligned pulley. Use the diagram to check the routing and ensure all pulleys are rotating freely.
- Visual Inspection: Regularly inspect the belt for cracks, fraying, or missing chunks. Refer to the diagram to ensure the belt is properly seated on all pulleys. Pay close attention to the ribbed surface of the belt, as this is where most wear occurs.
Safety – Highlight Risky Components
Working on the serpentine belt system involves inherent risks. Always disconnect the negative battery terminal before starting any work to prevent electrical shock. Key safety considerations include:
- Rotating Parts: The serpentine belt system operates with rapidly rotating parts. Keep hands, tools, and clothing clear of the belt and pulleys when the engine is running.
- Hot Engine: Allow the engine to cool down completely before working on the serpentine belt system to avoid burns.
- Spring-Loaded Tensioner: The tensioner is under considerable spring tension. Use the correct tool (typically a wrench or socket) to relieve the tension carefully. Never release the tensioner abruptly, as it can cause injury. Wear safety glasses when working with the tensioner.
- Belt Debris: A worn or broken belt can send rubber debris flying. Wear safety glasses to protect your eyes.
By understanding the 2010 Mazda 3 serpentine belt diagram, its components, and operational principles, you can confidently tackle a range of maintenance and repair tasks. Remember to always prioritize safety and consult the correct diagram for your specific engine configuration.
We have the serpentine belt diagram file available. You can download the diagram to help you with your repair job.