2010 Mercedes E350 Serpentine Belt Diagram
The serpentine belt, often called the accessory drive belt, is a critical component in your 2010 Mercedes-Benz E350. Understanding its routing and function is essential for routine maintenance, troubleshooting, and even more complex repairs. This article will provide a comprehensive guide to the 2010 E350 serpentine belt diagram, enabling you to confidently tackle related tasks. We've got the diagram itself available for download at the end of this article, making it a valuable resource for your garage.
Purpose of Understanding the Serpentine Belt Diagram
Why bother with the serpentine belt diagram? Several compelling reasons exist:
- Repairs and Replacement: The most obvious reason. If your serpentine belt breaks or needs replacement, correctly routing the new belt is paramount. An incorrectly routed belt will damage the belt itself, fail to drive the accessories properly, and potentially cause serious engine damage.
- Preventative Maintenance: Inspecting the belt's condition and alignment requires knowing where it's supposed to be. This allows you to identify potential problems before they lead to a catastrophic failure.
- Diagnosis of Accessory Issues: If you're experiencing problems with your power steering, air conditioning, or alternator, a misaligned or damaged serpentine belt could be the culprit. The diagram helps you quickly verify proper routing.
- Learning and Understanding: For the DIY enthusiast, understanding the serpentine belt system is a great way to deepen your knowledge of automotive mechanics. It allows you to trace the power flow from the engine to the various accessories.
Key Specs and Main Parts
Before diving into the diagram, let's identify the key components involved in the 2010 E350 serpentine belt system:
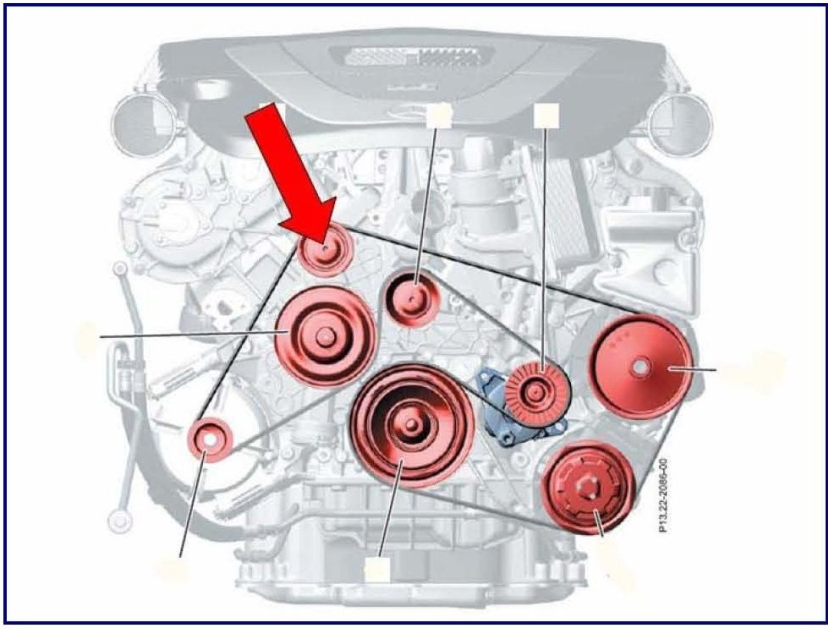
- Crankshaft Pulley: This pulley is directly connected to the engine's crankshaft and is the driving force behind the serpentine belt.
- Alternator Pulley: Driven by the serpentine belt, the alternator generates electrical power for the car's systems.
- Power Steering Pump Pulley: Provides hydraulic pressure for the power steering system, making steering easier.
- Air Conditioning Compressor Pulley: Compresses the refrigerant in the air conditioning system, providing cool air.
- Tensioner Pulley: A spring-loaded pulley that maintains the correct tension on the serpentine belt. This is crucial for preventing slippage and ensuring proper accessory operation. The tensioner itself often incorporates a damper to reduce vibrations and noise.
- Idler Pulley(s): Smooth, unpowered pulleys that guide the serpentine belt around the engine, optimizing its path and preventing it from rubbing against other components.
- Serpentine Belt: The belt itself, typically made of reinforced rubber, transmits power from the crankshaft to the various accessory pulleys.
The 2010 E350 uses a specific belt length. While it's always best to verify the correct part number with your VIN, a typical replacement belt will have a length specified in millimeters (mm) – consult your parts supplier for the exact specification for your engine variant (e.g., with or without A/C, different option packages). Using the correct belt length is critical for proper tensioning.
Understanding Serpentine Belt Diagram Symbols
Serpentine belt diagrams aren't complex, but understanding the symbols is essential:
- Solid Lines: These represent the path of the serpentine belt. Following the line carefully shows you how the belt is routed around the various pulleys.
- Circles: Represent the pulleys. The diagram may label each circle with the corresponding accessory (e.g., ALT for alternator, AC for air conditioning compressor).
- Arrows: Indicate the direction of rotation of each pulley. Pay close attention to these, as they show which side of the belt (smooth or ribbed) contacts the pulley.
- Tensioner Symbol: The tensioner pulley is usually depicted with a spring symbol indicating its spring-loaded mechanism. The diagram will likely show the direction in which to apply leverage to relieve tension for belt removal/installation.
- Ribbed vs. Smooth Surface: The diagram won't explicitly show this, but remember that the ribbed (grooved) side of the belt typically contacts the grooved pulleys (crankshaft, alternator, power steering pump, AC compressor), while the smooth side contacts the smooth pulleys (idler pulley, tensioner pulley).
How It Works: The Serpentine Belt System
The serpentine belt system is a relatively simple yet effective way to power various engine accessories. The crankshaft pulley, directly connected to the engine, provides the rotational force. This force is then transmitted to the serpentine belt, which wraps around the other accessory pulleys. As the crankshaft pulley rotates, it drives the belt, which in turn drives the alternator, power steering pump, and air conditioning compressor.
The tensioner pulley plays a crucial role in maintaining the correct belt tension. Without proper tension, the belt would slip, resulting in reduced accessory performance and premature belt wear. The tensioner automatically adjusts to compensate for belt stretch and engine vibrations, ensuring consistent contact between the belt and pulleys. The spring-loaded mechanism provides a constant force, keeping the belt taut.
Real-World Use and Basic Troubleshooting Tips
Here are some common scenarios where understanding the serpentine belt diagram becomes invaluable:
- Squealing Noise: A squealing noise, especially when starting the engine or turning the steering wheel, often indicates a loose or worn serpentine belt. Check the belt tension and condition. If the belt is glazed (shiny and hard) or cracked, it needs replacement.
- Accessory Malfunctions: If your power steering, air conditioning, or alternator stops working correctly, a broken or slipping serpentine belt could be the cause. Inspect the belt for damage and ensure it's properly routed. Also, check that the pulleys are turning freely.
- Belt Replacement: When replacing the serpentine belt, carefully follow the diagram to ensure correct routing. Incorrect routing can lead to accessory damage and belt failure. Use the correct tools to release the tension on the tensioner pulley.
- Visual Inspection: Regularly inspect the serpentine belt for signs of wear, such as cracks, fraying, glazing, or missing chunks. Early detection of these issues can prevent a complete belt failure.
Safety Considerations
Working on the serpentine belt system involves potential hazards. Always disconnect the negative battery terminal before starting any work to prevent accidental starting of the engine. The engine compartment can be hot, so allow the engine to cool down completely before working on the serpentine belt system.
The tensioner pulley stores significant spring energy. Use the correct tools to relieve the tension, and be careful to avoid pinching your fingers. A sudden release of the tensioner can cause injury.
Ensure that all tools are in good working condition and that you have a clear and well-lit work area. Avoid wearing loose clothing or jewelry that could get caught in the moving parts.
Finally, be aware of the rotating components. Never start the engine with tools or hands near the serpentine belt or pulleys. The rotating parts can cause serious injury.
Now that you're armed with this information, you're better equipped to understand and work on your 2010 Mercedes-Benz E350's serpentine belt system. Remember to always prioritize safety and consult the service manual for specific instructions and torque specifications. Below you can download the specific diagram for your 2010 E350. Good luck!
Download the 2010 Mercedes E350 Serpentine Belt Diagram: [Link to Diagram Here] - Assuming we have a downloadable file. You'll need to substitute this with a real link to the image or PDF.