2010 Mercury Milan Serpentine Belt Diagram
Alright, let's talk about the serpentine belt diagram for your 2010 Mercury Milan. This seemingly simple piece of paper (or, more likely, a digital file these days) is absolutely critical when it comes to servicing and maintaining your vehicle's accessory drive system. Whether you're a seasoned DIYer tackling a belt replacement or just trying to understand how the engine's accessories are powered, knowing how to read and interpret this diagram is essential.
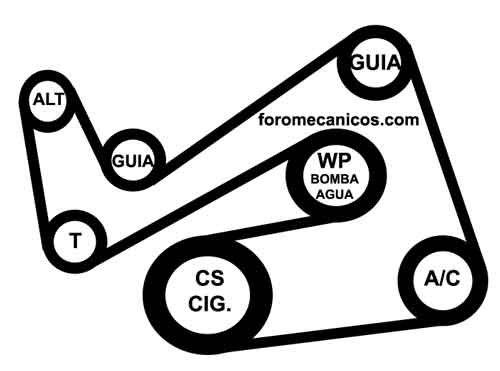
Purpose of the Serpentine Belt Diagram
Why bother with this diagram? Well, the serpentine belt snakes around various pulleys, powering key components like the alternator, power steering pump, air conditioning compressor, and sometimes the water pump. If the belt breaks, you're not just stranded; you're potentially looking at overheating, loss of power steering, and no air conditioning. The diagram serves several crucial purposes:
- Proper Belt Routing: This is the primary function. The diagram shows the precise path the belt must follow around each pulley. Incorrect routing can lead to belt slippage, premature wear, and failure to power the accessories correctly.
- Troubleshooting: It helps diagnose issues like belt noise or accessory malfunctions. By understanding the belt's path and the components it drives, you can isolate the source of the problem.
- Tensioner Identification: The diagram identifies the location and type of belt tensioner used. This is crucial for proper belt installation and tension adjustment.
- Part Identification: It can help you identify the various pulleys and components within the accessory drive system, making it easier to order replacement parts.
- Learning the System: Even if you're not actively working on your car, studying the diagram gives you a better understanding of how the engine's accessories are powered, which is just good general automotive knowledge.
Key Specs and Main Parts
The 2010 Mercury Milan came with a few engine options, primarily the 2.5L Duratec I4 and the 3.0L Duratec V6. While the general principle of the serpentine belt system is the same for both, the specific belt routing and pulley arrangements differ. Therefore, it's crucial to use the correct diagram for your specific engine.
Here's a breakdown of the main components typically found in a 2010 Mercury Milan serpentine belt system:
- Serpentine Belt: A single, long belt made of reinforced rubber that transmits power from the crankshaft pulley to the other accessories.
- Crankshaft Pulley (or Damper): Attached to the crankshaft, this pulley is the driving force behind the entire system.
- Alternator Pulley: Powers the alternator, which charges the battery and provides electrical power to the car.
- Power Steering Pump Pulley: Powers the power steering pump, which provides hydraulic assistance for steering.
- Air Conditioning (A/C) Compressor Pulley: Powers the A/C compressor, which circulates refrigerant to cool the cabin.
- Water Pump Pulley (sometimes): On some engines, the serpentine belt also drives the water pump, which circulates coolant to regulate engine temperature.
- Tensioner Pulley: A spring-loaded pulley that maintains proper tension on the serpentine belt. It's vital for preventing slippage and ensuring optimal accessory performance. There are two main types:
- Automatic Tensioner: Uses a spring mechanism to automatically adjust belt tension.
- Manual Tensioner: Requires manual adjustment to achieve the correct belt tension (less common).
- Idler Pulley: A smooth pulley that helps guide the belt and increase its wrap around other pulleys.
Symbols and Diagram Conventions
Understanding the symbols used in the serpentine belt diagram is key to interpreting it correctly. Here are some common conventions:
- Solid Lines: Represent the path of the serpentine belt. Thicker lines might indicate the "top" or outer surface of the belt.
- Dashed Lines: Often indicate the "back" or inner surface of the belt. This is the side that makes contact with the smooth pulleys.
- Arrows: Indicate the direction of belt rotation. Follow these arrows to understand how the belt wraps around each pulley.
- Component Icons: Each component (alternator, power steering pump, etc.) is represented by a specific icon. These icons are usually labeled with abbreviations (e.g., ALT for alternator, P/S for power steering).
- Tensioner Symbol: The tensioner pulley is usually depicted with a spring symbol to indicate its tensioning mechanism.
- Numbers or Letters: Some diagrams may include numbers or letters to indicate specific points or features, which are then explained in a legend.
Colors are less common, but if present, they might be used to highlight specific sections of the belt path or differentiate between different belt routing options.
How It Works
The serpentine belt system is a relatively simple power transmission system. The crankshaft pulley, driven directly by the engine, is the heart of the system. As the crankshaft rotates, it spins the serpentine belt. The belt, in turn, wraps around and drives the pulleys of the various accessories.
The tensioner pulley plays a critical role in maintaining the correct belt tension. Too much tension can overload the bearings in the accessory components, leading to premature failure. Too little tension can cause the belt to slip, resulting in reduced accessory performance and potential overheating (if the water pump is driven by the belt).
The idler pulley simply guides the belt and increases its contact area with the other pulleys, maximizing power transfer. It doesn't drive any accessories itself.
Real-World Use and Basic Troubleshooting
Here are a few practical ways to use the serpentine belt diagram for troubleshooting:
- Belt Squeal: A squealing belt is a common symptom of slippage. Check the diagram to ensure the belt is properly routed and the tensioner is functioning correctly. If the tensioner is weak or the belt is worn, replace them.
- Accessory Failure: If an accessory (e.g., alternator, power steering pump) stops working, check the diagram to see if it's driven by the serpentine belt. If so, inspect the belt for damage or slippage. Also, check the accessory's pulley for free rotation. A seized pulley can cause the belt to break.
- Belt Replacement: When replacing the serpentine belt, always refer to the diagram to ensure proper routing. It's a good idea to take a picture of the old belt routing before removing it, just in case.
- Visual Inspection: Regularly inspect the serpentine belt for cracks, fraying, or glazing. Any of these signs indicate that the belt needs to be replaced. The diagram helps you identify the belt and its part number for easy ordering.
Safety Considerations
Working on the serpentine belt system can be hazardous if you're not careful. Here are some key safety precautions:
- Disconnect the Battery: Always disconnect the negative battery cable before working on the electrical system. This prevents accidental shorts and potential injury.
- Engine Off and Cool: Never work on the serpentine belt system while the engine is running or hot. The moving parts can cause serious injury, and the hot engine components can burn you.
- Wear Safety Glasses: Protect your eyes from debris and flying particles.
- Keep Hands and Clothing Clear: Keep your hands, clothing, and tools clear of the rotating pulleys and belts.
- Tensioner Spring: Be extremely careful when working with the belt tensioner. The spring can be very strong and could cause injury if released unexpectedly. Use the correct tools to relieve tension.
Be particularly cautious with the Crankshaft Pulley and Belt Tensioner. Accidental contact with a rotating crankshaft pulley can cause severe injury.
Remember, while this guide provides a general overview, always consult the specific repair manual for your 2010 Mercury Milan and your engine type for detailed instructions and torque specifications.
And just so you know, we have a digital copy of the 2010 Mercury Milan serpentine belt diagram available for download. It includes multiple views and detailed information. Contact us, and we'll gladly provide it to you.