2010 Nissan Armada Fuse Box Diagram
For the experienced DIYer, understanding your vehicle's electrical system is crucial. And at the heart of that system lies the fuse box. This article delves into the 2010 Nissan Armada fuse box diagram, providing you with the knowledge to confidently diagnose, repair, and even modify your vehicle's electrical components. Knowing how to interpret and utilize this diagram can save you significant time and money, turning potentially frustrating issues into manageable projects.
Purpose of the Fuse Box Diagram
The fuse box diagram is essentially a roadmap to your Armada's electrical system. It shows the location of each fuse and relay, along with the circuit it protects. It's indispensable for:
- Troubleshooting electrical problems: When a component stops working, the diagram helps you quickly identify and check the corresponding fuse.
- Performing electrical repairs: Knowing the circuit layout allows you to safely disconnect components for repair or replacement.
- Adding aftermarket accessories: Properly tapping into the electrical system for lights, stereos, or other devices requires understanding the existing circuits and their amperage ratings.
- Learning about your vehicle's electrical system: Familiarizing yourself with the diagram gives you a deeper understanding of how various components are interconnected.
Without this diagram, you're essentially flying blind, risking further damage or injury.
Key Specs and Main Parts
The 2010 Nissan Armada typically has two main fuse box locations:
- Interior Fuse Box: Located under the dashboard, usually on the driver's side. This box primarily houses fuses for interior components like the radio, lights, power windows, and accessories.
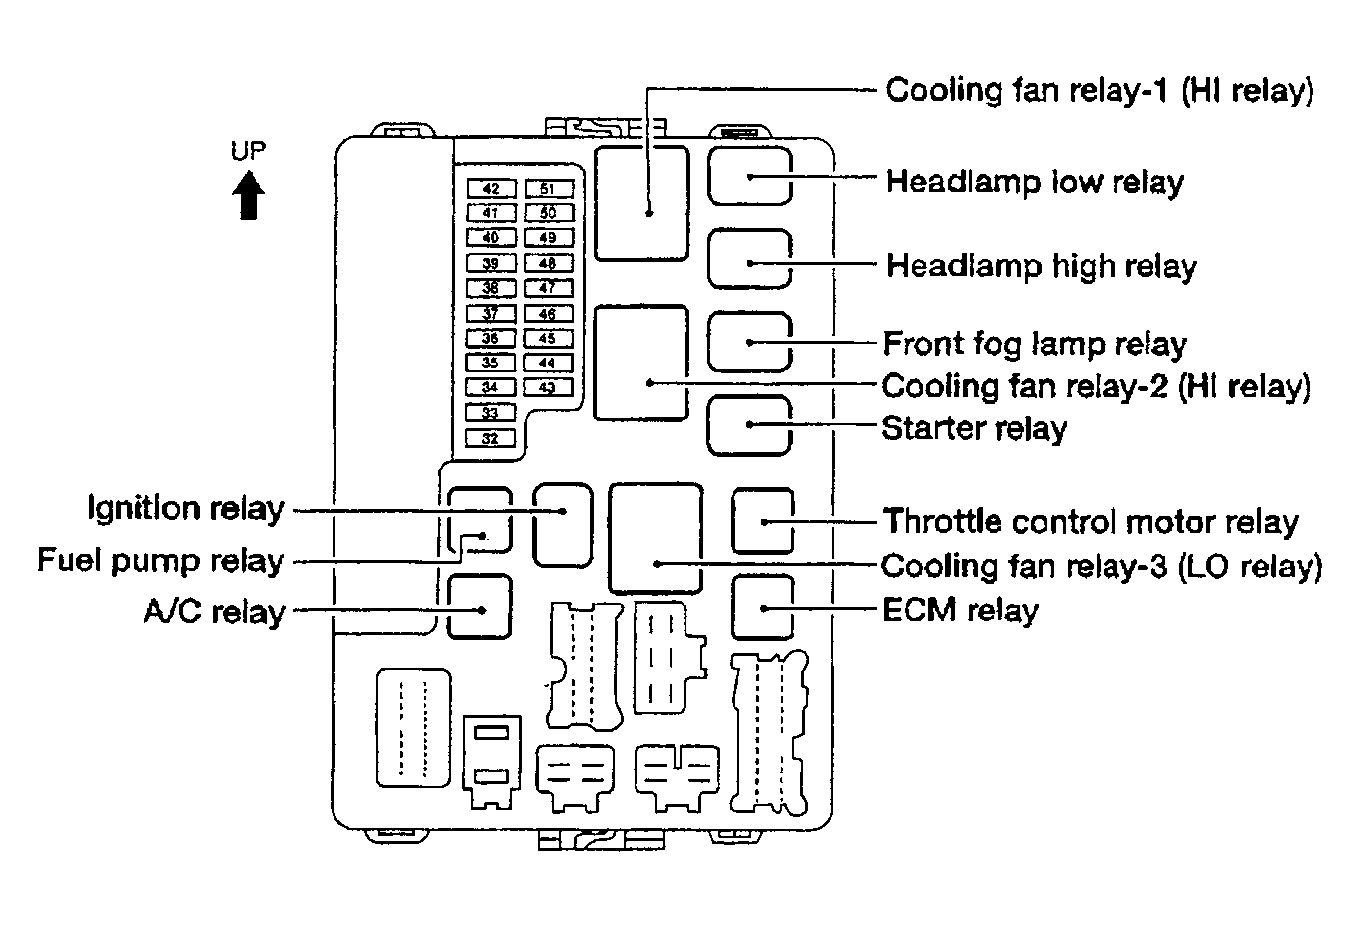
- Engine Compartment Fuse Box: Situated in the engine bay, often near the battery. This box contains fuses and relays for critical engine and vehicle systems like the fuel pump, ignition, ABS, and cooling fans.
Key Components:
- Fuses: Sacrificial devices designed to protect circuits from overcurrent. They contain a thin wire that melts and breaks the circuit when the current exceeds a specified level. Fuses are rated in Amperes (Amps or A), indicating the maximum current they can handle. Common fuse types include blade fuses (ATO, ATC, mini) and cartridge fuses.
- Relays: Electromagnetic switches that allow a low-current circuit to control a high-current circuit. They consist of a coil, contacts, and a spring. When the coil is energized, it creates a magnetic field that pulls the contacts together, completing the circuit. Relays are crucial for controlling components like headlights, starters, and fuel pumps, which require high current.
- Bus Bars: Metal strips used to distribute power from the battery to multiple fuses and relays. They provide a common connection point for various circuits.
- Fuse Box Housing: The plastic enclosure that protects the fuses, relays, and wiring from the environment.
Understanding the Symbols
The fuse box diagram uses various symbols to represent electrical components and connections. Being able to interpret these symbols is critical to understanding the schematic.
- Lines: Represent wires or conductors. A solid line indicates a direct connection, while a dashed line might indicate a shielded cable or a connection on a different circuit board.
- Colors: Wires are often color-coded to identify their function. The diagram should include a color key. Common colors include Red (power), Black (ground), and various other colors for specific circuits (e.g., Blue for headlights, Green for turn signals). Refer to the color key included with the diagram.
- Fuse Symbol: A zigzag line inside a rectangle or a simple line crossing a rectangle. The number next to the symbol indicates the fuse's amperage rating.
- Relay Symbol: Typically represented by a coil symbol and a set of switch contacts. The diagram may also show the relay's pin numbers and their functions (e.g., 30, 85, 86, 87).
- Ground Symbol: Three horizontal lines stacked on top of each other, decreasing in length.
- Component Symbols: Various symbols represent different components like lights, motors, switches, and sensors. Consult the diagram's legend for specific component symbols.
How It Works: A Simple Circuit
Imagine a simple circuit for the Armada's dome light. The circuit begins at the battery (+12V), goes through a fuse (let's say a 10A fuse), then to the dome light switch. From the switch, the circuit goes to the dome light bulb and then finally to ground.
Here's how it works:
- Power from the battery flows through the fuse. If there's a short circuit (e.g., a wire chafes and touches the metal body), the current will surge, and the 10A fuse will blow, breaking the circuit and preventing damage to the wiring and the dome light.
- When you turn on the dome light switch, you complete the circuit, allowing current to flow to the bulb.
- The bulb lights up, and the current then returns to the battery via the ground connection.
The fuse box diagram shows the exact location of the dome light fuse, its amperage rating, and the wiring path. It might also show any relays involved in controlling the dome light (e.g., a relay that dims the light gradually). By tracing the circuit on the diagram, you can pinpoint potential problem areas if the dome light stops working.
Real-World Use: Basic Troubleshooting Tips
Here are some common scenarios where the fuse box diagram comes in handy:
- Blown Fuse: If a component stops working, the first step is to check the corresponding fuse. Use the diagram to locate the fuse, then visually inspect it. A blown fuse will have a broken filament. Replace it with a fuse of the same amperage rating. Never use a fuse with a higher amperage rating; this could cause a fire.
- Relay Problems: If a component intermittently fails or doesn't work at all, the relay might be faulty. You can try swapping the relay with a known good relay of the same type. The diagram can help you locate the relay and identify its function.
- Locating Wiring Harness Connectors: When adding accessories, the diagram may show the location of relevant wiring harness connectors. This simplifies tapping into the correct circuit without cutting or splicing wires unnecessarily.
Troubleshooting Example: Your Armada's radio suddenly stops working. Consult the fuse box diagram, locate the fuse labeled "Radio," and check its condition. If the fuse is blown, replace it. If the radio still doesn't work, the problem may be elsewhere (e.g., the radio itself, the wiring harness, or the ground connection). The diagram can help you trace the wiring and identify potential fault locations.
Safety Precautions
Working with electrical systems can be dangerous. Observe the following safety precautions:
- Disconnect the Battery: Always disconnect the negative terminal of the battery before working on any electrical components. This prevents accidental short circuits and electric shock.
- Use Insulated Tools: Use tools with insulated handles to prevent electric shock.
- Avoid Water: Never work on electrical systems in wet conditions.
- High-Current Circuits: Be extremely cautious when working with circuits that handle high current, such as the starter motor and alternator. These circuits can deliver a dangerous electric shock.
- Airbag Systems: Airbag systems contain explosive charges. Consult a professional before working on or near airbag components. Disconnecting the battery for at least 30 minutes is generally recommended before working on these systems.
A thorough understanding of the 2010 Nissan Armada fuse box diagram can empower you to tackle a wide range of electrical repairs and modifications with confidence. Always double-check your work and consult a professional if you're unsure about any aspect of the electrical system.
We have a copy of the 2010 Nissan Armada fuse box diagram available for download. Use it in conjunction with the information provided in this article for best results.