2010 Nissan Murano Fuse Box Diagram
The 2010 Nissan Murano is a dependable vehicle, but like any machine, it can experience electrical issues. Understanding your vehicle's fuse box diagram is crucial for diagnosing and resolving these problems. This article serves as a comprehensive guide to the 2010 Murano's fuse box, equipping you with the knowledge to perform basic troubleshooting and repairs yourself. Think of this as your technical roadmap to navigating the Murano's electrical system.
Purpose of the Fuse Box Diagram
The fuse box diagram is essentially a key to your Murano's electrical system. It identifies the location of each fuse and relay, and more importantly, specifies which circuit each fuse protects. This is invaluable for several reasons:
- Troubleshooting: When an electrical component malfunctions (e.g., a non-functioning radio, a dead power window), the first step is usually to check the corresponding fuse. The diagram tells you which fuse to examine.
- Repair: Replacing a blown fuse is a simple fix, but only if you know which one to replace. The diagram prevents you from pulling the wrong fuse and potentially causing further issues.
- Modifications: If you're planning to add aftermarket accessories (e.g., a dashcam, auxiliary lights), you'll need to tap into the vehicle's electrical system. The diagram helps you identify suitable circuits and the appropriate fuse rating.
- Learning: Simply studying the diagram can enhance your understanding of how the Murano's electrical systems are organized and interconnected.
Key Specs and Main Parts
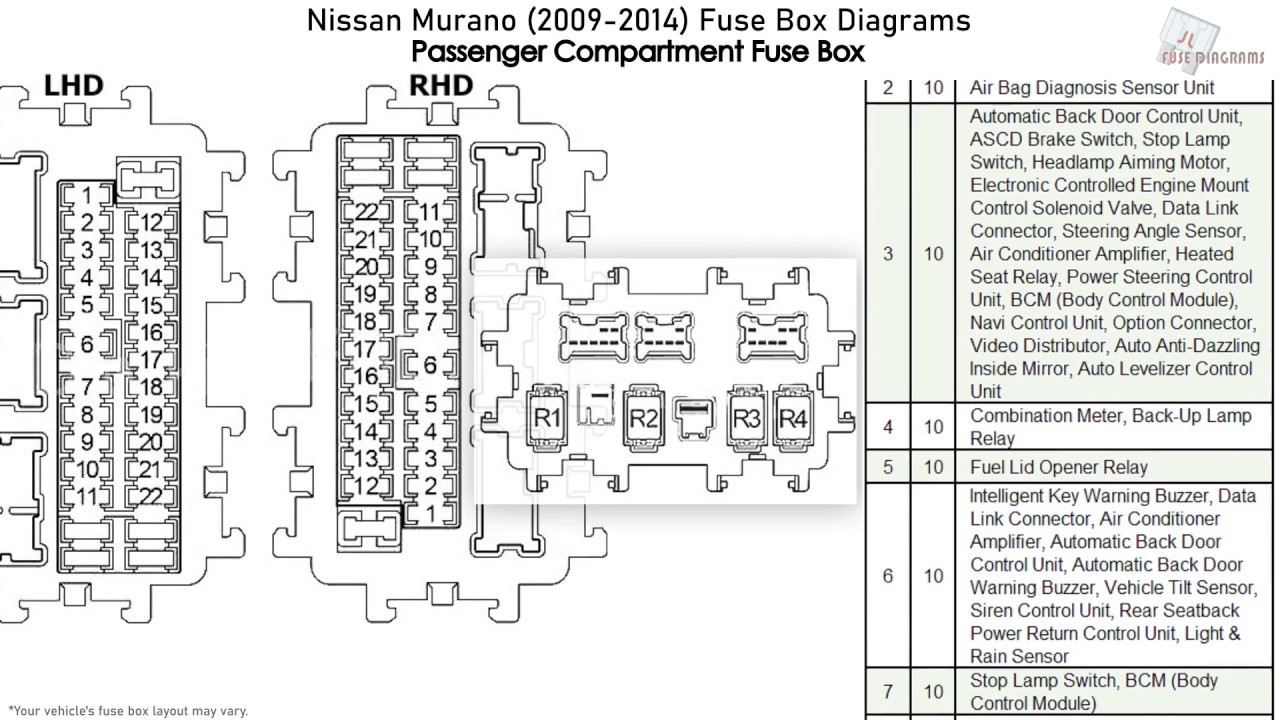
The 2010 Nissan Murano has two main fuse box locations:
- Interior Fuse Box: Located beneath the dashboard on the driver's side. This box typically houses fuses for interior components like the radio, power windows, interior lights, and climate control.
- Engine Compartment Fuse Box: Located in the engine bay, usually near the battery. This box contains fuses for vital engine components like the fuel pump, ignition system, headlights, and starter.
Each fuse box contains several key components:
- Fuses: These are safety devices designed to protect electrical circuits from overcurrent. They contain a thin wire that melts and breaks the circuit if the current exceeds a certain level. Fuses are rated in amperes (A), which indicates the maximum current they can handle. The Murano uses various fuse types, including blade fuses (ATO/ATC), mini-blade fuses, and potentially some cartridge fuses.
- Relays: These are electromechanical switches that control high-current circuits. They use a small control current to switch a larger current on or off. Relays are used for components like the headlights, starter motor, and horn.
- The Fuse Box Housing: This is the plastic enclosure that houses the fuses and relays. It usually has a cover that protects the components from dust and moisture.
- The Fuse Puller: A small plastic tool (often located inside the fuse box) used to safely remove and replace fuses without damaging them.
Symbols, Lines, Colors, and Icons
Understanding the symbols and notations on the fuse box diagram is essential for accurate identification. Here's a breakdown:
- Lines: Solid lines typically represent wires, while dashed lines might indicate ground connections or less critical circuits.
- Colors: Wire colors are often indicated on the diagram using abbreviations (e.g., "BLU" for blue, "RED" for red, "BLK" for black). These colors help you trace wires and identify circuits.
- Icons: The diagram uses icons to represent different electrical components. Some common icons include:
- Fuse Symbol: A stylized representation of a fuse (often a rectangle with a zigzag line).
- Relay Symbol: A rectangle with a coil and a switch contact.
- Headlight Symbol: A stylized representation of a headlight.
- Window Symbol: A stylized representation of a car window.
- Fuse Ratings: Each fuse location is labeled with its amperage rating (e.g., "10A," "20A," "30A"). This indicates the maximum current the fuse can handle. Using a fuse with a higher amperage rating than specified can be dangerous and can lead to electrical fires.
- Component Names: The diagram will also list the name of the component that each fuse protects (e.g., "Radio," "Power Window," "Fuel Pump").
How It Works
The fuse box serves as the central distribution point for electrical power in the Murano. The battery provides the initial power source, which is then distributed to various circuits throughout the vehicle. Each circuit is protected by a fuse. If a short circuit or overcurrent occurs, the fuse blows, interrupting the flow of electricity and preventing damage to the component and wiring. Relays act as electrically controlled switches, allowing low-current circuits to control high-current devices.
Think of it like a series of pipes carrying water. The fuses are like valves that automatically shut off if the water pressure (current) gets too high. The relays are like larger valves that can be controlled remotely by smaller switches.
Real-World Use – Basic Troubleshooting Tips
Here's a simple troubleshooting scenario using the fuse box diagram:
Problem: The radio in your 2010 Murano suddenly stops working.
Solution:
- Consult the Fuse Box Diagram: Locate the interior fuse box diagram (usually printed on the inside of the fuse box cover or in the owner's manual).
- Identify the Radio Fuse: Find the fuse labeled "Radio" or "Audio System" on the diagram. Note its amperage rating.
- Inspect the Fuse: Use the fuse puller to remove the fuse. Examine it closely. A blown fuse will have a broken filament (the thin wire inside the fuse).
- Replace the Fuse: If the fuse is blown, replace it with a new fuse of the exact same amperage rating.
- Test the Radio: Turn on the radio to see if it works. If it does, the problem is solved.
- If the Fuse Blows Again: If the new fuse blows immediately or shortly after being replaced, there is likely a short circuit in the radio circuit. This requires further investigation and may need professional attention.
Safety – Highlight Risky Components
Working with electrical systems can be dangerous. Here are some safety precautions:
- Disconnect the Battery: Before working on any electrical component, disconnect the negative terminal of the battery to prevent accidental shocks or short circuits.
- Use the Correct Fuse Rating: Never replace a fuse with one of a higher amperage rating. This can overload the circuit and cause a fire.
- Don't Work in Wet Conditions: Avoid working on electrical systems in wet or damp conditions.
- If in Doubt, Consult a Professional: If you're not comfortable working on electrical systems, consult a qualified mechanic.
- High-Current Fuses and Relays: Be extra cautious when working with fuses and relays for high-current components like the starter motor, alternator, and headlights. These circuits can carry significant amounts of current and pose a greater risk of shock. Always disconnect the battery.
This guide provides a solid foundation for understanding and using the 2010 Nissan Murano fuse box diagram. Remember to always consult your owner's manual for the most accurate and specific information regarding your vehicle. We have a copy of the 2010 Nissan Murano fuse box diagram available for download, which you can use as a handy reference. Remember, safety first!