2010 Nissan Murano Serpentine Belt Diagram
Alright, let's dive into the serpentine belt diagram for the 2010 Nissan Murano. Understanding this diagram is crucial for various reasons, whether you're tackling routine maintenance, diagnosing a squealing noise, or simply expanding your automotive knowledge. We're going to cover the specifics of the diagram itself, how the system works, and some practical tips for using this information in the real world.
Purpose of the Serpentine Belt Diagram
The serpentine belt diagram serves as a visual roadmap for the serpentine belt system. It's essential for:
- Belt Replacement: Knowing the exact routing is critical for correctly installing a new belt. An incorrectly routed belt can cause components to fail prematurely and prevent proper operation.
- Troubleshooting: If you suspect a problem with the belt or one of the components it drives (alternator, power steering pump, etc.), the diagram helps you quickly identify the components and their location.
- Component Repair/Replacement: When replacing components like the idler pulley or tensioner, the diagram reinforces the belt's correct position for reassembly.
- Understanding System Operation: It allows you to visualize the entire belt system and how each component interacts.
Key Specs and Main Parts of the 2010 Murano Serpentine Belt System
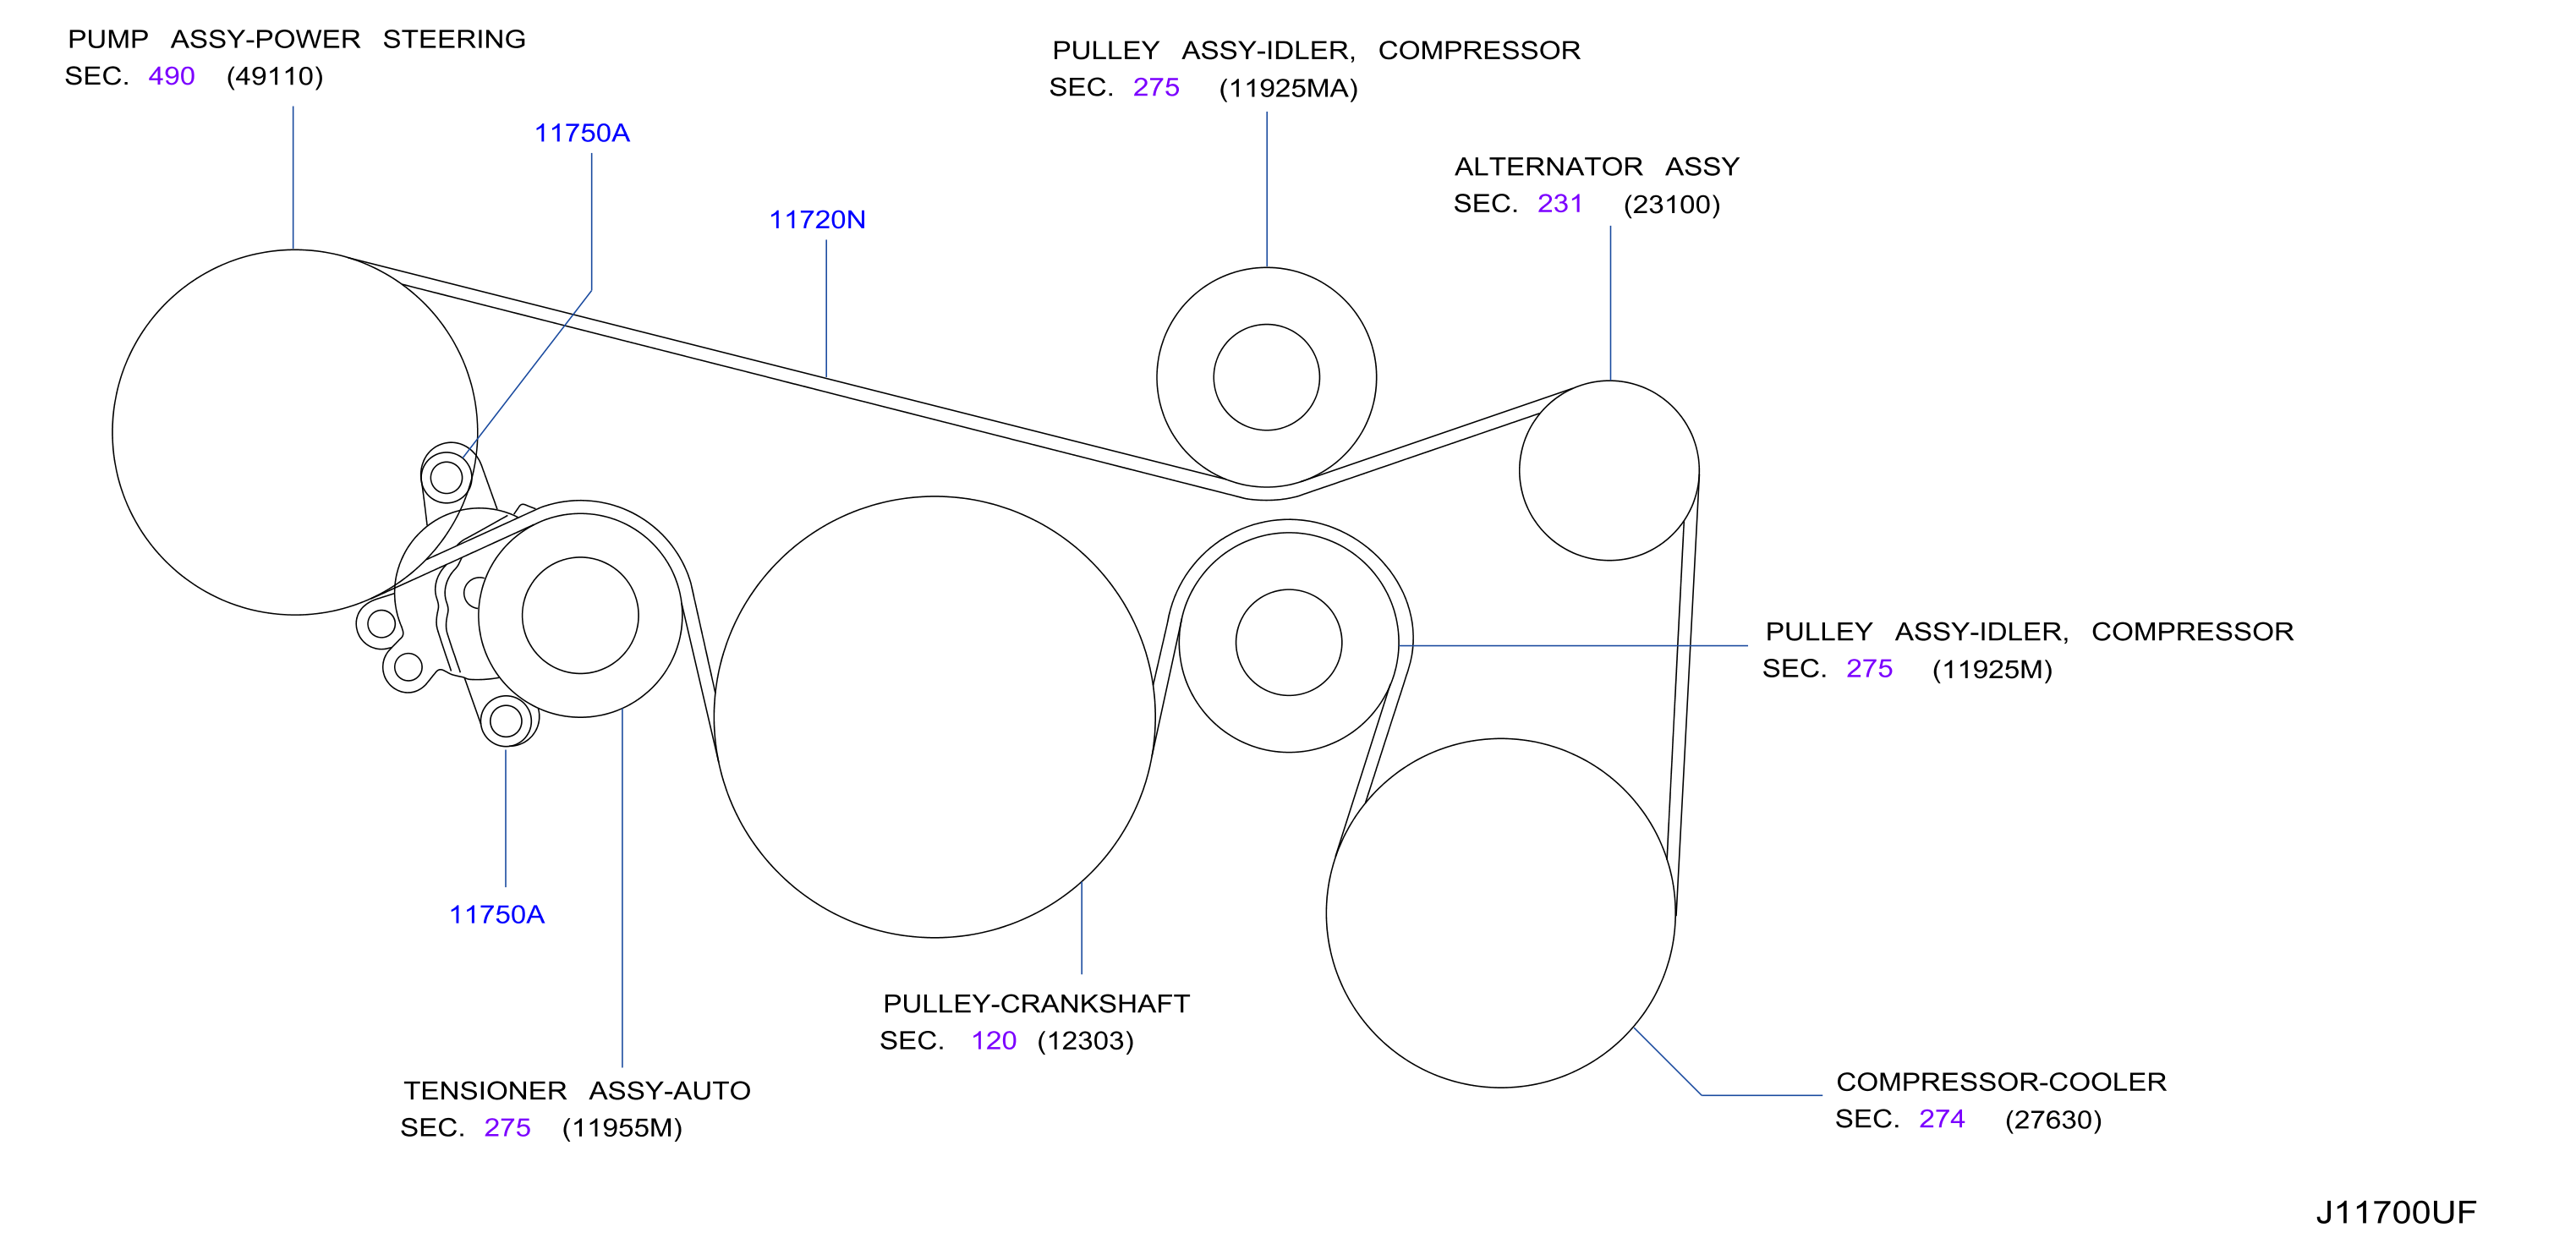
The 2010 Nissan Murano is equipped with a 3.5L V6 engine (VQ35DE). This engine uses a single serpentine belt to drive several critical components. The key parts you'll find in the diagram are:
- Crankshaft Pulley (or Damper): This is the main drive pulley, connected directly to the crankshaft and provides the rotational force for the belt.
- Alternator Pulley: Driven by the serpentine belt, the alternator generates electricity to charge the battery and power the vehicle's electrical system.
- Power Steering Pump Pulley: This pulley drives the power steering pump, which provides hydraulic assistance for steering.
- Air Conditioning (A/C) Compressor Pulley: The A/C compressor is responsible for circulating refrigerant in the air conditioning system.
- Idler Pulley(s): These smooth pulleys guide the belt and maintain the correct tension and routing, often changing the belt's direction.
- Belt Tensioner: A spring-loaded device that maintains proper tension on the serpentine belt. This is critical for preventing slippage and ensuring optimal performance of all driven components. It can be either automatic or manually adjustable. The Murano typically uses an automatic tensioner. A worn tensioner can cause belt slippage and noise.
- Serpentine Belt: A reinforced rubber belt designed to withstand high speeds and constant flexing. It transmits power from the crankshaft pulley to the other components.
The belt length is a crucial specification when replacing the belt. Refer to your vehicle's service manual or a reputable parts supplier for the correct belt length. Using the wrong length can lead to improper tension and premature belt failure.
Understanding the Symbols on the Diagram
The serpentine belt diagram uses specific symbols and line styles to convey information. Here's a breakdown:
- Solid Lines: Represent the path of the front (outer) surface of the serpentine belt.
- Dotted Lines: Represent the path of the back (inner) surface of the serpentine belt. This indicates that the belt is running *behind* the component in the diagram.
- Circles: Represent pulleys. The size of the circle doesn't necessarily reflect the actual size of the pulley.
- Arrows: Indicate the direction of rotation of each pulley. This is important for understanding how the belt is driving each component.
- Component Labels: Each pulley will be labeled with the name of the component it's connected to (e.g., "ALT" for alternator, "P/S" for power steering).
- Tensioner Symbol: The tensioner will be identified with a symbol, often showing an arrow indicating the direction of movement of the tensioner arm.
How the Serpentine Belt System Works
The serpentine belt system is a relatively simple but crucial system. The crankshaft pulley, powered directly by the engine, drives the serpentine belt. The belt, in turn, wraps around the pulleys of the various engine accessories (alternator, power steering pump, A/C compressor, etc.). The friction between the belt and the pulleys transfers the rotational force from the crankshaft to these accessories, allowing them to function. The tensioner pulley maintains the correct tension on the belt, ensuring that it doesn't slip. Insufficient tension results in squealing, reduced accessory performance, and potential overheating. Excessive tension can damage the belt and the accessory bearings.
Real-World Use and Basic Troubleshooting
Here are some scenarios where the serpentine belt diagram becomes invaluable:
- Squealing Noise: A common symptom of a worn, glazed, or loose serpentine belt. Use the diagram to check the belt's condition, routing, and the tensioner's operation. Look for cracks, fraying, or missing chunks on the belt. Also, inspect the pulleys for any signs of damage or misalignment.
- Battery Not Charging: If the alternator isn't being driven properly due to a slipped or broken belt, the battery won't charge. The diagram helps you confirm that the belt is properly routed around the alternator pulley.
- Loss of Power Steering Assist: If the serpentine belt slips or breaks, the power steering pump won't function, resulting in a loss of power steering assist. The diagram will show you the belt's routing around the power steering pump pulley.
- A/C Not Working: Similarly, a slipping or broken belt can prevent the A/C compressor from functioning.
Troubleshooting Tip: Before replacing the belt, check the condition of all pulleys. A damaged or misaligned pulley can quickly destroy a new belt. Spin each pulley by hand (with the engine off!) and listen for any unusual noises or roughness. Wobbling or excessive play indicates a worn bearing.
Safety Precautions
Working on the serpentine belt system involves potential hazards:
- High Temperatures: The engine and exhaust system can be extremely hot. Allow the engine to cool down completely before working on the serpentine belt system.
- Moving Parts: Never work on the serpentine belt system with the engine running. Accidental contact with a moving belt or pulley can cause serious injury.
- Battery Disconnection: Disconnect the negative battery cable before starting any work. This will prevent accidental electrical shocks or damage to electronic components.
- Eye Protection: Wear safety glasses to protect your eyes from debris.
Specifically, the tensioner pulley is under spring tension. When releasing the tension on the belt, the tensioner arm can snap back forcefully. Use the correct tool (typically a serpentine belt tool with the appropriate socket) to carefully release the tension. Avoid placing your fingers or hands in the path of the tensioner arm.
Replacing a serpentine belt on a 2010 Nissan Murano is a manageable DIY project for an experienced DIYer, but always prioritize safety. Refer to your vehicle's service manual for detailed instructions and torque specifications.
We have the serpentine belt diagram available for download in a PDF format. This will provide you with a high-resolution version that you can print out and use while working on your Murano. Just [link to download]. Good luck!