2010 Toyota Camry 2.5 Serpentine Belt Diagram
Alright, let's dive into the serpentine belt diagram for the 2010 Toyota Camry with the 2.5-liter engine. Knowing this layout is crucial whether you're diagnosing a squealing belt, replacing worn components, or just wanting a better understanding of your engine's accessory drive system. This guide will break down the diagram, explaining what each part does and how it all works together.
Purpose of the Serpentine Belt Diagram
Why even bother with this diagram? Simple: it’s your roadmap for the serpentine belt system. Here's why it's important:
- Repair and Replacement: When replacing the serpentine belt itself or any of the components it drives, the diagram shows you the correct belt routing. Incorrect routing can cause serious damage.
- Troubleshooting: If you're hearing squealing, chirping, or seeing a worn belt, the diagram helps you identify potential problem areas, like misaligned pulleys or failing components.
- Maintenance: It allows you to visually inspect the system. You can identify the locations of all pulleys and ensure they're properly aligned and not excessively worn.
- Understanding: For the DIY enthusiast, it's a great way to grasp how the accessory drive system functions and how each component contributes to the car's operation.
Key Specs and Main Parts
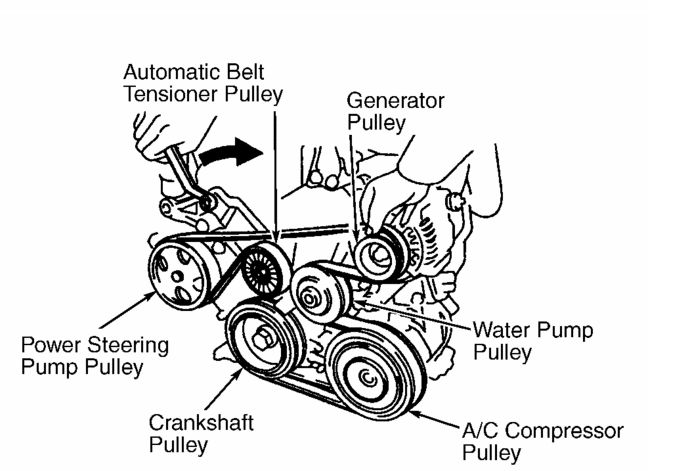
The 2010 Camry 2.5L engine uses a single, multi-ribbed serpentine belt to drive several crucial engine accessories. Here are the key components:
- Crankshaft Pulley (Harmonic Balancer): This is the driving force behind the entire system. Connected directly to the crankshaft, it transfers the engine's rotational energy to the belt.
- Alternator Pulley: The alternator generates electrical power for the car. The serpentine belt spins it, creating the energy needed to charge the battery and power electrical components.
- Air Conditioning (A/C) Compressor Pulley: The A/C compressor is responsible for cooling the cabin. The belt spins the compressor, which pressurizes refrigerant to create cold air.
- Power Steering Pump Pulley: The power steering pump provides hydraulic assistance to make steering easier. The belt drives the pump to maintain pressure in the power steering system.
- Water Pump Pulley: The water pump circulates coolant throughout the engine to prevent overheating. The belt drives the water pump to ensure proper engine cooling.
- Tensioner Pulley (Automatic): This spring-loaded pulley automatically adjusts the belt tension. Proper tension is crucial for efficient operation and preventing slippage. It's arguably one of the most critical components of the system.
- Idler Pulley(s): Some diagrams show one or more idler pulleys. These pulleys provide extra support or redirect the belt's path, often used where space is constrained.
Belt Specifications: While the exact length varies depending on the specific A/C configuration, a common length for the 2010 Camry 2.5L serpentine belt is around 81-82 inches (2057-2083 mm). The belt usually has 6 ribs. Always verify the exact specifications for your vehicle using the owner's manual or a parts catalog. Using the wrong size belt can result in incorrect tension, slippage, and premature wear. The part number is also very important.
Diagram Symbols Explained
The serpentine belt diagram employs standard symbols to represent the various components and belt routing. Understanding these symbols is key to interpreting the diagram correctly:
- Solid Line: A solid line indicates the path of the serpentine belt itself.
- Dashed Line: A dashed line *may* indicate the belt's path on the backside of a pulley (where it's not directly contacting the pulley's grooved surface), or sometimes simply represents an alternative routing path. Always confirm this by visual inspection if possible.
- Circles: Circles represent pulleys. Different sizes of circles often indicate different pulley diameters.
- Arrows: Arrows indicate the direction of rotation of each pulley. This is extremely useful for confirming proper belt routing. Ensure each component rotates in the correct direction based on the crankshaft's rotation.
- Component Icons: The diagram may include small icons representing each component (alternator, A/C compressor, etc.). These are usually labeled with abbreviations (ALT, A/C, P/S, W/P).
- Tensioner Symbol: The tensioner pulley is usually depicted with a spring or curved arrow, indicating its ability to move and maintain belt tension.
How It Works
The serpentine belt system is a relatively simple yet vital mechanism. The crankshaft pulley, powered by the engine, initiates the rotation. The serpentine belt wraps around this pulley, transferring the rotational force to all the other pulleys in the system. The tensioner pulley plays a crucial role in maintaining consistent belt tension, ensuring that all accessories receive adequate power. Too little tension causes slippage and reduced performance; too much tension can damage bearings and shorten belt life.
The serpentine belt's path is carefully engineered to maximize contact with each pulley and efficiently transfer power. The layout must account for the rotational direction of each component. For instance, the alternator and power steering pump usually rotate in the same direction as the crankshaft, while the A/C compressor and water pump *might* rotate in the opposite direction, depending on the specific layout. That is why knowing what is the correct routing is very important.
Real-World Use & Troubleshooting
Let's talk about applying this knowledge to real-world problems:
- Squealing Belt: A common symptom is a squealing noise, especially upon startup or when accelerating. This often indicates a loose belt or glazed belt surface. Inspect the tensioner pulley to ensure it's functioning correctly. Check the belt for cracks, glazing, or excessive wear. If any pulleys are misaligned, the belt can also squeal.
- Belt Slippage: If accessories are not functioning properly (e.g., weak A/C, poor power steering), the belt might be slipping. Check belt tension and inspect for oil or coolant contamination, which can reduce friction.
- Belt Wear: Regularly inspect the belt for cracks, fraying, or missing ribs. Replace the belt if any significant wear is observed. Generally, serpentine belts should be replaced every 60,000 to 100,000 miles, or as specified in the owner's manual.
- Component Failure: A failing component, such as a seized A/C compressor or power steering pump, can put excessive strain on the belt, causing it to break. If you suspect a component is failing, address it promptly to prevent further damage.
- Alignment Issues: Use a straight edge or laser alignment tool to check the alignment of the pulleys. Misaligned pulleys can cause premature belt wear and noise.
Safety First!
Working on the serpentine belt system can be hazardous if you don't take proper precautions. Here's what to keep in mind:
- Disconnect the Battery: Always disconnect the negative battery terminal before working on any electrical components, including the alternator.
- Hot Engine: Never work on the serpentine belt system when the engine is hot. Allow the engine to cool completely before starting any repairs.
- Moving Parts: Keep your hands, hair, and clothing away from the serpentine belt and pulleys when the engine is running. The spinning components can cause serious injury.
- Tensioner Spring: The tensioner pulley is under spring tension. Use the correct tool (usually a wrench or socket) to relieve the tension before removing or installing the belt. Releasing the tensioner improperly can cause it to snap back forcefully, leading to injury.
- Eye Protection: Wear safety glasses to protect your eyes from debris.
We have the full 2010 Toyota Camry 2.5L Serpentine Belt Diagram available as a high-resolution file. You can download it for easy reference during your maintenance or repair work.