2011 Chevy Camaro 3.6 Serpentine Belt Diagram
The serpentine belt in your 2011 Chevy Camaro 3.6L engine is a critical component. It's responsible for powering several essential engine accessories. Understanding its layout and proper routing, therefore, is invaluable for routine maintenance, troubleshooting, and even performance modifications. This article will break down the serpentine belt diagram for your Camaro, offering a detailed explanation tailored for the experienced DIYer.
Purpose: Why You Need This Diagram
A serpentine belt diagram isn't just a pretty picture. It's an indispensable tool when you're tackling any task involving the belt system, including:
- Belt Replacement: The most common use. A correct diagram ensures you route the new belt properly. An incorrectly routed belt will cause accessories to malfunction or fail entirely.
- Troubleshooting: Slipping belts, squealing noises, or non-functioning accessories often point to a belt issue. The diagram allows you to visually inspect the belt's path and identify potential problems, such as a misaligned pulley or a seized component.
- Component Replacement: Replacing the alternator, power steering pump, AC compressor, or idler pulleys requires removing and reinstalling the serpentine belt. The diagram guides you through this process.
- Learning and Understanding: Even if you don't plan on immediate repairs, understanding the serpentine belt system helps you appreciate the engine's complexity and diagnose potential issues early on.
- Performance Upgrades: If you're considering modifications that affect accessory drive, such as an underdrive pulley, understanding the original serpentine belt routing is critical.
Key Specs and Main Parts of the 2011 Camaro 3.6L Serpentine Belt System
The 2011 Camaro 3.6L V6 utilizes a single serpentine belt to drive several essential accessories. The specific layout and components are designed for optimal efficiency and reliability. Here's a breakdown of the key components:
- Crankshaft Pulley (Crank Pulley): Located at the bottom of the engine, driven directly by the crankshaft. It's the driving force of the entire serpentine belt system.
- Alternator Pulley: Powers the alternator, which charges the battery and provides electricity to the vehicle's electrical system.
- Power Steering Pump Pulley: Drives the power steering pump, which provides hydraulic assistance for steering.
- Air Conditioning (AC) Compressor Pulley: Powers the AC compressor, responsible for cooling the cabin.
- Idler Pulley(s): Smooth, non-driven pulleys used to guide the belt and maintain proper tension and wrap angle around other pulleys. They help optimize belt routing.
- Tensioner Pulley: A spring-loaded pulley that automatically maintains proper belt tension. A functional tensioner is vital for belt longevity and accessory performance.
- Water Pump Pulley: Although driven by the belt, in some configurations, the water pump may be driven otherwise. Check the provided diagram for the specific setup on your 2011 Camaro 3.6L.
- Serpentine Belt: The rubber belt itself, designed with multiple ribs to grip the pulleys effectively.
Decoding the Serpentine Belt Diagram: Symbols and Conventions
A serpentine belt diagram isn't just a jumble of lines and circles. It uses specific symbols and conventions to convey information clearly. Here's how to interpret them:
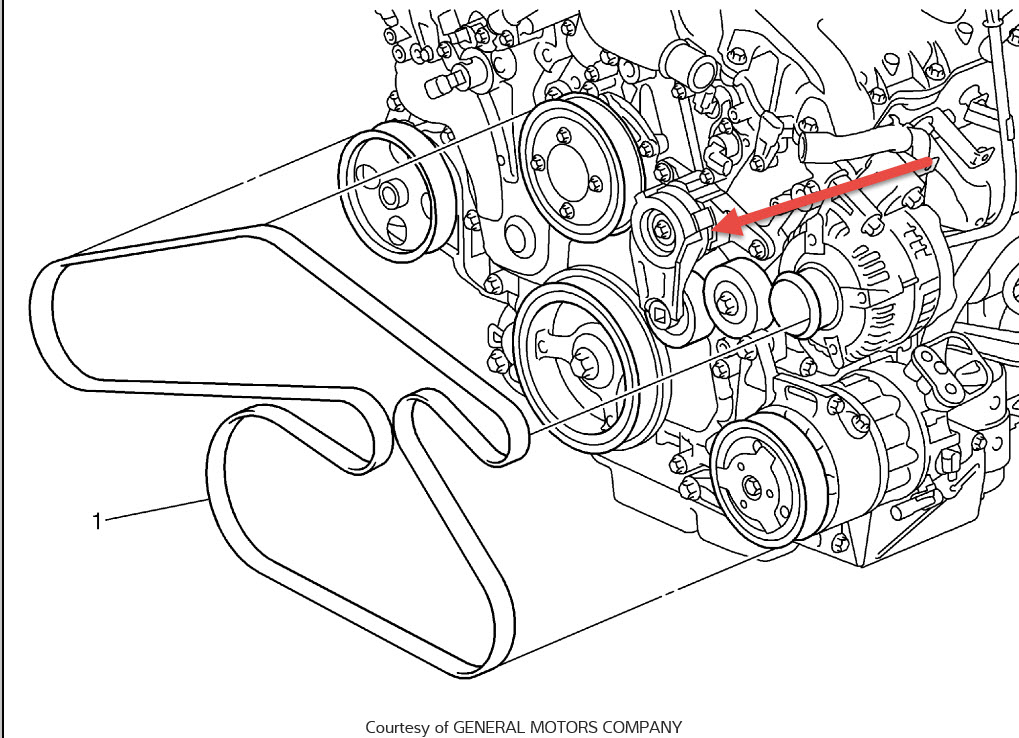
- Solid Lines: Represent the belt's path. Follow these lines carefully to ensure proper routing.
- Arrows: Indicate the direction of belt travel. Make sure the belt travels in the correct direction around each pulley.
- Circles: Represent pulleys. Different sizes may indicate different pulley diameters.
- Shaded or Colored Pulleys: Sometimes, diagrams use shading or color to differentiate between different types of pulleys (e.g., driven vs. idler). Refer to the diagram's legend for specific meanings.
- Text Labels: Clearly label each pulley with its corresponding component (e.g., "ALT" for alternator, "P/S" for power steering).
- Tensioner Indicator: The tensioner is usually depicted with an arrow or a symbol indicating the direction to move it for belt removal or installation.
How the Serpentine Belt System Works
The serpentine belt system operates on a relatively simple principle: power transfer through friction. The crankshaft pulley, driven directly by the engine, spins the serpentine belt. The belt, in turn, wraps around the pulleys of various accessories. The friction between the belt and the pulleys causes the accessories to rotate, powering them.
The tensioner pulley plays a crucial role in maintaining optimal belt tension. As the belt stretches over time or experiences changes in temperature, the tensioner automatically adjusts to keep the belt tight and prevent slippage. Without proper tension, the belt will slip, leading to reduced accessory performance (e.g., weak AC, poor power steering) and eventually, belt failure. The belt will lose the necessary wrap angle which ensures sufficient contact patch to transmit power.
Real-World Use: Basic Troubleshooting Tips
Here are some common problems and how the serpentine belt diagram can help you diagnose them:
- Squealing Noise: Often caused by a slipping belt. Check the diagram to ensure the belt is routed correctly and that the tensioner is functioning properly. Inspect the belt for cracks, glazing, or fraying. A loose belt, worn belt, or contaminated pulleys are common causes.
- Accessory Malfunction: If a specific accessory isn't working (e.g., AC not cooling, power steering not assisting), check the diagram to see if the belt is properly routed around that accessory's pulley. Also, ensure the belt isn't broken or severely damaged.
- Belt Wear or Damage: Inspect the belt regularly for signs of wear, such as cracks, fraying, or missing ribs. The diagram can help you identify areas of high stress where wear might be more pronounced. A misaligned pulley can cause abnormal wear on one side of the belt.
- Belt Jumps Off Pulleys: This could be caused by a seized pulley, a worn tensioner, or an obstruction in the belt path. The diagram will let you check that all components are where they should be.
Safety Considerations
Working on the serpentine belt system can be hazardous if you don't take proper precautions:
- Disconnect the Battery: Always disconnect the negative battery terminal before working on any electrical components, including the alternator.
- Hot Engine: Allow the engine to cool down completely before working on the serpentine belt system. Components can get extremely hot.
- Moving Parts: Keep your hands and clothing away from moving parts when the engine is running. The serpentine belt can cause serious injury.
- Tensioner Spring: The tensioner spring is under considerable pressure. Use the correct tools and techniques to release the tension safely. Refer to the service manual for specific instructions.
Remember, safety is paramount. If you're not comfortable performing these tasks, it's always best to consult a qualified mechanic.
We have the serpentine belt diagram file. Contact us to download it.