2011 Chevy Equinox Serpentine Belt Diagram
For the intermediate DIYer, knowing the serpentine belt routing for your 2011 Chevy Equinox is essential. This guide provides a detailed breakdown of the serpentine belt diagram, its components, and how to use it effectively for maintenance and repairs. We'll cover everything from understanding the diagram's symbols to practical troubleshooting tips, ensuring you're well-equipped to handle this important aspect of your vehicle's upkeep.
Purpose of the Serpentine Belt Diagram
The serpentine belt diagram is your roadmap for understanding how the serpentine belt is routed around the various engine accessories in your 2011 Chevy Equinox. It's crucial for several reasons:
- Belt Replacement: When replacing a worn or broken serpentine belt, the diagram ensures you route the new belt correctly. Incorrect routing can lead to accessory malfunction, belt slippage, and even engine damage.
- Troubleshooting: The diagram helps diagnose issues related to the belt and its driven components. For instance, squealing noises can often be traced back to belt tension, alignment, or a failing pulley.
- Preventative Maintenance: Understanding the belt's path allows for proper inspection of pulleys, idlers, and the tensioner, preventing unexpected breakdowns.
- Learning and Understanding: Studying the diagram provides a deeper understanding of how your engine's accessories are powered, enhancing your overall automotive knowledge.
Key Specs and Main Parts
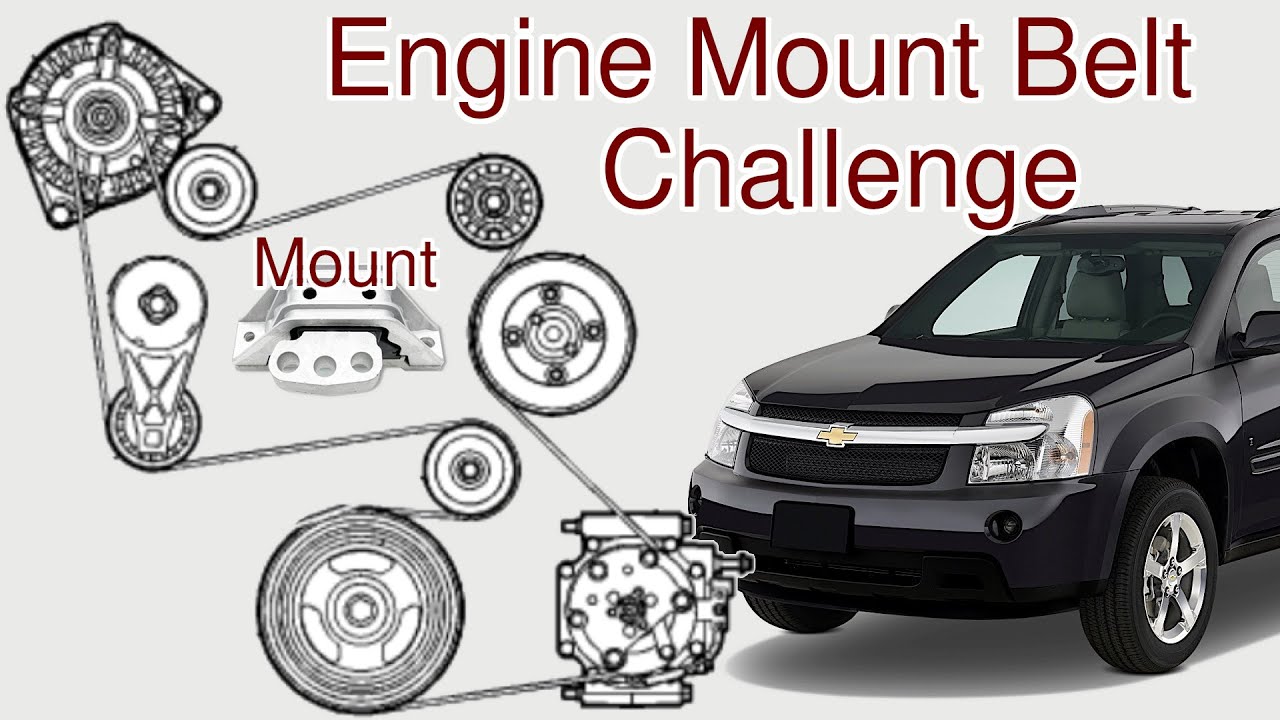
The serpentine belt system on your 2011 Equinox consists of several key components, all driven by a single, continuous belt. Knowing these components is crucial for interpreting the diagram and performing repairs. The 2011 Equinox typically used a 6PK or 7PK belt, depending on the engine (2.4L or 3.0L respectively). This designation refers to the number of "ribs" or "grooves" on the belt itself. Always verify the correct belt number for your specific engine.
Here's a breakdown of the key components:
- Crankshaft Pulley (or Harmonic Balancer): The heart of the system. Bolted to the crankshaft, it transfers the engine's rotational force to the serpentine belt.
- Alternator Pulley: Driven by the belt, the alternator generates electrical power for the vehicle's systems.
- Power Steering Pump Pulley: If your Equinox has hydraulic power steering (some models have electric power steering), the pump, driven by this pulley, provides assistance for steering.
- Air Conditioning Compressor Pulley: The A/C compressor compresses refrigerant to provide cooling.
- Idler Pulleys: Smooth, bearing-equipped pulleys that guide the belt around the engine. They maintain proper belt alignment and wrap angle on other pulleys.
- Belt Tensioner: A spring-loaded device that maintains the correct tension on the serpentine belt. This is *critical* for proper operation and prevents slippage. A failing tensioner is a common cause of belt noise and premature wear. The tensioner typically includes a pulley.
- Water Pump Pulley: Driven by the belt, the water pump circulates coolant throughout the engine to regulate temperature.
Decoding the Symbols on the Serpentine Belt Diagram
Serpentine belt diagrams use a standardized set of symbols to represent the components and belt routing. Here’s how to interpret them:
- Solid Lines: A solid line represents the portion of the serpentine belt that is in contact with a pulley. This indicates the belt is actively driving the accessory.
- Dotted Lines: A dotted or dashed line typically indicates the back side of the belt – the side that is *not* in contact with a pulley. It shows the belt’s path as it wraps around various components.
- Circles: Circles represent pulleys. A circle labeled with "ALT" signifies the alternator pulley, "P/S" for power steering, "A/C" for the air conditioning compressor, and "CRANK" for the crankshaft pulley.
- Arrows: Arrows indicate the direction of belt rotation. This is crucial when verifying the correct routing.
- Tensioner Symbol: The tensioner is often depicted as a spring symbol or a parallelogram with an arrow indicating the direction of its tension.
Some diagrams may use color-coding to further differentiate between belt sections, but this is less common. The key is to focus on the line types (solid vs. dotted) and the component labels.
How the Serpentine Belt System Works
The serpentine belt system is a clever and efficient design. The crankshaft pulley, connected directly to the engine's crankshaft, acts as the primary driver. As the engine turns, the crankshaft pulley rotates, transferring that rotational force to the serpentine belt. The belt, in turn, wraps around and drives all the other accessory pulleys (alternator, power steering pump, A/C compressor, water pump, etc.).
The belt tensioner plays a crucial role by maintaining the correct amount of tension on the belt. Too little tension causes slippage, resulting in reduced accessory performance and potential damage. Too much tension can overload bearings and shorten belt life. The spring-loaded tensioner automatically adjusts to compensate for belt stretch and wear, ensuring optimal performance.
The idler pulleys simply guide the belt along the desired path, ensuring sufficient wrap angle on each driven pulley for maximum grip and power transfer. Without them, the belt might slip or not make sufficient contact with the accessories to drive them effectively.
Real-World Use: Basic Troubleshooting
Here are a few common issues you might encounter and how the serpentine belt diagram can help:
- Squealing Noise: A squealing noise, especially when the engine is first started or under load, often indicates a slipping belt. Check the belt tension. If the tensioner is at its limit, the belt may be worn and need replacement. Also, inspect the pulleys for signs of wear or damage. Misalignment of the pulleys can also cause squealing.
- Battery Not Charging: If the alternator isn't being driven properly due to a slipping or broken belt, the battery won't charge. Verify the belt is intact and properly routed around the alternator pulley. A failing tensioner can also cause this issue.
- Loss of Power Steering: If the power steering pump pulley isn't being driven, you'll experience a loss of power steering assistance. Again, check the belt's condition and routing.
- Overheating: If the water pump pulley isn't being driven, the engine can overheat. Immediately check the belt's integrity and routing.
- Visual Inspection: Regularly inspect the belt for cracks, fraying, or missing chunks. Replace the belt immediately if you find any of these signs. Also, observe the belt while the engine is running. Excessive vibration or "wobbling" can indicate a failing tensioner or a misaligned pulley.
Safety Considerations
Working on the serpentine belt system involves several safety risks. Always disconnect the negative battery cable before starting any work. The engine compartment contains many moving parts that can cause serious injury.
- Moving Parts: Never put your hands or tools near the serpentine belt while the engine is running.
- Hot Surfaces: The engine and exhaust components can be extremely hot, even after the engine has been off for a while. Allow sufficient time for cooling before working in the engine compartment.
- Tensioner Spring: The belt tensioner is under considerable spring pressure. Use the correct tool (typically a wrench or socket on the tensioner pulley) to relieve the tension before removing the belt. Releasing the tension incorrectly can cause the tool to slip and potentially injure you.
- Eye Protection: Always wear safety glasses to protect your eyes from debris.
Remember, if you're uncomfortable performing any of these tasks, it's always best to consult a qualified mechanic.
We have a downloadable version of the 2011 Chevy Equinox Serpentine Belt Diagram available. Having this file readily accessible can be a valuable resource for your maintenance and repair endeavors.