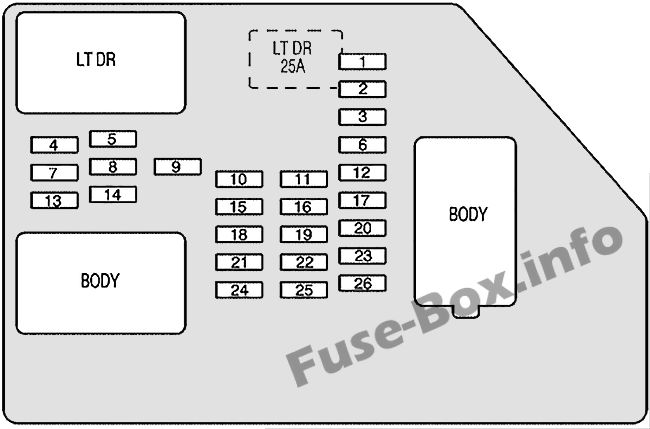
2011 Chevy Suburban Fuse Box Diagram
The 2011 Chevy Suburban, a full-size SUV, is a workhorse. But like any complex machine, it relies on a well-organized electrical system, and at the heart of that system is the fuse box. Understanding the 2011 Chevy Suburban fuse box diagram is crucial for anyone looking to perform DIY repairs, add aftermarket accessories, or simply gain a deeper understanding of their vehicle's electrical workings.
Purpose of the Fuse Box Diagram
The fuse box diagram is essentially a map of your Suburban's electrical safety net. It allows you to quickly identify which fuse protects which circuit. Without it, diagnosing electrical problems becomes a frustrating process of trial and error. The diagram is vital for:
- Troubleshooting electrical issues: Is your radio not working? Tail lights out? The fuse box diagram will point you to the likely culprit.
- Replacing blown fuses: Identifying the correct fuse is critical to avoid damaging other components.
- Installing aftermarket accessories: Knowing which circuits are available and their amperage rating is essential for safe and effective accessory installation (e.g., adding a sound system, lights, or a trailer brake controller).
- Understanding vehicle systems: Studying the fuse box diagram provides insight into how different electrical systems are interconnected.
Key Specs and Main Parts
The 2011 Chevy Suburban typically has three main fuse box locations:
- Underhood Fuse Box: Located in the engine compartment, this box houses high-amperage fuses and relays that protect critical engine and chassis components, such as the starter, alternator, ABS system, and cooling fan. It's usually a black plastic enclosure with a hinged lid.
- Instrument Panel Fuse Box: Found inside the cabin, often on the driver's side, tucked away beneath the dashboard. This box protects circuits related to interior electronics, such as the radio, power windows, power locks, instrument cluster, and climate control system.
- Rear Fuse Box (optional): Some models might have an additional fuse box located in the rear cargo area. This is less common but may house fuses related to rear power outlets or entertainment systems.
Inside each fuse box, you'll find:
- Fuses: These are the sacrificial components that protect circuits from overcurrent. They come in various amperage ratings, typically indicated by a number printed on the fuse. Common fuse types in the 2011 Suburban include blade-type (ATO/ATC), mini-blade, and cartridge fuses.
- Relays: These are electromechanical switches that allow a low-current circuit to control a high-current circuit. They are used for components like headlights, fuel pump, and horn.
- Fuse Puller: A small plastic tool (often integrated into the fuse box lid) used to safely remove fuses without damaging them or the fuse box.
Symbols – Understanding the Diagram
Fuse box diagrams aren't just lists of numbers; they use a combination of numbers, letters, and symbols to identify each fuse and its corresponding circuit. Here's a breakdown:
- Fuse Number/Label: Each fuse location is assigned a unique number or code (e.g., F1, F2, IGN E, BATT). This number corresponds directly to the fuse's designation in the diagram.
- Circuit Description: A brief description of the circuit protected by the fuse (e.g., "Radio," "Power Windows," "Fuel Pump").
- Amperage Rating: The maximum current (measured in Amperes or Amps) that the fuse can handle before blowing. This is crucial for replacement. Using a fuse with a higher amperage than specified can damage the circuit.
- Lines and Connections: The diagram will use lines to represent electrical connections and the path of current flow.
- Color Coding (less common but possible): Sometimes, the diagram might use color coding to differentiate between different types of circuits (e.g., power, ground, signal). However, the 2011 Suburban diagrams typically rely more on labels.
- Icons: Certain icons might be used to represent specific components. For example, a lightbulb icon might indicate a fuse protecting exterior lights.
How It Works
The fuse box works by providing a centralized location for fuses, which are connected in series with the circuits they protect. An electrical circuit is a complete path that allows electricity to flow from a power source (like the battery) to a device (like a lightbulb) and back. A fuse is a deliberately weak point in that circuit. It contains a thin strip of metal designed to melt and break the circuit if the current exceeds a safe level. This overcurrent can be caused by a short circuit (where electricity bypasses the intended path and flows directly to ground) or by an overload (where too many devices are drawing power from the same circuit). When the fuse blows, it interrupts the flow of electricity, preventing damage to the protected component and potentially preventing a fire.
The relays are controlled by the vehicle's electronic control modules (ECMs) or switches. When a relay is activated, it closes a high-current circuit, allowing power to flow to a device that requires a significant amount of current, like the starter motor or the headlights. This system protects the control module from being overloaded.
Real-World Use – Basic Troubleshooting Tips
Here's a basic troubleshooting scenario:
- Identify the Problem: For example, your radio isn't working.
- Consult the Fuse Box Diagram: Locate the instrument panel fuse box diagram (usually inside the cover of the fuse box itself or in the owner's manual). Identify the fuse labeled "Radio."
- Inspect the Fuse: Use the fuse puller to carefully remove the fuse. Examine the fuse's element. If the element is broken or blackened, the fuse is blown.
- Replace the Fuse: Replace the blown fuse with a new fuse of the exact same amperage rating. Using a higher amperage fuse can damage the circuit.
- Test the Circuit: Turn on the radio. If it works, the problem is solved. If the fuse blows again immediately, there is likely a short circuit in the radio wiring or the radio itself. This will likely need professional diagnosis.
Important: If a fuse repeatedly blows, don't just keep replacing it with higher and higher amperage fuses. This is a dangerous practice that can cause serious damage and potentially start a fire. Take the vehicle to a qualified mechanic to diagnose the underlying problem.
Safety – Risky Components
Working with automotive electrical systems can be dangerous. Here are some crucial safety precautions:
- Disconnect the Battery: Before working on any electrical components, disconnect the negative (-) battery cable. This prevents accidental short circuits and electrical shocks. Use proper insulated tools.
- High-Amperage Circuits: Be extremely careful when working with high-amperage circuits, such as the starter or alternator circuits. These circuits can deliver a large amount of current, which can cause serious burns or even death.
- Airbag Circuits: Avoid disturbing any wiring or components related to the airbag system. Airbags can deploy unexpectedly if triggered, causing serious injury. If you suspect a problem with the airbag system, take the vehicle to a qualified mechanic.
- Never Bypass a Fuse: Do not use a piece of wire or other conductive material to bypass a fuse. This defeats the purpose of the fuse and can cause a fire.
- Read the Diagram Carefully: Ensure you understand the diagram before you begin working. If in doubt, consult a qualified mechanic.
- Work in a Well-Lit Area: Good lighting is essential for safe and accurate work.
The 2011 Chevy Suburban fuse box diagram is your essential guide to understanding and maintaining your vehicle's electrical system. By understanding how the fuse box works and following proper safety precautions, you can confidently tackle many common electrical repairs and upgrades.
We have the complete 2011 Chevy Suburban fuse box diagram available for download. It includes detailed layouts for all three fuse box locations, circuit descriptions, and amperage ratings. Download it now to have it readily available for your next automotive project!