2011 Chevy Traverse 3.6 Serpentine Belt Diagram
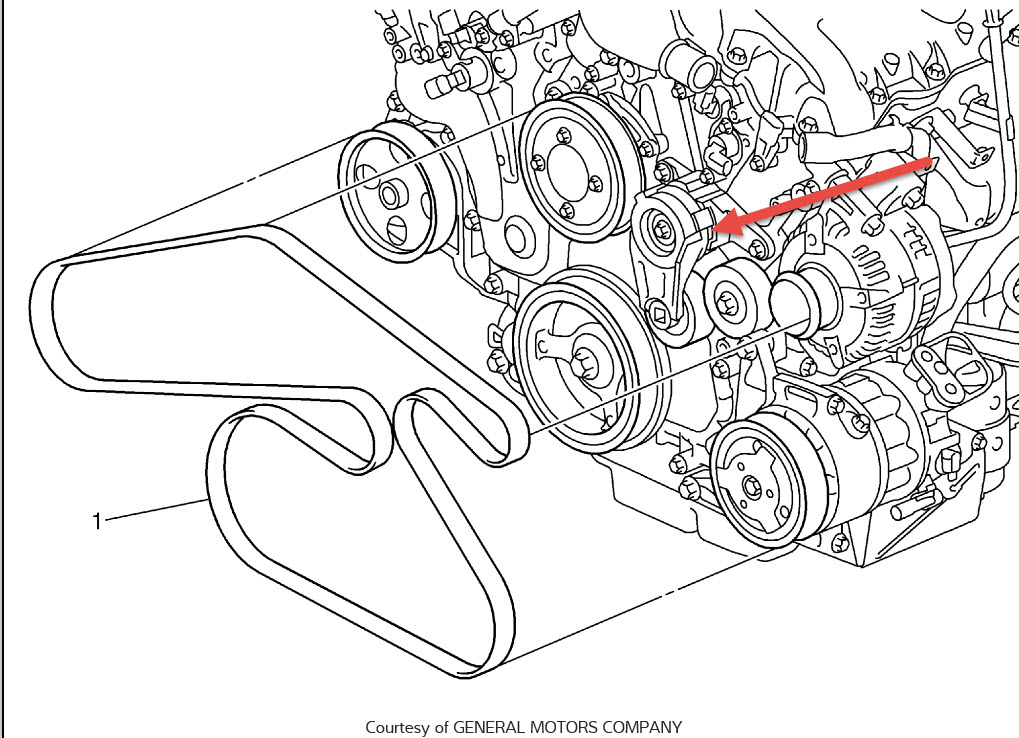
Alright, let's dive into the serpentine belt diagram for the 2011 Chevy Traverse with the 3.6L engine. This isn't just some pretty picture; it's your roadmap to understanding, maintaining, and potentially fixing the accessory drive system in your vehicle. Whether you're replacing a worn belt, diagnosing a squealing noise, or just want to know your engine a little better, this guide will break down everything you need to know.
Purpose: Why Bother with a Serpentine Belt Diagram?
The serpentine belt is a critical component, responsible for driving various engine accessories. A malfunctioning or broken belt can lead to serious problems. Here's why understanding the diagram is essential:
- Repair and Replacement: The primary reason. If your belt snaps or shows significant wear, you'll need to replace it. The diagram shows the correct routing, ensuring the new belt is properly installed.
- Troubleshooting: A squealing or chirping noise often indicates a problem with the belt, tensioner, or one of the driven accessories. The diagram helps pinpoint the possible source of the issue.
- Preventative Maintenance: Knowing the belt's path allows you to visually inspect it for cracks, fraying, or glazing, enabling proactive maintenance and preventing breakdowns.
- Accessory Replacement: Replacing an alternator, power steering pump, or AC compressor often requires removing the serpentine belt. The diagram ensures you reinstall it correctly.
- General Knowledge: Simply understanding how your engine works enhances your overall automotive knowledge and empowers you to perform more maintenance tasks yourself.
Key Specs and Main Parts
The 2011 Chevy Traverse 3.6L uses a single serpentine belt to drive the following accessories:
- Crankshaft Pulley (Damper): This is the driving force of the whole system. It's connected directly to the engine's crankshaft and transfers rotational power to the belt.
- Alternator: Generates electrical power to charge the battery and run electrical components.
- Power Steering Pump: Provides hydraulic pressure to assist steering.
- Air Conditioning (AC) Compressor: Compresses refrigerant for the air conditioning system.
- Water Pump: Circulates coolant through the engine to prevent overheating.
- Tensioner Pulley (Automatic Belt Tensioner): Maintains proper belt tension. This is usually spring-loaded and automatically adjusts to compensate for belt stretch and wear. A crucial part for proper operation and belt life.
- Idler Pulley(s): Smooth, unpowered pulleys that guide the belt and optimize its wrap angle around other pulleys. They are *not* powered.
Belt Specification: While specific belt length can vary slightly by manufacturer, you're generally looking at a multi-ribbed belt around 91-92 inches in length (actual length will be stamped on the old belt or listed in your owner's manual or auto parts store database). Check with your local auto parts store using your VIN for the correct replacement belt. Using the incorrect belt size can cause serious problems!
Symbols, Lines and Icons
Understanding the diagram's symbology is critical for accurate interpretation:
- Solid Lines: Represent the path of the outer surface of the belt. This is the side with the ribs.
- Dashed Lines: Often used, although less common on modern serpentine belt diagrams, they *might* indicate the path of the *inner* (smooth) surface of the belt, but more likely denote components that are *behind* others in the diagram for clarity. The solid lines are what you really need to follow.
- Arrows: Indicate the direction of belt travel around each pulley. This is crucial to verify proper routing!
- Pulley Icons: Each pulley is represented by a circle or stylized drawing. They are usually labeled with abbreviations: ALT (Alternator), P/S (Power Steering), AC (Air Conditioning), WP (Water Pump), CRK (Crankshaft), TENS (Tensioner), IDLR (Idler).
- Component Outlines: Larger components like the engine block or accessory mounting brackets may be outlined to provide context.
Color Coding: While not always present, some diagrams may use color to differentiate between belt sections or highlight specific components. Consult the diagram's legend if color is used.
How It Works
The serpentine belt system is relatively straightforward in principle. The crankshaft pulley, driven by the engine, rotates, transferring its rotational energy to the serpentine belt. The belt, in turn, drives all the accessories by wrapping around their respective pulleys. The tensioner pulley maintains adequate tension on the belt to prevent slippage and ensure efficient power transfer. The idler pulley is crucial for properly wrapping the belt around the necessary driven components to avoid slippage.
Think of it like a series of gears linked by a rubber band. If the band is too loose (low tension), the gears won't turn properly. If the band is worn or broken, the system fails entirely.
Real-World Use: Basic Troubleshooting
Here's how the diagram can help with common issues:
- Squealing Noise: Usually indicates belt slippage. Check the belt tensioner. If the tensioner arm is bouncing excessively, it may be faulty. Also, inspect the belt itself for wear, glazing (shiny surface), or contamination (oil or coolant). Refer to the diagram to check if the belt is routed correctly.
- Broken Belt: First, identify why the belt broke. Was the tensioner seized? Was a pulley misaligned? Was the water pump locked up? Replacing the belt without addressing the root cause will only lead to another failure. The diagram helps you visually inspect each component in the system for potential issues.
- Accessory Malfunction: If an accessory (e.g., the alternator) isn't working, don't immediately assume it's faulty. Check the belt tension and condition first. A slipping belt can prevent the accessory from spinning at the required speed. Use the diagram to verify the belt's routing around the accessory pulley.
- Belt Installation: After replacing the belt, double-check the routing against the diagram *before* starting the engine. An incorrectly routed belt can cause damage to the accessories or the engine itself.
Safety Considerations
Working on the serpentine belt system can be dangerous:
- Hot Engine: Always allow the engine to cool completely before working on the belt system. Touching hot engine components can cause severe burns.
- Moving Parts: Never work on the belt system with the engine running. The belt and pulleys can cause serious injury.
- Battery Disconnection: Disconnect the negative battery cable before working on any electrical components, including the alternator.
- Tensioner Spring: The belt tensioner is spring-loaded and can snap back with considerable force. Use the correct tools (usually a wrench or socket) to relieve the tension before removing or installing the belt.
- Proper Tools: Use the correct tools for the job. Forcing bolts or pulleys can damage components.
Specifically, when working around the crankshaft pulley, be *extremely* careful. An accidental slip could result in serious injury from contact with the spinning engine.
Remember, if you're uncomfortable performing any of these procedures, consult a qualified mechanic.
We have a high-resolution serpentine belt diagram available for download to help you further with your repairs or maintenance. This diagram provides a clear visual reference for your 2011 Chevy Traverse 3.6L engine. Just let me know you need it.