2011 Dodge Journey Serpentine Belt Diagram
For the intermediate car owner tackling maintenance or repairs on their 2011 Dodge Journey, understanding the serpentine belt system is crucial. This article provides a detailed breakdown of the 2011 Dodge Journey Serpentine Belt Diagram, empowering you to confidently diagnose, maintain, and potentially replace the belt yourself. This knowledge is invaluable, saving you money and providing a deeper understanding of your vehicle's inner workings.
Purpose of the Serpentine Belt Diagram
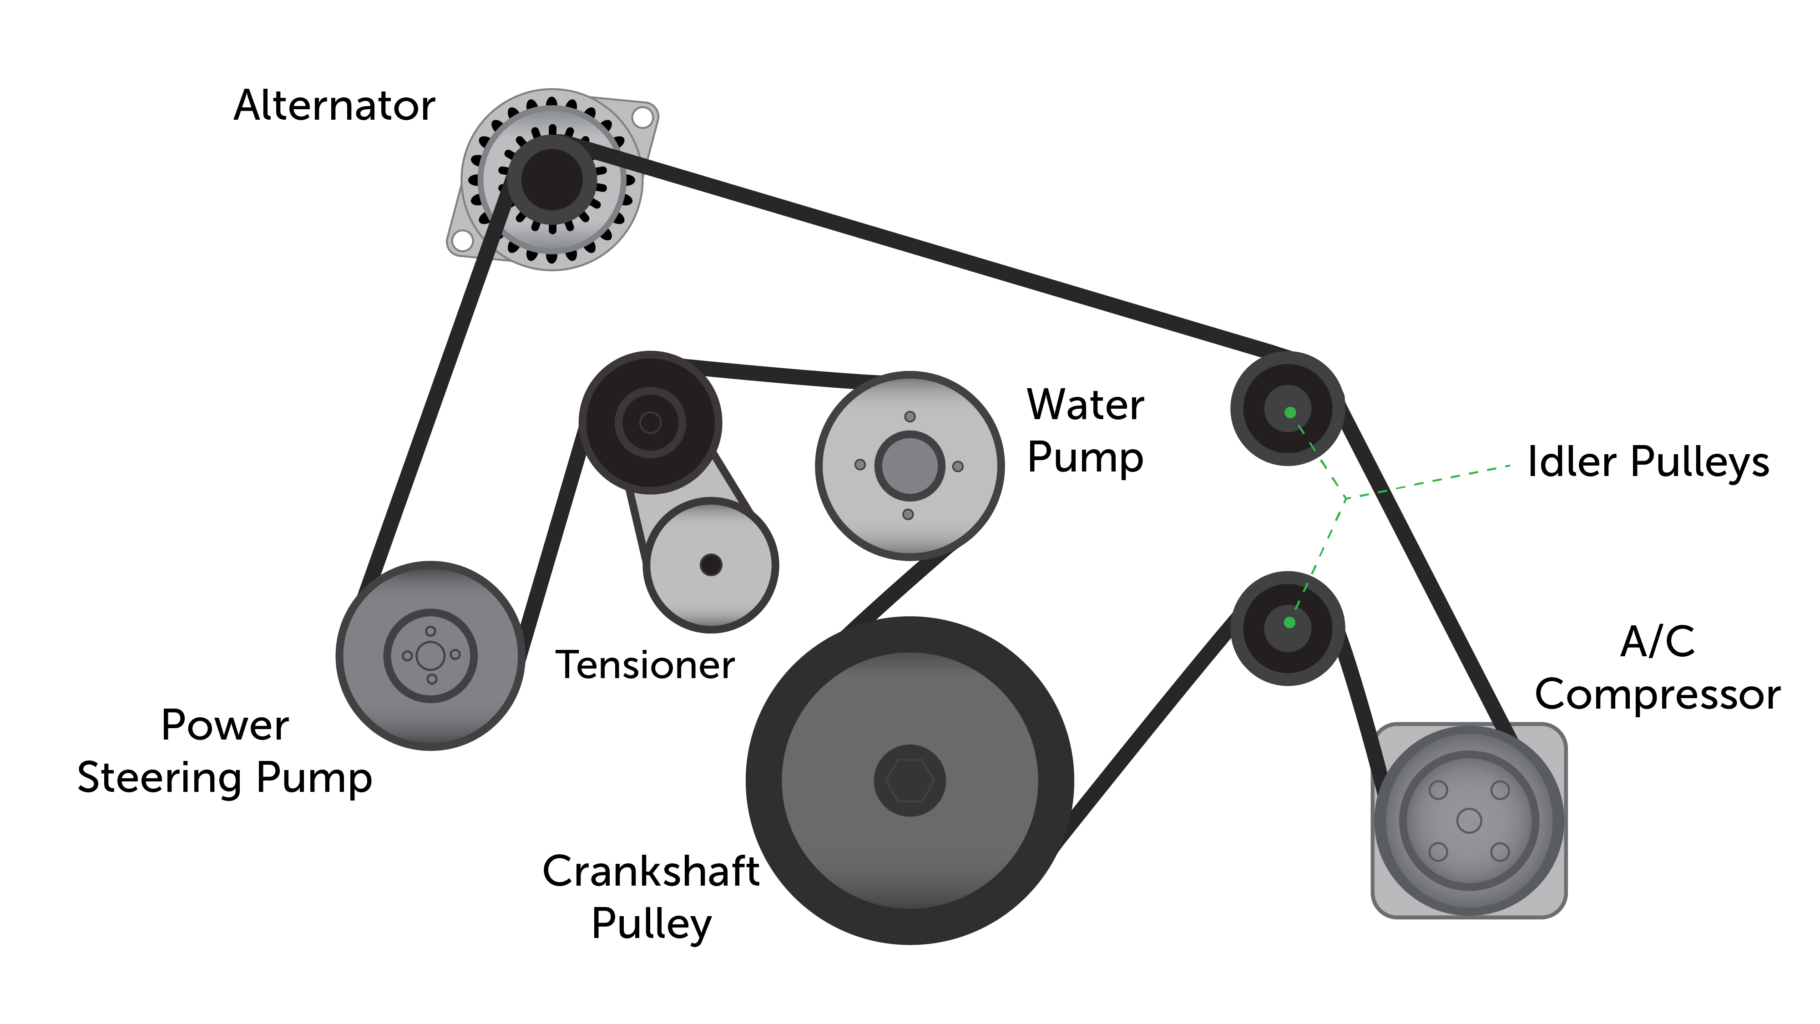
The serpentine belt diagram is essentially a roadmap for the serpentine belt. Its primary purpose is to illustrate the correct routing path of the belt around various engine accessories. This is critical because the serpentine belt is responsible for powering several vital components, including the:
- Alternator: Charges the battery and provides electrical power while the engine is running.
- Power Steering Pump: Provides hydraulic assistance for steering.
- Air Conditioning Compressor: Compresses refrigerant for the AC system.
- Water Pump: Circulates coolant to regulate engine temperature.
Having the correct diagram is essential for:
- Belt Replacement: Ensuring the new belt is installed correctly. An incorrectly routed belt will not function properly and can cause significant damage.
- Troubleshooting: Diagnosing issues related to the serpentine belt system, such as squealing noises, overheating, or electrical problems.
- General Maintenance: Visually inspecting the belt for wear, cracks, or damage and understanding how tension is applied.
Incorrect belt routing can lead to premature belt failure, damage to the accessories it powers, and even engine damage due to overheating. So, understanding the diagram is paramount.
Key Specs and Main Parts
The 2011 Dodge Journey typically came with one of two engine options:
- 2.4L Inline-4 Engine: This engine has a specific serpentine belt routing configuration.
- 3.6L V6 Engine: This engine has a different serpentine belt routing configuration compared to the 2.4L.
Always consult the correct diagram for your specific engine type.
Key components involved in the serpentine belt system include:
- Serpentine Belt: A long, continuous belt made of rubber or synthetic materials.
- Crankshaft Pulley: The main pulley connected to the engine's crankshaft that drives the serpentine belt.
- Alternator Pulley: The pulley on the alternator that is driven by the serpentine belt.
- Power Steering Pump Pulley: The pulley on the power steering pump driven by the belt.
- Air Conditioning Compressor Pulley: The pulley on the AC compressor.
- Water Pump Pulley: The pulley on the water pump.
- Tensioner Pulley: A spring-loaded pulley that maintains proper tension on the serpentine belt. This is *critical* for proper function.
- Idler Pulley(s): Smooth pulleys that help guide the belt and increase its wrap angle around other pulleys.
The belt tensioner is a particularly important component. It's designed to automatically adjust the belt tension as the belt stretches over time, ensuring optimal performance and preventing slippage. The tensioner is usually spring-loaded and has a mechanism for releasing the tension during belt removal and installation.
Symbols Explained
Serpentine belt diagrams use specific symbols to represent different components and the belt's routing. Understanding these symbols is key to interpreting the diagram correctly.
- Solid Lines: Represent the primary routing path of the serpentine belt. The thickness of the line doesn't usually matter.
- Arrows: Indicate the direction of rotation for each pulley. Pay close attention to these arrows, as they are crucial for understanding the belt's path.
- Circles: Represent pulleys. Often, the diagrams will label the pulleys with abbreviations like "ALT" for Alternator, "PS" for Power Steering, "AC" for Air Conditioning, "WP" for Water Pump, "CRANK" for Crankshaft, "TENS" for Tensioner, and "IDLR" for Idler.
- Shaded Areas: Sometimes, shaded areas are used to highlight the ribbed side of the belt (the side that contacts the pulleys) versus the smooth side. This can be helpful when the belt routing is complex.
- Dashed Lines (Less Common): May be used to indicate a path the belt takes behind other components or for auxiliary routing if applicable.
In some cases, different colors might be used to distinguish between different sections of the belt routing, particularly on more complex diagrams. However, color coding is not always standard.
How It Works
The serpentine belt system operates on the principle of rotational force transfer. The engine's crankshaft, through the crankshaft pulley, provides the rotational force that drives the serpentine belt. The belt, in turn, transmits this force to the various accessory pulleys, causing them to rotate and perform their respective functions.
The tensioner pulley plays a crucial role in maintaining the proper friction between the belt and the pulleys. Insufficient tension leads to belt slippage, resulting in reduced performance of the accessories (e.g., weak power steering, poor AC performance, low alternator output). Excessive tension, on the other hand, can put undue stress on the bearings of the accessories and the belt itself, leading to premature failure.
The routing of the belt is carefully designed to maximize the contact area between the belt and the pulleys, ensuring efficient power transfer. The idler pulleys help to guide the belt around tight corners and increase the wrap angle around certain pulleys, further enhancing the grip and preventing slippage.
Real-World Use – Basic Troubleshooting Tips
Here are some common serpentine belt-related problems and how the diagram can help you troubleshoot them:
- Squealing Noise: Often caused by a loose or worn belt. Check the tensioner and the belt's condition. The diagram helps you locate the tensioner and verify that the belt is routed correctly.
- Overheating: If the water pump is not being driven properly due to a slipping or broken belt, the engine can overheat. The diagram confirms the water pump's pulley is in the belt path.
- Battery Not Charging: A slipping or broken belt can prevent the alternator from charging the battery. The diagram confirms that the alternator pulley is in the belt path.
- Power Steering Issues: Difficult steering can result from a slipping or broken belt affecting the power steering pump. The diagram confirms the power steering pump's pulley is in the belt path.
- AC Not Working: A slipping or broken belt can prevent the AC compressor from functioning. The diagram confirms the AC compressor's pulley is in the belt path.
Visual Inspection: Regularly inspect the serpentine belt for signs of wear, such as cracks, fraying, glazing (a shiny appearance), or missing chunks. Replace the belt if you find any of these issues. A worn belt is prone to breaking, leaving you stranded.
Safety Considerations
Working on the serpentine belt system involves potential hazards. Always disconnect the negative battery cable before starting any work to prevent electrical shock.
Rotating Parts: The serpentine belt and pulleys are rotating components. Never put your hands near the belt or pulleys while the engine is running. Serious injury can occur.
Spring-Loaded Tensioner: The tensioner is spring-loaded and can snap back forcefully if not handled properly. Use the correct tool (usually a wrench or socket) to release the tension before removing the belt. Wear safety glasses to protect your eyes.
Hot Engine: Allow the engine to cool down completely before working on the serpentine belt system. The engine components can be very hot and cause burns.
Belt Routing: Double-check the belt routing against the diagram before starting the engine. An incorrectly routed belt can cause serious damage.
We have the 2011 Dodge Journey Serpentine Belt Diagram available for download. This diagram provides a visual aid to help you perform the job correctly. Remember to always consult the correct diagram for your specific engine type and follow all safety precautions.