2011 Gmc Sierra Radio Wiring Diagram
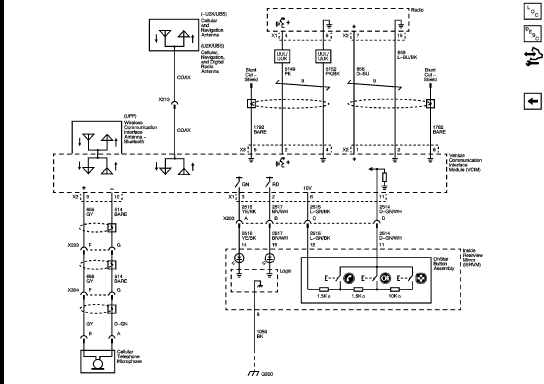
Alright, let's dive into the wiring diagram for the 2011 GMC Sierra's radio system. Whether you're upgrading your sound system, diagnosing a faulty speaker, or just trying to understand how everything's connected, this diagram is your best friend. This isn't just a schematic; it's a roadmap to the electrical heart of your Sierra's audio system.
Purpose of the 2011 GMC Sierra Radio Wiring Diagram
Why do you need this diagram? Several reasons. First and foremost, it's invaluable for repairs. If your radio suddenly stops working, knowing which wires to check for continuity and voltage is crucial. Second, it's essential for upgrades. Swapping out speakers, adding an amplifier, or installing a new head unit requires a clear understanding of the existing wiring. Finally, it's great for learning. Understanding the wiring can help you grasp how the entire audio system functions, which is useful for future modifications or troubleshooting.
Key Specs and Main Parts of the Radio System
The 2011 GMC Sierra radio system typically involves several key components:
- Head Unit: The main control unit, often referred to as the radio, provides the interface for audio selection, volume control, and sometimes other vehicle functions. This is the central point for all audio signals.
- Speakers: These convert electrical signals into sound waves. Standard configurations usually include front and rear speakers, and sometimes tweeters for higher frequencies.
- Amplifier (If Equipped): Some Sierra models have a separate amplifier to boost the audio signal before it reaches the speakers. This enhances sound quality and volume.
- Wiring Harness: The collection of wires connecting all the components. The wiring harness is crucial for delivering power and signals between the head unit, speakers, and amplifier.
- Antenna: Receives radio signals from broadcasting stations.
- OnStar Module (If Equipped): Integrates with the audio system for communication and emergency services.
- Steering Wheel Controls (If Equipped): Allow control of the audio system without taking your hands off the wheel.
Important Specs: The wiring diagram will often specify the wire gauge (thickness) which affects the current carrying capacity. Knowing the voltage (typically 12V DC in automotive systems) is also critical for safe testing. Impedance of speakers (usually measured in Ohms) is crucial when replacing or adding speakers to match the amplifier capabilities. A mismatch can damage your amplifier.
Understanding Symbols on the Wiring Diagram
The wiring diagram uses a standardized set of symbols to represent different components and connections. Here's a breakdown of some common ones:
- Lines: These represent wires. A solid line indicates a direct connection, while a dashed line might indicate a shielded wire or a wire that's part of a harness.
- Colors: Each wire is assigned a specific color, which is indicated on the diagram. For example, "RED" might indicate a 12V power wire, while "BLK" is usually ground. These colors are essential for identifying the correct wires when working on your vehicle.
- Ground Symbol: Usually represented by a series of descending lines or a triangle. This indicates the wire is connected to the vehicle's chassis, providing a path for electrical current to return to the battery.
- Connector Symbols: These indicate where wires connect to each other or to components. They can be represented by circles, squares, or other shapes, often with a number indicating the number of pins in the connector.
- Component Symbols: Symbols representing the head unit, speakers, amplifier, and other components. Each component will have a specific symbol that is labelled for easy identification.
Color codes are paramount. A typical color might be "LT GRN/BLK," meaning light green with a black stripe. Always verify the color against the actual wire in your vehicle, as colors can sometimes fade or be difficult to distinguish.
How the Radio Wiring Works
The basic flow of the system is as follows: Power is supplied to the head unit from the vehicle's battery, usually through a fused circuit. The head unit processes audio signals from various sources (radio, CD player, auxiliary input, etc.). These signals are then amplified (either by the head unit itself or a separate amplifier) and sent to the speakers. The speakers convert these electrical signals into sound.
The wiring diagram illustrates how each of these components is interconnected. It shows which wires carry power, ground, audio signals, and control signals. It also shows the location of connectors and splices, which are common points of failure.
Real-World Use: Basic Troubleshooting Tips
Let's say your radio isn't turning on. Here's how you might use the wiring diagram:
- Check the Fuse: Consult the diagram to identify the fuse that protects the radio circuit. Use a multimeter to check for continuity across the fuse. If it's blown, replace it with a fuse of the correct amperage.
- Verify Power and Ground: Use the diagram to identify the power and ground wires at the head unit connector. Use a multimeter to check for 12V DC between the power wire and ground, with the ignition on. If there's no voltage, trace the power wire back towards the fuse box, checking for breaks or loose connections along the way. Also, confirm you have a good ground connection.
- Speaker Issues: If one or more speakers aren't working, check the wiring connections at the speaker. Use the diagram to identify the speaker wires at the head unit or amplifier (if equipped). Use a multimeter to measure the resistance of the speaker. An open circuit indicates a faulty speaker or a break in the wiring.
Continuity Testing: Use a multimeter in continuity mode to check for breaks in the wiring. Disconnect the wire from both ends and place the multimeter probes on each end. A beep indicates a continuous circuit, while no beep indicates a break.
Safety Considerations
Working with automotive electrical systems can be dangerous. Here are some key safety precautions:
- Disconnect the Battery: Always disconnect the negative terminal of the battery before working on any electrical components. This prevents short circuits and potential electrocution.
- Avoid Cutting Wires: If possible, avoid cutting wires. Use wire strippers to remove insulation instead. If you must cut a wire, be sure to properly insulate the connection afterward using heat shrink tubing or electrical tape.
- Use a Multimeter: A multimeter is an essential tool for troubleshooting electrical problems. Learn how to use it properly to measure voltage, current, and resistance.
- Airbags: Be aware of the location of airbags. Disconnecting the battery is critical, but avoid directly messing with airbag wiring unless you're a trained technician. Accidental deployment can cause serious injury.
- Don't Exceed Circuit Limits: Don't overload circuits by adding too many accessories. This can cause wires to overheat and potentially start a fire. Refer to the wiring diagram and the vehicle's owner's manual for information on circuit ratings.
The most risky components are often those connected to the battery and the ignition system. Be particularly careful when working with these components, as they carry high voltage and current.
Important Note: Always double-check your work and ensure that all connections are secure before reconnecting the battery. Loose connections can cause intermittent problems and potentially damage electrical components.
Remember, this article provides a general overview of the 2011 GMC Sierra radio wiring diagram. Each vehicle can have slight variations, so always refer to the specific diagram for your vehicle's model and trim level. We have the complete wiring diagram file available for download.