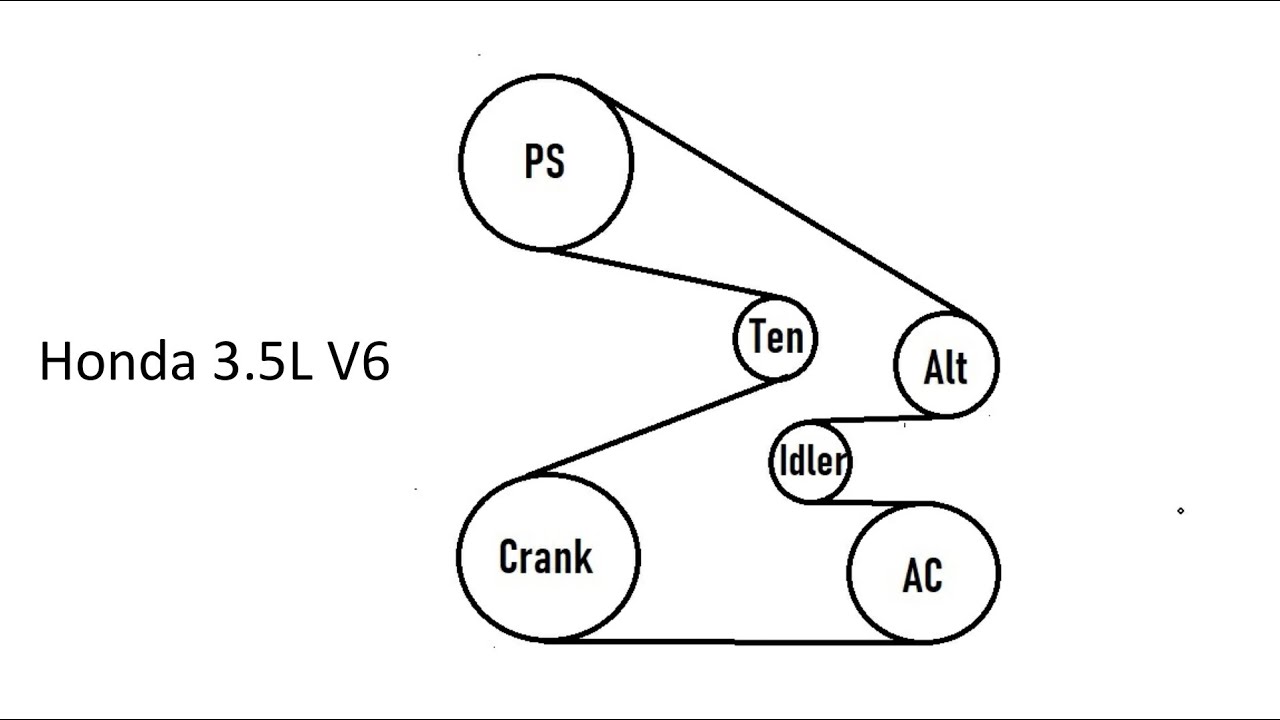
2011 Honda Accord V6 Serpentine Belt Diagram
Alright, let's dive into the serpentine belt diagram for the 2011 Honda Accord V6. Whether you're tackling a squealing belt, replacing a worn one, or just trying to understand your engine bay a bit better, this diagram is your roadmap. Knowing how to read and interpret it can save you time, money, and potentially prevent damage to other components. This isn't just a random picture; it's a crucial piece of documentation.
Purpose of the Serpentine Belt Diagram
The serpentine belt diagram serves several critical purposes:
- Replacement Guide: The most common use. If you're replacing the serpentine belt, the diagram shows you exactly how the new belt should be routed around the various pulleys. Incorrect routing can lead to immediate failure of the belt, or damage to components.
- Troubleshooting: If you hear a squealing or chirping noise coming from the engine, the diagram helps you identify the components driven by the belt. This allows you to focus your diagnostic efforts.
- Component Identification: The diagram clearly labels all the accessories driven by the belt, such as the alternator, power steering pump, AC compressor, and idler pulleys. This helps you understand the engine's accessory drive system.
- Preventive Maintenance: Regularly inspecting the belt and pulleys, guided by the diagram, can help you identify potential issues before they become major problems.
- Learning the System: Even if you’re not actively repairing anything, studying the diagram helps you understand how the various engine accessories are driven. It gives you a solid foundation for more complex engine work in the future.
Key Specs and Main Parts (2011 Honda Accord V6)
Before we jump into the diagram itself, let's cover the key components and specifications related to the serpentine belt system in the 2011 Honda Accord V6.
- Engine Type: J35Z2 (3.5L V6 SOHC)
- Belt Length: Approximately 91-92 inches (this can vary slightly, so always double-check with your parts supplier using your VIN).
- Main Components:
- Crankshaft Pulley: The main driver, connected directly to the engine's crankshaft.
- Alternator Pulley: Powers the vehicle's electrical system and charges the battery.
- Power Steering Pump Pulley: Provides hydraulic pressure for power steering.
- AC Compressor Pulley: Compresses refrigerant for the air conditioning system.
- Tensioner Pulley: Maintains the correct tension on the belt, preventing slippage and extending its lifespan. This is often spring-loaded and allows for belt installation and removal.
- Idler Pulley(s): Guide the belt and provide optimal wrap around other pulleys. The 2011 Accord V6 typically has one or more idler pulleys.
- Belt Type: Multi-ribbed, typically a "K" series belt.
Understanding the Diagram: Symbols, Lines, and Colors
The diagram itself is a simplified representation of the belt's routing. Here's how to interpret the common symbols:
- Solid Lines: These represent the path of the serpentine belt itself. The direction of the line shows which way the belt travels.
- Circles: Circles indicate pulleys. The size of the circle doesn't necessarily represent the physical size of the pulley.
- Labels: Each pulley will be labeled with its corresponding component (e.g., "ALT" for alternator, "P/S" for power steering).
- Arrow(s): Arrows on or near pulleys indicate the direction of rotation. This is crucial for understanding how the belt drives each component.
- Tensioner Symbol: The tensioner pulley is often shown with a special symbol to differentiate it. It often looks like a pulley with an arrow or a spring symbol indicating the tensioning mechanism.
- Ribbed vs. Smooth: The diagram doesn't always show the ribbing on the pulleys, but it's implied that the ribbed side of the belt contacts the ribbed pulleys (crankshaft, alternator, AC compressor, power steering), and the smooth side of the belt contacts the smooth pulleys (idler and tensioner).
How It Works: The Serpentine Belt System
The serpentine belt system is designed to efficiently transfer rotational power from the engine's crankshaft to various accessories. The crankshaft pulley, directly connected to the engine, drives the serpentine belt. As the crankshaft rotates, the belt turns all the other pulleys connected to it. The tensioner pulley is critical, maintaining the proper tension on the belt so it doesn't slip. If the belt is too loose, it will squeal and fail to properly drive the accessories. If it's too tight, it can put excessive stress on the bearings of the accessories and the belt itself, leading to premature failure.
The 2011 Honda Accord V6 utilizes a single, long serpentine belt to drive all the accessories. This is a departure from older vehicles that used multiple belts. The serpentine belt design is more efficient and requires less maintenance than the multi-belt system.
Real-World Use: Basic Troubleshooting Tips
Here's how you can use the serpentine belt diagram in real-world scenarios:
- Squealing Belt: If you hear a squealing noise, inspect the belt for cracks, glazing, or fraying. Use the diagram to identify the tensioner pulley and check its condition. A worn tensioner might not be providing enough tension, causing the belt to slip. Also, visually inspect all pulleys for damage or contamination (oil, coolant).
- Belt Slippage: If you suspect the belt is slipping (e.g., the AC isn't cooling properly), use the diagram to ensure the belt is routed correctly. A misrouted belt won't have the proper wrap around the pulleys and will slip.
- Component Failure: If one of the accessories isn't working (e.g., the alternator isn't charging the battery), use the diagram to verify that the belt is properly driving the corresponding pulley. If the belt is intact and the pulley is turning, the problem likely lies within the accessory itself.
- Belt Wear: Regularly inspect the belt for signs of wear, such as cracks, fraying, or missing ribs. The diagram helps you identify the areas of the belt that are most prone to wear, such as the points where the belt bends sharply around small pulleys.
Safety Considerations
Working on the serpentine belt system involves some inherent risks. Here are a few crucial safety precautions:
- Disconnect the Battery: Before working on any part of the electrical system, always disconnect the negative battery terminal. This prevents accidental electrical shocks.
- Hot Engine: Never work on the serpentine belt system when the engine is hot. Allow the engine to cool completely before starting any work. The exhaust manifold and other engine components can reach extremely high temperatures.
- Moving Parts: Never attempt to diagnose or repair the serpentine belt system with the engine running. The moving belt and pulleys can cause serious injury.
- Pulley Alignment: Ensure that all pulleys are properly aligned before installing a new belt. Misaligned pulleys can cause premature belt wear and failure. Use a straightedge or laser alignment tool to check for proper alignment.
- Tensioner Spring: The tensioner pulley has a strong spring that can cause injury if released unexpectedly. Use the correct tool to relieve the tension on the belt before removing it.
We have the 2011 Honda Accord V6 Serpentine Belt Diagram available for download. It provides a clear visual guide to the belt routing and component locations. Having this diagram readily accessible can significantly simplify your repair and maintenance tasks.