
2011 Honda Pilot Serpentine Belt Diagram
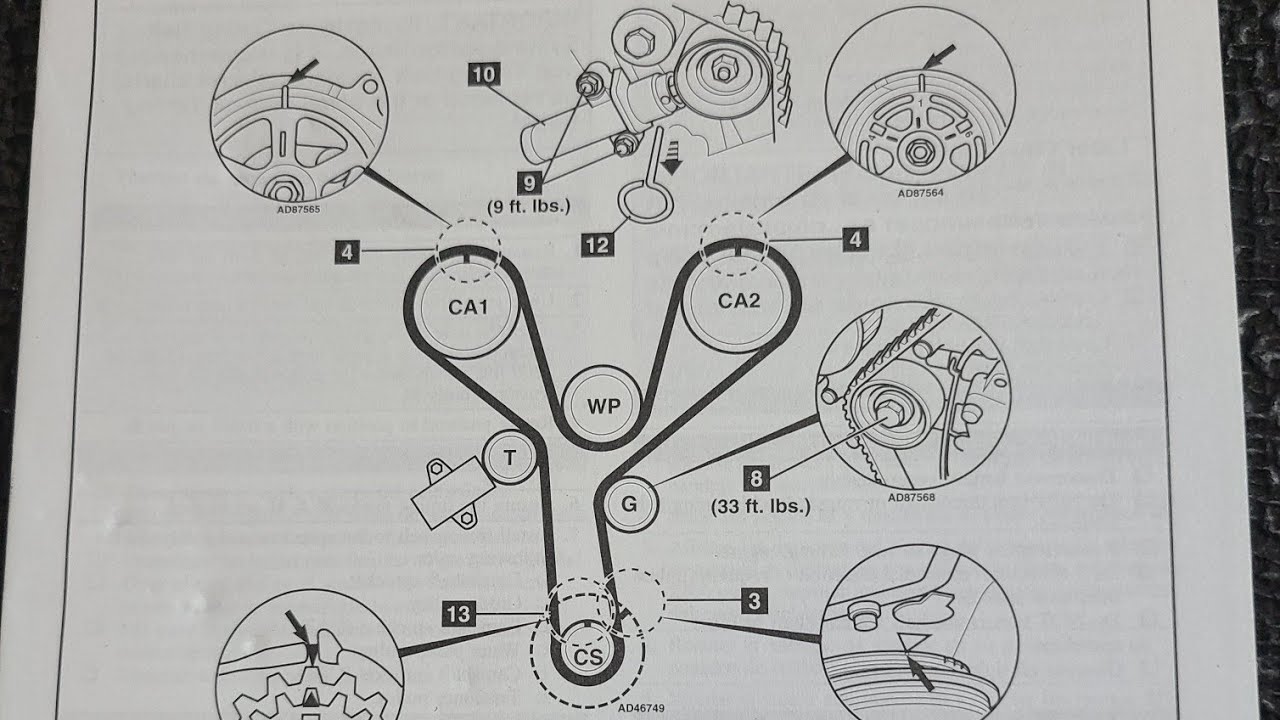
The serpentine belt in your 2011 Honda Pilot is a critical component, responsible for powering several vital engine accessories. Understanding its routing and condition is essential for preventative maintenance and timely repairs. This article provides a comprehensive breakdown of the 2011 Honda Pilot serpentine belt diagram, enabling you to diagnose issues, perform replacements, and better understand your vehicle's operation. We'll cover key specifications, component identification, and real-world troubleshooting tips.
Purpose of the Serpentine Belt Diagram
The serpentine belt diagram serves as a visual roadmap for the belt's path through the engine bay. Its primary purposes include:
- Repair and Replacement: Correct belt routing is paramount after a replacement. An incorrect installation can damage the belt, accessories, or even the engine itself. The diagram ensures accurate placement.
- Troubleshooting: When experiencing squealing noises, accessory malfunctions (e.g., power steering loss, AC failure), or belt wear, the diagram helps identify potential problem areas and related components.
- Preventive Maintenance: Regular inspection of the belt's condition (cracks, wear, tension) is crucial. The diagram allows you to quickly locate and examine the entire belt.
- General Understanding: Familiarity with the belt's routing provides a deeper understanding of how your engine accessories function and interact.
Key Specs and Main Parts
While the diagram is visual, knowing the specifications and component names enhances your understanding. Here are some essential details for the 2011 Honda Pilot:
- Belt Length: The 2011 Honda Pilot (3.5L V6 engine) typically uses a serpentine belt around 90-91 inches in length. It is *critical* to consult your owner's manual or a parts catalog to confirm the exact length for your specific model, as variations can exist. Using the wrong length belt can lead to improper tension and premature failure.
- Belt Type: Serpentine belts are typically made from EPDM (Ethylene Propylene Diene Monomer) rubber, known for its durability and resistance to heat and cracking.
- Main Components Driven:
- Crankshaft Pulley: The driving force of the belt, connected directly to the engine's crankshaft.
- Alternator Pulley: Powers the vehicle's electrical system and charges the battery.
- Power Steering Pump Pulley: Provides hydraulic assistance for steering.
- Air Conditioning Compressor Pulley: Compresses refrigerant for the AC system.
- Water Pump Pulley: Circulates coolant to regulate engine temperature.
- Tensioner Pulley: Maintains proper belt tension. This is often a spring-loaded mechanism.
- Idler Pulley(s): Guides the belt around the various components. They are smooth and do not drive any accessory.
Diagram Symbols and Markings
Serpentine belt diagrams use various symbols to convey information. Here's a breakdown of common elements:
- Solid Lines: Represent the portion of the belt that is in direct contact with the pulley's groove.
- Dashed Lines: Typically indicate the backside (smooth side) of the belt contacting a pulley. These are often used for idler pulleys or for tensioners that engage the belt's back.
- Arrows: Show the direction of belt rotation. Following these arrows is crucial for understanding how each component drives the next.
- Component Labels: Each pulley will be labeled with an abbreviation indicating the component it belongs to (e.g., ALT for Alternator, P/S for Power Steering, A/C for Air Conditioning, WP for Water Pump, CRANK for Crankshaft).
- Tensioner Location: The tensioner pulley is usually clearly indicated, often with a spring symbol or a note indicating the direction to rotate the tensioner to relieve belt tension during removal and installation.
How It Works
The serpentine belt system is relatively simple in principle. The crankshaft pulley, driven by the engine's rotation, transfers power to the other accessory pulleys via the serpentine belt. The belt's tension, maintained by the tensioner, ensures adequate grip and prevents slippage. Each accessory pulley then performs its designated function (generating electricity, providing power steering, cooling the air, etc.).
The critical aspect is the routing. The belt must follow a specific path to ensure that all accessories are driven in the correct direction and with sufficient contact. The diagram provides this essential routing information.
Real-World Use: Basic Troubleshooting Tips
Here are some common serpentine belt-related problems and how the diagram can help:
- Squealing Noise: A squealing or chirping noise is often caused by a slipping belt. Using the diagram, inspect the belt for wear (cracks, fraying, glazing). Also, check the tensioner for proper operation. A weak or failing tensioner can cause the belt to slip. Locate the tensioner on the diagram and then find it on the car. Is it bouncing excessively while the engine is running?
- Accessory Malfunction: If an accessory like the alternator or power steering pump isn't working, consult the diagram to verify that the belt is properly routed around its pulley and that the pulley is spinning when the engine is running. If the pulley isn't spinning, the belt may be broken or slipped off the pulley.
- Belt Damage: Look for signs of wear, such as cracks, fraying, or missing chunks. The diagram helps you inspect the entire belt length. Pay close attention to areas where the belt makes sharp bends or comes into contact with other components.
- Incorrect Routing After Replacement: If you replaced the belt yourself and suspect an incorrect routing, carefully compare the actual belt path to the diagram. Even a minor deviation can cause problems.
Safety Considerations
Working with the serpentine belt system involves certain risks:
- Moving Parts: Never work on the serpentine belt while the engine is running. The belt and pulleys are rotating at high speeds and can cause serious injury. Ensure the engine is off and the key is removed from the ignition.
- Hot Engine: The engine can be extremely hot, especially after running. Allow the engine to cool down completely before working on the belt.
- Tensioner Spring: The tensioner is spring-loaded and can release with considerable force. Use the correct tools and techniques to release the tensioner safely during belt removal and installation. Consult your vehicle's repair manual for specific instructions.
- Battery Disconnect: While not always necessary for belt replacement, disconnecting the negative battery terminal is a good safety practice to prevent accidental electrical shorts.
Important Note: The water pump is a critical cooling component. If the serpentine belt fails completely, the water pump will stop functioning, potentially leading to engine overheating and severe damage. If you suspect a belt problem, address it immediately.
We have the detailed 2011 Honda Pilot Serpentine Belt Diagram available for download. This file provides a high-resolution, printable version of the diagram for your reference. With this diagram and the knowledge you've gained from this article, you'll be well-equipped to handle serpentine belt-related maintenance and repairs on your 2011 Honda Pilot.