2011 Infiniti Qx56 Fuse Box Diagram
So, you're diving into the electrical system of your 2011 Infiniti QX56? Good on you! Understanding the fuse box diagram is absolutely crucial for diagnosing electrical issues, performing modifications, or simply getting a better handle on your vehicle's inner workings. Think of it as the Rosetta Stone for your QX56's electrical language. We're going to break down everything you need to know, from the purpose of the diagram to real-world troubleshooting.
Purpose of the 2011 Infiniti QX56 Fuse Box Diagram
Why bother with this diagram in the first place? Several key reasons:
- Troubleshooting Electrical Problems: When a component fails (a light, the radio, power windows), the first suspect is often a blown fuse. The diagram allows you to quickly identify the correct fuse to check, saving you time and preventing potential further damage.
- Performing Modifications: Adding aftermarket accessories (like a new sound system, lights, or even a trailer brake controller) often requires tapping into the existing electrical system. The diagram helps you find appropriate power sources and ensure you're using correctly rated fuses to protect your circuits.
- Understanding Vehicle Systems: Just browsing the diagram can give you a better understanding of how the various electrical systems in your QX56 are interconnected. You'll see which circuits are protected by which fuses, and how different components are powered.
- Preventing Electrical Fires: A blown fuse is a safety mechanism! Replacing a blown fuse with one of a higher amperage can overload the circuit, potentially leading to melted wires and even a fire. The diagram ensures you use the correct replacement fuse.
Key Specs and Main Fuse Box Locations
The 2011 Infiniti QX56 actually has multiple fuse boxes, each responsible for different circuits. Knowing where they are is the first step.
- Inside the Cabin (Instrument Panel): Typically located on the driver's side, often behind a small access panel near the steering wheel or under the dashboard. This box usually houses fuses for interior lights, the radio, power windows, and other comfort/convenience features.
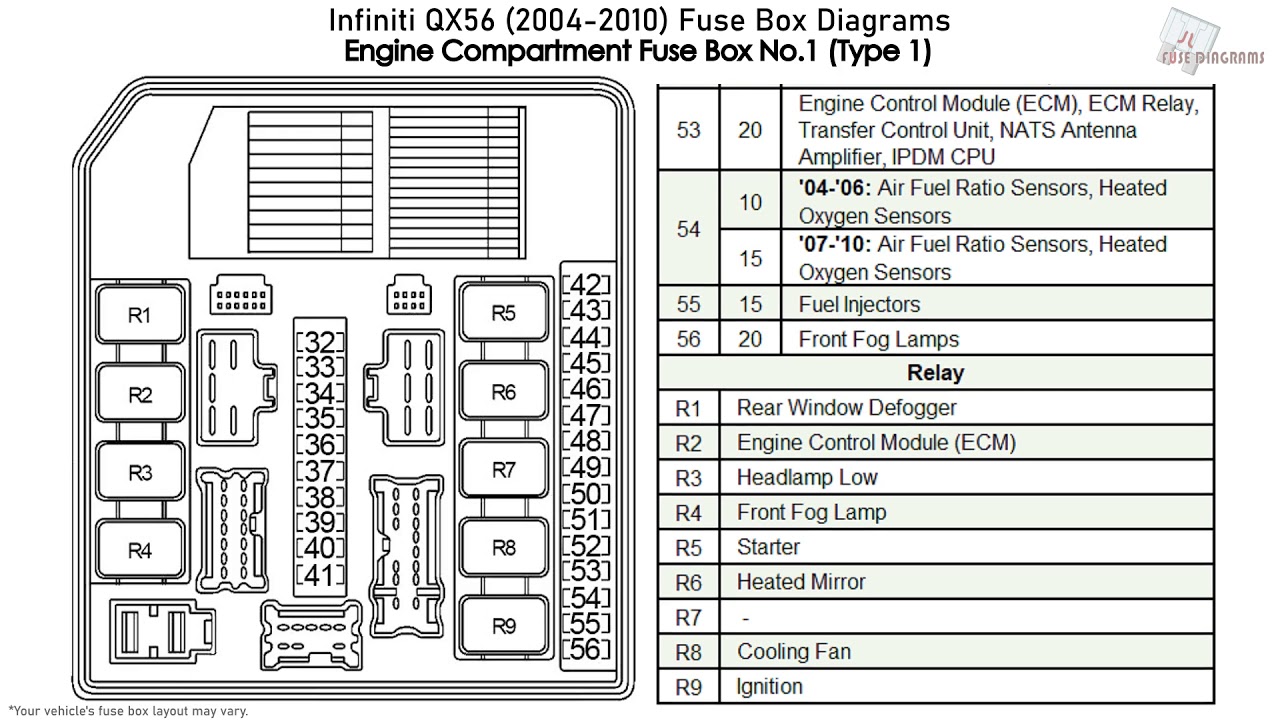
- Under the Hood (Engine Compartment): This box is usually found near the battery and contains fuses for critical engine components like the fuel pump, ignition system, engine control unit (ECU), and headlights.
- Possibly a Third Location (Consult Owner's Manual): Some QX56 models might have a smaller, secondary fuse box located elsewhere, such as in the cargo area or under the rear seat. Always refer to your owner's manual for the exact locations on *your* specific vehicle.
Key Specs:
- Fuse Types: The QX56 primarily uses blade-type fuses, available in various sizes and amperage ratings (e.g., Mini, ATO, Maxi).
- Amperage Ratings: Fuses are rated in amps (A). The amperage rating indicates the maximum current the fuse can handle before it blows. Using the correct amperage is critical!
- Voltage: Automotive electrical systems are typically 12V DC (Direct Current).
Symbols and Legend: Deciphering the Diagram
Fuse box diagrams aren't just a collection of numbers. They use symbols, colors, and abbreviations to convey information concisely. Here's a breakdown:
- Numbers: Each fuse location is numbered, allowing you to quickly cross-reference the diagram with the actual fuse box.
- Abbreviations: Common abbreviations include:
- ACC: Accessory (powered when the ignition is in the ACC or ON position)
- IGN: Ignition (powered when the ignition is ON)
- ST: Starter (powered during engine starting)
- BATT: Battery (always powered)
- ECU: Engine Control Unit
- ABS: Anti-lock Braking System
- SRS: Supplemental Restraint System (Airbags) – Handle with EXTREME caution!
- Lines and Colors: These often represent wiring connections. Thicker lines might indicate higher current-carrying capacity. Colors can sometimes (but not always) correspond to wire colors in the vehicle. Don't rely solely on color for identification!
- Icons: Some diagrams use icons to represent the component protected by the fuse (e.g., a light bulb for headlights, a steering wheel for power steering).
Important: The legend is KEY! The legend defines all the symbols and abbreviations used in the specific diagram for your 2011 QX56. Without the legend, the diagram is almost useless. Make sure you have it!
How It Works: The Fuse as a Circuit Protector
A fuse is a sacrificial device designed to protect an electrical circuit from overcurrent. It's essentially a thin strip of metal with a specific melting point. When the current in the circuit exceeds the fuse's amperage rating, the metal strip melts, breaking the circuit and stopping the flow of electricity. This prevents damage to components and reduces the risk of fire.
Think of it like a dam on a river. The dam (fuse) can handle a certain amount of water flow (current). If the water flow exceeds the dam's capacity, the dam breaks (fuse blows) to prevent flooding downstream (damage to components).
Why does overcurrent happen? Common causes include:
- Short Circuit: A direct connection between a power wire and ground (e.g., due to damaged insulation). This creates a path of very low resistance, resulting in a huge surge of current.
- Overloaded Circuit: Connecting too many devices to a single circuit, exceeding its capacity.
- Component Failure: A faulty component can draw excessive current.
Real-World Use: Basic Troubleshooting Tips
Okay, let's get practical. You have a problem, and you suspect a blown fuse. Here's how to proceed:
- Identify the Problem: Determine which component isn't working.
- Consult the Diagram: Locate the fuse box diagram for your 2011 QX56. Use the index or search for the component you're troubleshooting (e.g., "Power Windows").
- Locate the Fuse: Find the corresponding fuse number and amperage rating in the diagram.
- Access the Fuse Box: Open the appropriate fuse box (instrument panel or engine compartment).
- Inspect the Fuse: Visually inspect the fuse. A blown fuse will usually have a broken filament or a darkened appearance.
- Test the Fuse (Recommended): Use a multimeter set to continuity to test the fuse. A good fuse will show continuity (a beep or a reading close to zero ohms). A blown fuse will show no continuity.
- Replace the Fuse: Replace the blown fuse with a new fuse of the exact same amperage rating.
- Test the Component: Turn on the ignition and test the component that wasn't working.
- If the Fuse Blows Again: If the new fuse blows immediately, there's likely a short circuit or overload in the circuit. Further diagnosis is required. Do *not* keep replacing fuses with higher amperage ratings! This is dangerous.
Safety First: Handle with Care
Working with automotive electrical systems can be dangerous if you're not careful. Here are some key safety precautions:
- Disconnect the Battery: Before working on any electrical circuits, disconnect the negative battery terminal. This will prevent accidental short circuits.
- SRS (Airbag) Circuits: Airbag circuits are extremely sensitive and potentially dangerous. Improper handling can cause accidental airbag deployment, leading to serious injury. If you suspect a problem with the SRS, it's best to consult a qualified technician. Don't attempt to diagnose or repair SRS circuits yourself unless you have specialized training and equipment.
- Use the Correct Tools: Use insulated tools designed for automotive electrical work.
- Don't Tamper with Fuses: Never bypass a fuse or replace it with a higher amperage fuse than specified. This can overload the circuit and cause a fire.
- Consult a Professional: If you're uncomfortable working on electrical systems, or if you're unsure about any aspect of the repair, it's best to consult a qualified mechanic.
You now possess a solid understanding of your 2011 Infiniti QX56 fuse box diagram. With this knowledge, you can confidently troubleshoot electrical issues, perform modifications, and maintain your vehicle's electrical system safely and effectively.
To assist you further, we have the complete 2011 Infiniti QX56 fuse box diagram file available for download. This diagram will provide you with a detailed visual representation of the fuse locations, amperage ratings, and corresponding circuits. Refer to it frequently as you work on your vehicle. Happy wrenching!