2011 Jeep Grand Cherokee Serpentine Belt Diagram
The serpentine belt on your 2011 Jeep Grand Cherokee is a critical component, responsible for driving several essential engine accessories. Understanding its routing, tension, and overall health is paramount for maintaining your vehicle's reliability. This article provides a comprehensive guide to the 2011 Grand Cherokee serpentine belt diagram, equipping you with the knowledge to diagnose issues, perform replacements, and keep your Jeep running smoothly.
Purpose of Understanding the Serpentine Belt Diagram
Why bother with a diagram? Several compelling reasons exist. First, it's indispensable for repairs and maintenance. Replacing a serpentine belt without knowing the correct routing can lead to incorrect installation, causing damage to components and potentially leaving you stranded. Second, understanding the diagram helps with troubleshooting. By knowing the belt's path and the components it drives, you can diagnose issues like squealing noises or component failures more effectively. Third, it empowers you to learn about your vehicle's systems. Comprehending the serpentine belt system provides a valuable insight into the engine's accessory drive and its interconnectedness.
Key Specs and Main Parts of the Serpentine Belt System
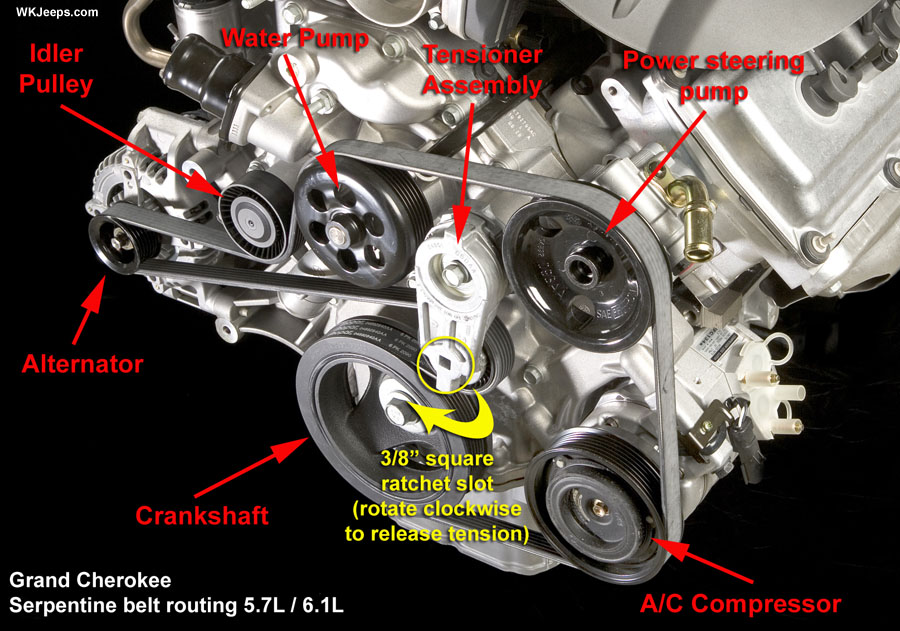
The serpentine belt itself is a long, continuous belt, usually made of reinforced rubber, that snakes around various pulleys. Its function is to transfer rotational power from the engine's crankshaft to the accessories. The 2011 Grand Cherokee (depending on engine configuration - V6 or V8) has a slightly different belt routing. Key components involved include:
- Crankshaft Pulley: This pulley, directly connected to the crankshaft, is the driving force of the entire system.
- Alternator Pulley: The alternator generates electrical power to charge the battery and run electrical systems. The belt drives the alternator's rotor.
- Power Steering Pump Pulley: This pulley drives the power steering pump, which provides hydraulic assistance to the steering system.
- Air Conditioning Compressor Pulley: The AC compressor circulates refrigerant, providing cooling to the cabin. This pulley is often equipped with an electromagnetic clutch that engages and disengages the compressor as needed.
- Idler Pulleys: Smooth, non-driven pulleys that guide the belt and maintain proper tension. They often play a key role in changing the belt's direction.
- Tensioner Pulley: A spring-loaded pulley that automatically maintains the correct tension on the belt. A worn tensioner can cause belt slippage and noise. The tensioner is critical to proper belt function and longevity.
Specific belt lengths and widths vary depending on the engine and optional equipment. Always consult the vehicle's service manual or a reliable parts catalog to obtain the correct belt specification. Using the wrong belt size will lead to problems.
Understanding Diagram Symbols
Serpentine belt diagrams use specific symbols to represent components and belt routing. Familiarizing yourself with these symbols is essential for interpreting the diagram accurately.
- Solid Lines: Typically indicate the path of the belt. The thicker the line, sometimes but not always, indicates a more important section.
- Dotted Lines: Can represent the rear or hidden section of the belt (the part you don't directly see).
- Pulleys: Usually depicted as circles. Some diagrams may label the pulleys with abbreviations indicating the component they drive (e.g., ALT for alternator, P/S for power steering).
- Arrows: Indicate the direction of belt travel. Pay close attention to these arrows when routing the belt.
- Tensioner Indicator: This may not always be present, but it often looks like a small scale or pointer showing the acceptable tension range.
Colors, if present, might differentiate between the front and back side of the belt's travel, but this is not standard. Always refer to the diagram's legend for any color-coding information.
How the Serpentine Belt System Works
The serpentine belt system is a marvel of engineering efficiency. The crankshaft pulley, driven directly by the engine, provides the initial power. As the crankshaft rotates, it spins the serpentine belt. The belt, in turn, wraps around and drives the pulleys of the various accessories – alternator, power steering pump, AC compressor, and potentially other components like a water pump (though on the 2011 Grand Cherokee, the water pump is usually driven by the timing chain). The tensioner pulley, with its spring-loaded mechanism, automatically adjusts to maintain the proper belt tension. This is crucial for preventing belt slippage, which can lead to reduced performance of the accessories. Incorrect tension is one of the leading causes of premature belt failure.
Real-World Use: Basic Troubleshooting Tips
Here are some common issues you might encounter and how the serpentine belt diagram can help you diagnose them:
- Squealing Noise: A squealing noise, especially when the engine is first started or under load, often indicates a slipping belt. Check the belt tensioner. If the tensioner is weak or seized, the belt may not be making adequate contact with the pulleys. Also, inspect the belt for glazing or wear. The diagram helps you quickly identify all the pulleys the belt touches, so you can inspect them for damage.
- Accessory Failure: If your alternator, power steering, or AC compressor stops working, the serpentine belt is one of the first things to check. A broken or slipped belt will prevent the accessory from functioning. Use the diagram to confirm that the belt is properly routed around the affected accessory's pulley.
- Visible Belt Damage: Cracks, fraying, or missing chunks of the belt are clear indicators of a problem. Replace the belt immediately. Use the diagram as a reference to ensure correct routing during installation. Note the path the belt takes around the tensioner, as this is commonly a source of error.
- Excessive Belt Wear: If the belt is wearing out prematurely, it could be due to misalignment of the pulleys. Use a straight edge to check the alignment of each pulley. The diagram helps you understand the overall layout and identify potential misalignments.
Safety Considerations
Working on the serpentine belt system involves several safety considerations. Always disconnect the negative battery cable before working on any electrical components. The alternator, in particular, can be dangerous if mishandled. Ensure the engine is cool before starting work. The pulleys can be hot after the engine has been running. Keep your hands and clothing away from the moving belt and pulleys when the engine is running. Exercise caution when using tools near the belt and pulleys to avoid injury. The tensioner is under spring pressure and can release forcefully if not handled correctly. Refer to the service manual for specific instructions on releasing the tensioner. Avoid using sharp tools near the belt, as this could damage it.
The AC system contains pressurized refrigerant, so avoid disconnecting any AC lines unless you are a qualified technician. Improper handling of refrigerant can be harmful to the environment. Some components like the catalytic converter can retain heat for a long time after the engine is shut off and extreme care should be taken not to come in contact.
We have the 2011 Jeep Grand Cherokee serpentine belt diagram available for download. It includes detailed routing for various engine configurations. Having this diagram readily available can significantly simplify your maintenance and repair tasks. Proper maintenance of the serpentine belt system is essential for the reliable operation of your Jeep. By understanding the diagram and following these guidelines, you can keep your vehicle running smoothly for years to come.