2011 Jeep Wrangler Serpentine Belt Diagram
The serpentine belt in your 2011 Jeep Wrangler is a critical component, responsible for powering several essential systems. Understanding its routing, condition, and replacement procedure is crucial for maintaining your vehicle's reliability. This article provides a detailed breakdown of the 2011 Jeep Wrangler's serpentine belt diagram, offering valuable insights for intermediate car owners, modders, and DIY mechanics. We'll cover the key components, their function, and troubleshooting tips, empowering you to tackle serpentine belt-related issues with confidence. We also have the diagram available for download, linked at the end of this article.
Purpose of Understanding the Serpentine Belt Diagram
The serpentine belt diagram is your roadmap to understanding the belt's routing around various engine components. Knowing the correct path is essential for several reasons:
- Replacement: Correctly routing a new serpentine belt is paramount. An incorrectly routed belt will not function properly and can lead to component failure and even engine damage.
- Diagnosis: The diagram aids in diagnosing issues related to the serpentine belt, such as slippage, noise, or accessory malfunctions. By understanding the belt's path, you can identify potential problem areas.
- Maintenance: Regular inspection of the belt and pulleys is easier with a clear understanding of the system. The diagram helps you identify each component for inspection.
- Learning: Even if you don't plan to perform the work yourself, understanding the system gives you a better understanding of your vehicle and allows you to communicate more effectively with your mechanic.
Key Specs and Main Parts
The 2011 Jeep Wrangler (JK) utilizes a single serpentine belt to drive several accessories. Let's look at the important specifications and components:
- Belt Length: The specific length varies based on engine configuration and whether or not you have air conditioning. Refer to your owner's manual or the replacement belt's packaging for the correct length. Getting the correct length is absolutely critical for proper tensioning.
- Belt Material: Serpentine belts are typically made from a durable synthetic rubber compound, often EPDM (Ethylene Propylene Diene Monomer).
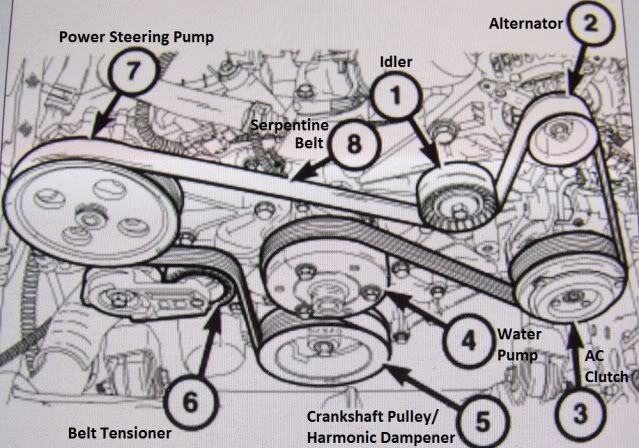
The main components driven by the serpentine belt include:
- Crankshaft Pulley: This is the driving pulley, directly connected to the engine's crankshaft. It's the source of power for the entire system.
- Alternator: The alternator charges the battery and powers the vehicle's electrical system. A slipping belt can lead to a dead battery.
- Power Steering Pump: The power steering pump provides hydraulic pressure to assist in steering. A faulty belt can cause difficult steering.
- Air Conditioning Compressor (A/C): The A/C compressor circulates refrigerant to cool the cabin. A slipping belt can result in poor A/C performance.
- Water Pump: The water pump circulates coolant through the engine to regulate temperature. A failing belt here is critical because it can lead to engine overheating and severe damage.
- Idler Pulley(s): These smooth pulleys guide the belt and maintain its tension. They are also used to help with the routing of the belt.
- Tensioner Pulley: The tensioner pulley maintains the correct tension on the serpentine belt. It's spring-loaded and automatically adjusts for belt stretch. The tensioner is essential for proper belt performance.
Symbols and Diagram Conventions
Understanding the diagram's symbols will help you interpret the belt's routing:
- Solid Lines: Represent the serpentine belt itself. The line indicates the path the belt takes around the pulleys.
- Circles: Represent the various pulleys, each labeled with its corresponding component (e.g., ALT for Alternator, P/S for Power Steering).
- Arrows: Indicate the direction of rotation for each pulley. This is important for understanding how the belt interacts with each component.
- Tensioner Symbol: The tensioner is often represented by a spring symbol, indicating its spring-loaded mechanism.
- Diagram Orientation: Diagrams are usually oriented with the front of the engine at the top. However, always verify the diagram against your specific engine.
Often, diagrams will use different line thicknesses to represent the belt. Thicker lines might indicate the 'top' side of the belt (the side you directly see), while thinner lines represent the portion that is behind or obscured by other components.
How It Works: Serpentine Belt System
The serpentine belt system is a relatively simple but crucial system. The crankshaft pulley, driven by the engine, turns the serpentine belt. The belt, in turn, wraps around and drives the various accessory pulleys. The tensioner pulley maintains the correct tension on the belt, ensuring that it doesn't slip. Proper tension is vital for optimal performance of all driven accessories. If the belt is too loose, it will slip, leading to reduced performance or failure of the accessories. If the belt is too tight, it can put excessive strain on the bearings of the accessories and the belt itself, shortening their lifespan.
The tensioner pulley is spring loaded which allows it to automatically adjust to small changes in belt length, for example, as the belt warms up during operation or as it stretches during its service life. The tensioner also helps to absorb vibrations and keep the belt running smoothly.
Real-World Use: Basic Troubleshooting Tips
Here are some common issues related to the serpentine belt and how the diagram can help:
- Squealing Noise: A squealing noise, especially during startup or acceleration, often indicates a slipping serpentine belt. Check the belt's tension and condition. Use the diagram to identify all the pulleys and check them to make sure they are turning freely. If a pulley is seized or difficult to turn, it may be the cause of the squealing.
- Accessory Malfunction: If the alternator, power steering, or A/C is not working correctly, a broken or slipping belt is a potential cause. Use the diagram to confirm the belt is properly routed and inspect the belt for damage.
- Belt Wear and Tear: Regularly inspect the belt for cracks, fraying, or missing chunks. The diagram helps you visually inspect the entire length of the belt, noting any areas of concern.
- Belt Coming Off: If the belt comes off completely, it indicates a serious problem, such as a seized pulley or a damaged tensioner. Use the diagram to verify that the belt is routed correctly, and then check the pulleys for damage or resistance.
When troubleshooting, always start with a visual inspection of the belt and pulleys. Look for signs of wear, damage, or misalignment.
Safety Precautions
Working on the serpentine belt system involves potential hazards. Keep the following safety tips in mind:
- Disconnect the Battery: Always disconnect the negative battery terminal before working on the engine. This prevents accidental electrical shorts.
- Hot Engine: Never work on the serpentine belt system when the engine is hot. Allow the engine to cool completely to avoid burns.
- Moving Parts: Keep your hands and clothing away from moving parts when the engine is running. The serpentine belt and pulleys can cause serious injury. The radiator fan is especially dangerous!
- Tensioner Tool: Use the correct tool to relieve tension on the tensioner pulley when removing or installing the belt. Improperly releasing the tension can cause injury or damage the tensioner.
- Eye Protection: Wear safety glasses to protect your eyes from debris.
Always consult your vehicle's repair manual for specific instructions and torque specifications.
Now that you understand the 2011 Jeep Wrangler serpentine belt diagram, you're better equipped to diagnose and address issues related to this crucial system. Remember to prioritize safety and consult your vehicle's repair manual for specific instructions. You can download the detailed serpentine belt diagram for the 2011 Jeep Wrangler here.