2011 Jeep Wrangler Unlimited Wiring Diagram
The 2011 Jeep Wrangler Unlimited wiring diagram is your roadmap to understanding the electrical system of this iconic vehicle. Whether you're performing routine maintenance, troubleshooting a pesky electrical gremlin, or adding aftermarket accessories, having a clear understanding of the wiring is absolutely crucial. This isn't just a nice-to-have; it's a *necessity* for avoiding costly mistakes and potentially damaging your Jeep.
Purpose of the Wiring Diagram
Think of the wiring diagram as the blueprint for your Jeep's electrical system. Its primary purpose is to illustrate the interconnectedness of all electrical components – from the battery and starter to the lights, sensors, and entertainment system. This diagram serves several key functions:
- Troubleshooting: When an electrical problem arises, the diagram helps you trace the circuit from the power source to the affected component, identifying potential breaks, shorts, or faulty connections.
- Repair: It provides guidance for replacing damaged wires, connectors, or components, ensuring you reconnect everything correctly.
- Modification: If you're adding aftermarket accessories like lights, winches, or stereo equipment, the diagram helps you identify the correct wiring points and avoid overloading circuits.
- Understanding: Even without immediate problems, studying the diagram gives you a deeper understanding of how your Jeep's electrical system works, enabling you to anticipate potential issues and perform preventative maintenance.
Key Specs and Main Parts
Before diving into the diagram itself, it's essential to understand the fundamental components of the 2011 Jeep Wrangler Unlimited's electrical system. Some key areas to look for include:
- Power Distribution: This area involves the battery, alternator, starter, and the main power distribution center (PDC). The PDC, often a box containing fuses and relays, distributes power to various circuits throughout the vehicle. Its crucial to identify the location of the PDC and the function of each fuse and relay.
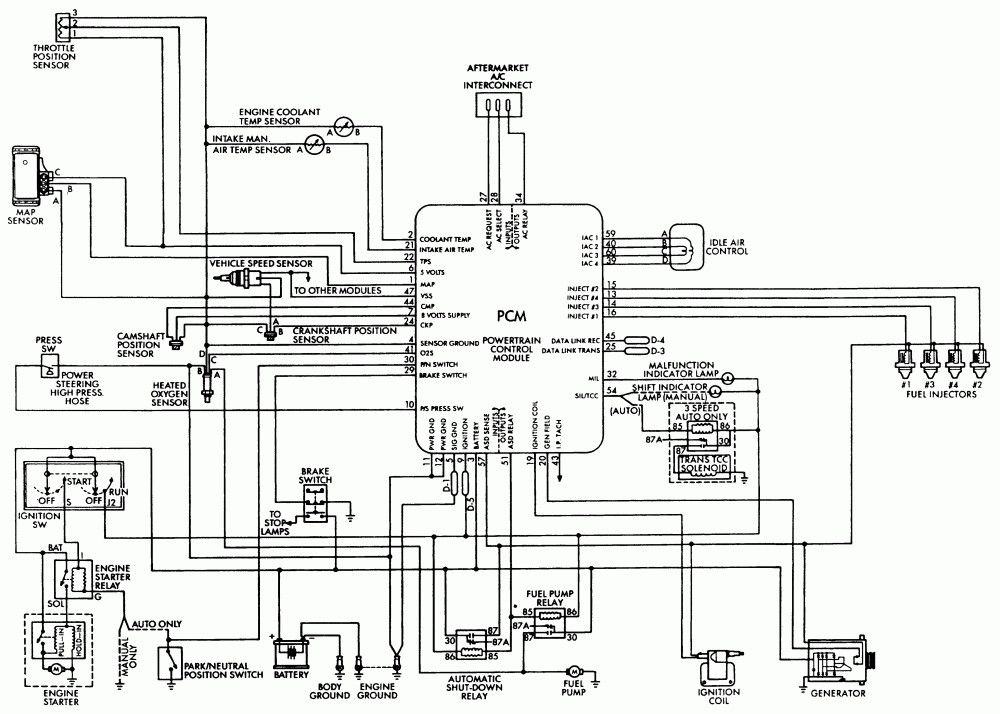
- Engine Management: This section covers the sensors, actuators, and the powertrain control module (PCM). Understanding this system allows for diagnoses of fuel, ignition, and emission control issues.
- Body Control: Look for the body control module (BCM), which controls functions like lights, windows, door locks, and the instrument cluster.
- Lighting System: This covers headlights, taillights, turn signals, and interior lights. It’s often a common area for modifications and repairs.
- Charging System: This includes the alternator, voltage regulator, and battery wiring.
- Starting System: This covers the starter motor, solenoid, and related wiring.
The 2011 Wrangler uses a 12-volt electrical system, standard for most vehicles. The wiring diagram will typically show voltage levels and amperage ratings for various circuits, providing crucial information for selecting appropriate fuses and wiring for modifications.
Symbols: Decoding the Language of Wiring Diagrams
Wiring diagrams use a standardized set of symbols to represent electrical components and connections. Understanding these symbols is key to interpreting the diagram accurately. Here's a breakdown of some common symbols you'll encounter:
- Lines: Solid lines represent wires, while dashed lines may indicate shielding or connections to ground. The thickness of the line *doesn't* necessarily indicate wire gauge, but it *does* show separate wires.
- Colors: Wires are color-coded to help identify them in the vehicle. The diagram will include a color code chart that explains the meaning of each color (e.g., RD = Red, BK = Black, GN = Green). Pay close attention to color combinations (e.g., RD/BK = Red with a Black stripe).
- Circles: Represent light bulbs or lamps.
- Squares and Rectangles: Represent relays, switches, or control modules.
- Diamonds: Usually indicate ground connections.
- Zigzag Lines: Represent resistors.
- Capacitor Symbol: Will appear as two small vertical lines.
- Fuses and Circuit Breakers: Depicted as squiggly lines within a rectangle.
It's crucial to reference the diagram's legend or key to fully understand the specific symbols used in that particular diagram. Manufacturers sometimes use slightly different variations, although the core symbols remain consistent.
How It Works: Tracing the Circuit
To understand how the electrical system works, you need to be able to trace the flow of electricity through the diagram. Start by identifying the power source (usually the battery). Follow the lines representing the wires to the component you're interested in. Pay attention to switches, relays, and fuses along the way. These components control the flow of electricity to the device. Consider a simple circuit, such as the headlights. The diagram will show the path from the battery, through a fuse, to the headlight switch, then to the headlights themselves, and finally to ground. When the switch is closed, the circuit is complete, and the headlights turn on.
Understanding the concept of ground is crucial. Ground provides a return path for the electricity back to the battery, completing the circuit. Without a proper ground, the circuit won't function.
Real-World Use: Basic Troubleshooting
Let's say your 2011 Wrangler's tail lights aren't working. Here's how you might use the wiring diagram to troubleshoot the problem:
- Consult the Diagram: Locate the tail light circuit on the wiring diagram.
- Check the Fuse: Identify the fuse that protects the tail light circuit and check if it's blown.
- Inspect the Switch: If the fuse is good, examine the tail light switch for any signs of damage or malfunction. Use a multimeter to test for continuity across the switch terminals when it's in the "on" position.
- Trace the Wiring: Follow the wiring from the switch to the tail lights, looking for any breaks, shorts, or loose connections. Check the ground connection for the tail lights as well.
- Test the Bulbs: Before diving too deep, check the simple things! Make sure the bulbs themselves are not burnt out.
Remember to use a multimeter to test for voltage and continuity along the circuit. This will help you pinpoint the exact location of the problem.
Safety: Handling Electrical Components with Care
Working with electrical systems can be dangerous if you don't take proper precautions. Here are some safety guidelines to follow:
- Disconnect the Battery: Always disconnect the negative battery cable before working on any electrical components. This prevents accidental shorts and shocks.
- Use Proper Tools: Use insulated tools specifically designed for electrical work.
- Avoid Water: Never work on electrical systems in wet conditions.
- Identify High-Risk Components: Be especially careful around the airbag system. Accidental deployment of an airbag can cause serious injury. Refer to the service manual for specific procedures for working around airbags. Also, the alternator is an area you need to be cautious around.
- Double-Check Your Work: Before reconnecting the battery, double-check all your connections to ensure they are secure and correct.
Warning: The airbag system is a high-voltage system and should only be serviced by a qualified technician. Incorrect handling can lead to serious injury or death.
Always refer to the factory service manual for specific safety precautions and procedures for your 2011 Jeep Wrangler Unlimited.
By understanding and effectively using the 2011 Jeep Wrangler Unlimited wiring diagram, you empower yourself to confidently tackle a wide range of electrical repairs and modifications. Remember to prioritize safety and take your time to trace the circuits carefully.
We have the complete 2011 Jeep Wrangler Unlimited wiring diagram available for download. This diagram is a valuable resource that will assist you in understanding and maintaining your Jeep's electrical system. You can download the diagram by following the instructions provided.