2011 Kia Sorento 2.4 Serpentine Belt Diagram
Welcome, fellow gearheads, to a deep dive into the serpentine belt system of the 2011 Kia Sorento with the 2.4L engine. Understanding this system is crucial for maintaining your Sorento's performance and preventing potentially costly breakdowns. This guide will equip you with the knowledge to interpret the serpentine belt diagram accurately, diagnose common issues, and even tackle some DIY repairs with confidence. Think of this as your personal mechanic's cheat sheet, tailored for the experienced DIYer.
Purpose of the Serpentine Belt Diagram
Why bother with a diagram? Simple: precision and efficiency. The serpentine belt diagram is your roadmap to understanding the belt's routing around various engine components. It's essential for several reasons:
- Replacement: When it's time to replace a worn-out or cracked belt, the diagram ensures you install the new one correctly. Incorrect routing can lead to component failure and even engine damage.
- Troubleshooting: A squealing or slipping belt often points to a problem in the system. The diagram helps you identify the components involved and diagnose the root cause.
- Maintenance: Familiarizing yourself with the belt's path allows for easier inspection and preventative maintenance.
- Learning: Understanding how the belt drives various accessories enhances your overall automotive knowledge and gives you a deeper appreciation for your Sorento's engineering.
Key Specs and Main Parts
Before we dissect the diagram, let's familiarize ourselves with the key components involved in the 2011 Kia Sorento 2.4L's serpentine belt system. Knowing the names and functions of these parts is fundamental for accurate diagnosis and repair:
- Serpentine Belt: The main component, a long, continuous belt made of reinforced rubber that transmits rotational force from the crankshaft to various engine accessories.
- Crankshaft Pulley (Crank Pulley): Driven directly by the engine's crankshaft, this pulley is the driving force behind the entire serpentine belt system.
- Alternator: This component generates electrical power to charge the battery and run the car's electrical systems. The serpentine belt turns its pulley.
- Power Steering Pump: Provides hydraulic pressure to assist steering, making it easier to turn the steering wheel. Driven by the serpentine belt.
- Air Conditioning Compressor: Compresses refrigerant to cool the cabin air. You guessed it – belt-driven!
- Water Pump: Circulates coolant throughout the engine to regulate temperature. While *some* 2.4L Sorento models might have the water pump driven by the timing chain, it's essential to confirm if yours is serpentine belt driven to avoid incorrect assessment.
- Tensioner Pulley: A spring-loaded pulley that maintains the correct tension on the serpentine belt, preventing slippage and ensuring proper operation of all driven components. There's usually an indicator mark to show correct tension.
- Idler Pulley: A smooth pulley that guides the serpentine belt around the engine, changing its direction and preventing interference with other components. It does not drive any accessories.
Important Note: While most 2011 Kia Sorento 2.4L engines use a fairly standard serpentine belt layout for the accessories listed above, there can be slight variations depending on the specific trim level and options (e.g., with or without air conditioning). Always double-check your vehicle's specific diagram before performing any work.
Symbols and Conventions in the Diagram
Serpentine belt diagrams use specific symbols and conventions to convey information efficiently. Understanding these symbols is crucial for interpreting the diagram accurately. Here's a breakdown of the most common symbols you'll encounter:
- Solid Lines: Represent the path of the serpentine belt itself. The thickness of the line might indicate the width of the belt in some diagrams, although this is rare.
- Dashed Lines: Often indicate the *back* of the belt, showing how it wraps around pulleys that are obscured from the viewer's perspective.
- Arrows: Show the direction of belt rotation. Pay close attention to these arrows, as incorrect installation will lead to immediate failure.
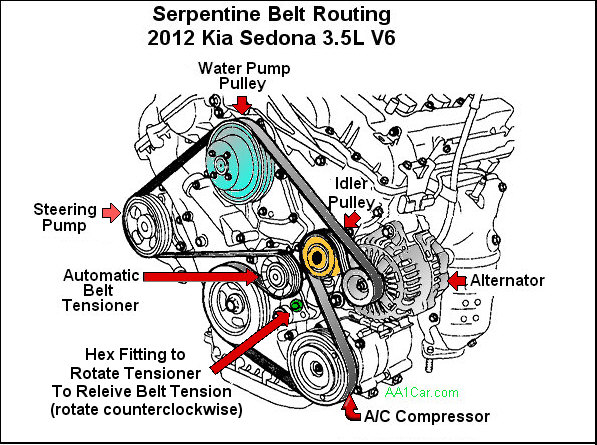
- Pulleys: Depicted as circles, often with a symbol inside indicating the component they are connected to (e.g., "ALT" for Alternator, "P/S" for Power Steering).
- Tensioner: Usually shown with a spring symbol, representing the tensioning mechanism. The diagram should show the direction in which you need to apply force to relieve the tension for belt removal.
- Idler Pulley: Plain circles, usually without any specific designation beyond their purpose (Idler).
Color Coding: Some diagrams use color coding to highlight different parts of the system. For example, the belt path might be in blue, while the pulleys are in gray or black. However, color coding is not universally used.
How the Serpentine Belt System Works
The serpentine belt system is a marvel of efficiency. The engine's crankshaft turns the crankshaft pulley. This rotational force is then transferred to the serpentine belt. The belt, in turn, wraps around the pulleys of the various engine accessories, driving them all with a single belt. The tensioner pulley ensures the belt maintains the correct tension, preventing slippage and ensuring optimal performance of all driven components.
Think of it like a well-coordinated orchestra. The crankshaft is the conductor, setting the tempo. The serpentine belt is the instrument, transmitting the rhythm to all the musicians (the accessories). And the tensioner keeps everyone in tune, ensuring a harmonious performance.
Real-World Use: Troubleshooting Tips
Now, let's put this knowledge into practice. Here are some common serpentine belt issues and how the diagram can help you diagnose them:
- Squealing Noise: This is often caused by a slipping belt. Check the belt tension using the tensioner indicator. If the tension is correct, inspect the belt for wear, cracks, or glazing. The diagram helps you quickly identify all the pulleys the belt wraps around so you can inspect their condition and alignment. A misaligned pulley can also cause squealing.
- Belt Breakage: This can be caused by excessive wear, a seized pulley, or improper installation. The diagram reminds you of the correct routing, which is crucial for preventing stress on the belt. Check all pulleys for free rotation. If a pulley is seized, it needs to be replaced.
- Accessory Malfunction: If an accessory isn't working correctly (e.g., the alternator isn't charging the battery), first check the belt for proper tension and condition. If the belt is fine, the problem may lie within the accessory itself. The diagram confirms that the accessory is indeed driven by the serpentine belt, ruling out other possible causes.
Important: When inspecting the belt, look for signs of wear, such as cracks, fraying, glazing (a shiny, hardened surface), and missing chunks. Any of these signs indicate that the belt needs replacement.
Safety Precautions
Working on the serpentine belt system involves inherent risks. Always prioritize safety:
- Disconnect the Battery: Before working on any electrical component, disconnect the negative terminal of the battery to prevent accidental shocks or short circuits.
- Hot Engine: Never work on the engine while it's hot. Allow it to cool down completely to avoid burns.
- Moving Parts: Keep your hands and clothing clear of the serpentine belt and pulleys while the engine is running. Serious injury can result from entanglement.
- Tensioner Release: When releasing the belt tension, use the correct tool and follow the manufacturer's instructions carefully. The spring-loaded tensioner can snap back with considerable force.
- Eye Protection: Wear safety glasses to protect your eyes from debris.
Risky Components: The crankshaft pulley and the alternator are particularly risky components due to their direct connection to the engine and the electrical system, respectively. Exercise extra caution when working near these parts.
Conclusion
Understanding the serpentine belt system of your 2011 Kia Sorento 2.4L is essential for both preventative maintenance and troubleshooting. Armed with the knowledge from this guide and a clear diagram, you're well-equipped to tackle many serpentine belt-related issues yourself, saving you time and money. Remember to prioritize safety and consult a qualified mechanic if you're unsure about any procedure.
We have the full serpentine belt diagram file available for download. It will be a great resource for your future maintenance and repair endeavors.