2011 Mazda 3 Serpentine Belt Diagram
Alright, let's talk about the serpentine belt diagram for your 2011 Mazda 3. This might seem like a small thing, but having a good understanding of this diagram is crucial whether you're planning some DIY maintenance, troubleshooting a squealing noise, or just want to understand how your engine accessories are driven. I’m here to give you the expert, yet approachable, rundown you need.
Purpose of the Serpentine Belt Diagram
The serpentine belt diagram is essentially a roadmap for how the serpentine belt is routed around the various pulleys on your engine. It's not just a pretty picture; it's a critical tool for several reasons:
- Repair and Replacement: When you're replacing a worn or broken serpentine belt, the diagram ensures you route the new belt correctly. Incorrect routing can lead to serious engine damage.
- Troubleshooting: A diagram helps you visually inspect the belt's path for misalignments, worn pulleys, or other issues that might be causing problems like squealing or accessory failures.
- Preventative Maintenance: Understanding the belt's routing allows you to quickly assess the condition of all the components driven by the belt during routine checks.
- Learning and Understanding: For any DIYer or car enthusiast, familiarizing yourself with the serpentine belt diagram helps you understand the relationship between the engine and its accessories. You'll gain a deeper insight into how your car works.
Key Specs and Main Parts of the 2011 Mazda 3 Serpentine Belt System
The 2011 Mazda 3 comes in several engine configurations (2.0L and 2.5L), and while the basic principle remains the same, the specific routing of the serpentine belt *can* vary slightly. For this discussion, we'll focus on the most common setups. Here's what you need to know:
Main Components:
- Crankshaft Pulley (or Harmonic Balancer): This is the main driving pulley, connected directly to the crankshaft. It's the heart of the system, transferring engine rotation to the belt.
- Alternator Pulley: The alternator generates electricity to power your car's electrical system and charge the battery. The serpentine belt drives the alternator.
- Air Conditioning (A/C) Compressor Pulley: The A/C compressor circulates refrigerant to cool the cabin. This pulley engages and disengages as needed.
- Power Steering Pump Pulley: The power steering pump provides hydraulic assistance to make steering easier. The serpentine belt drives this pump.
- Idler Pulleys: These are smooth pulleys used to guide the belt around the engine and maintain proper tension. They don't drive any accessories themselves.
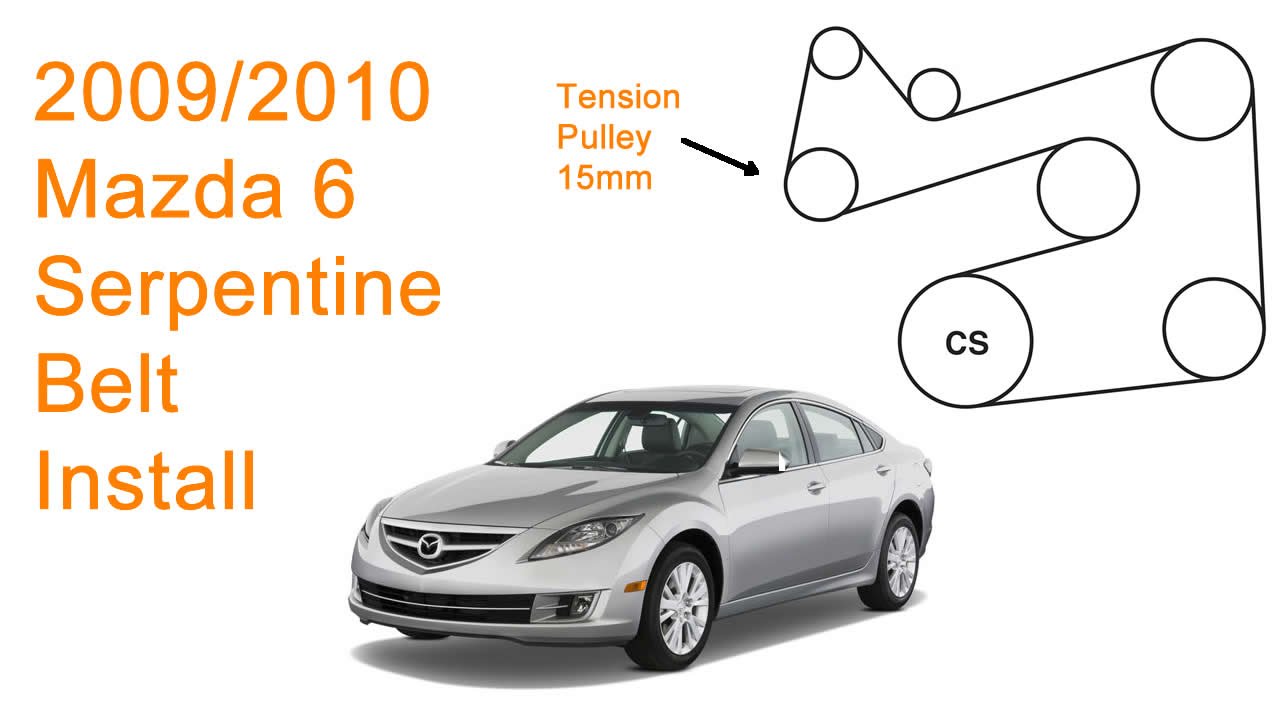
- Tensioner Pulley: This spring-loaded pulley maintains the correct tension on the serpentine belt, preventing slippage and extending the belt's lifespan. This is a *critical* component. A failing tensioner is a common cause of belt noise and premature wear.
- Serpentine Belt: The belt itself is a multi-ribbed, continuous belt made of durable rubber composite. It's designed to grip the pulleys and transfer rotational force.
Key Specs (General):
- Belt Length: This varies depending on the engine and accessories installed. Consult your owner's manual or a parts catalog for the correct length. Using the wrong length belt can cause tensioning problems and damage.
- Belt Material: Typically made of EPDM (Ethylene Propylene Diene Monomer) rubber, which offers good heat and abrasion resistance.
- Pulley Grooves: The number and spacing of the grooves on the belt and pulleys must match for proper engagement.
Understanding Serpentine Belt Diagram Symbols
Serpentine belt diagrams are designed to be clear and easy to understand, even if you're not a seasoned mechanic. Here's a breakdown of common symbols and conventions:
- Solid Lines: Represent the path of the serpentine belt itself. Follow the line to see how the belt is routed.
- Arrows: Indicate the direction of belt travel. This is crucial for ensuring correct installation.
- Circles: Represent pulleys. Larger circles usually indicate the crankshaft pulley or accessory pulleys, while smaller circles are typically idler pulleys.
- Icons/Labels: Each pulley is typically labeled with an abbreviation indicating the component it drives. For example: "ALT" for alternator, "A/C" for air conditioning compressor, "P/S" for power steering pump, "CRANK" for crankshaft. "IDLER" identifies the idler pulleys and "TENSIONER" identifies the tensioner pulley.
- Dotted Lines (Less Common): Sometimes used to indicate the back (smooth side) of the belt making contact with a pulley. This is less common but can be important for understanding the belt's path.
- Color Coding (Rare): Some diagrams may use different colors to highlight specific sections of the belt path, but this is not a standard practice. Don't rely on color coding unless it's explicitly explained in the diagram's legend.
How It Works: Transferring Power
The serpentine belt system is a relatively simple, yet effective, method for transferring power from the engine to various accessories. The crankshaft pulley, driven directly by the engine, rotates the serpentine belt. The belt, in turn, grips the pulleys of the alternator, A/C compressor, power steering pump, and other accessories, causing them to rotate as well. The tensioner pulley maintains constant tension on the belt, ensuring a firm grip and preventing slippage. If the belt slips, accessories will not function properly, and you will likely hear a high-pitched squealing noise.
The specific arrangement of the pulleys is carefully designed to maximize the contact area between the belt and the pulleys, ensuring efficient power transfer. The idler pulleys help guide the belt around the engine and increase the wrap angle (the amount of the pulley's circumference that the belt contacts) on certain pulleys.
Real-World Use: Basic Troubleshooting
Here's how you can use the serpentine belt diagram to troubleshoot common problems:
- Squealing Noise: A squealing noise, especially when the engine is first started or under heavy load, often indicates a slipping serpentine belt. Use the diagram to check the belt's tension. A loose belt is the most likely culprit. Also, inspect the belt for cracks, wear, or glazing.
- Accessory Failure: If an accessory (e.g., alternator, A/C compressor) stops working, check the serpentine belt diagram to verify that the belt is routed correctly and that the pulley is turning. A broken or missing belt is an obvious problem. Also, check the accessory's pulley itself to ensure it is not seized.
- Visual Inspection: Regularly inspect the serpentine belt for signs of wear, such as cracks, fraying, or missing ribs. Use the diagram as a reference to check the belt's alignment and ensure it's properly seated on all the pulleys.
- Misalignment: If you notice unusual wear on the edge of the belt, it could indicate a misaligned pulley. Use a straight edge to check the alignment of the pulleys and compare it to the diagram.
Safety Considerations
Working on the serpentine belt system involves certain risks. Here's what you need to keep in mind:
- Engine Off: Always work on the serpentine belt system with the engine off and the key removed from the ignition.
- Hot Engine: Allow the engine to cool completely before working on the belt system. The engine components can get extremely hot.
- Rotating Parts: Be extremely careful to keep your hands, clothing, and tools away from the rotating parts of the engine when the engine is running.
- Tensioner Spring: The tensioner pulley is spring-loaded and can snap back forcefully if not handled correctly. Use the correct tool to release the tension before removing the belt. Never attempt to release the tensioner without the proper tool.
- Battery Disconnect (Optional but Recommended): Disconnecting the negative battery cable can help prevent accidental starting of the engine while you're working on the belt system.
Important Note: If you're not comfortable working on the serpentine belt system yourself, it's best to take your car to a qualified mechanic. Incorrect installation or improper handling can lead to serious engine damage.
By using the proper tools and consulting the serpentine belt diagram, you can keep your car’s engine and accessories running smoothly. A properly maintained serpentine belt system is key to ensuring reliable performance and avoiding costly repairs down the road.
We have a high-resolution, printable serpentine belt diagram specific to the 2011 Mazda 3. You can download it here: [Link to Download]. Make sure to select the diagram that matches your engine configuration (2.0L or 2.5L). Good luck!