2011 Mercedes Ml350 Serpentine Belt Diagram
Alright, let's dive into the serpentine belt system of your 2011 Mercedes-Benz ML350. Knowing the layout and functionality of this seemingly simple belt is crucial for routine maintenance, troubleshooting annoying squeals, and even preventing catastrophic engine damage. This guide will act as your personal instruction manual to understanding the 2011 ML350's serpentine belt diagram.
Purpose of Understanding the Serpentine Belt Diagram
Why bother learning this? Because the serpentine belt is responsible for driving several vital engine components. A broken or worn belt can lead to:
- Loss of Power Steering: Making the steering wheel incredibly difficult to turn.
- Alternator Failure: Resulting in a dead battery and a non-starting vehicle.
- Cooling System Failure: If the belt drives the water pump, overheating and potential engine damage are imminent.
- Air Conditioning Loss: Say goodbye to cool air on a hot day.
Having a clear understanding of the belt's routing – and therefore, the functions it drives – allows you to quickly diagnose problems, perform replacements yourself (saving on labor costs), and even proactively identify potential issues before they escalate into more significant (and expensive) repairs. Furthermore, understanding the system allows you to make informed decisions about replacement parts, such as choosing a high-quality belt designed for longevity.
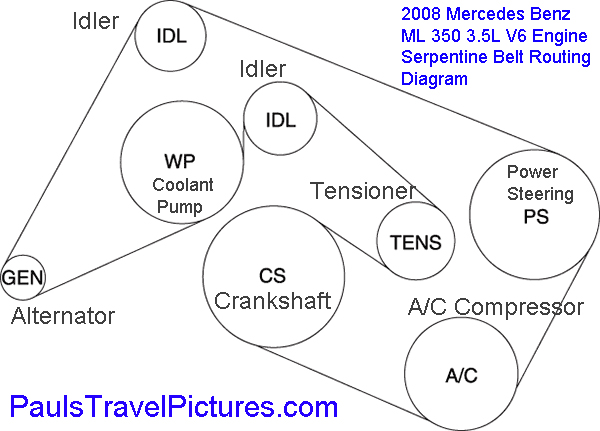
Key Specs and Main Parts
The serpentine belt system on the 2011 ML350 is fairly standard, but here's a breakdown of the key components you'll find on the diagram:
- Serpentine Belt: The heart of the system. Usually made of a reinforced rubber compound. Key spec to look for when replacing is the belt's length and number of ribs (ensure it matches OEM specifications).
- Crankshaft Pulley (or Damper): Located at the bottom of the engine, connected directly to the crankshaft. This pulley initiates the belt's movement, driven by the engine's rotation.
- Alternator Pulley: Driven by the belt, the alternator generates electricity to charge the battery and power the car's electrical systems.
- Power Steering Pump Pulley: Provides hydraulic pressure to assist in steering.
- Water Pump Pulley: Circulates coolant throughout the engine to maintain operating temperature.
- Air Conditioning Compressor Pulley: Compresses refrigerant for the air conditioning system.
- Tensioner Pulley: This spring-loaded pulley maintains the correct tension on the belt. Critical for proper operation and belt longevity. A failing tensioner is a common cause of belt squeal.
- Idler Pulley: Smooth, non-driven pulleys that guide the belt and provide optimal wrap around other pulleys.
These components, especially the tensioner, are important to check for wear and tear during regular maintenance. A seized pulley can cause the belt to shred, leading to the issues mentioned earlier.
Understanding the Diagram's Symbols
A good serpentine belt diagram isn't just a pretty picture; it's a roadmap. Here's how to decipher its language:
- Solid Lines: Indicate the path of the serpentine belt. The thickness of the line doesn’t typically have any specific meaning.
- Arrows: Show the direction of belt rotation around each pulley. This is essential for understanding how each component is driven.
- Component Icons: Each pulley is represented by a circle, often with a small icon inside indicating the component it drives (e.g., a lightning bolt for the alternator, a steering wheel for the power steering pump).
- Tensioner Representation: The tensioner pulley is often shown with a spring or an arrow indicating the direction of its tensioning force. Look for the pivot point, indicating the arm’s range of motion.
Colors aren't typically used on serpentine belt diagrams, but if you encounter one that does, a legend should explain the meaning of each color. Most commonly, colors are used to highlight the *path* of the belt.
How the Serpentine Belt System Works
The system's functionality is elegantly simple. The crankshaft pulley, connected to the engine's crankshaft, rotates and drives the serpentine belt. The belt, in turn, wraps around all the other pulleys, transferring the rotational force from the crankshaft to the alternator, power steering pump, water pump, and air conditioning compressor.
The tensioner pulley plays a crucial role by maintaining constant pressure on the belt. This prevents the belt from slipping, especially under heavy loads (like when the AC is running full blast or when the power steering is at full lock). If the belt slips, it won't drive the accessories properly, and you'll likely hear a squealing or chirping noise.
Think of it as a chain reaction: the crankshaft starts the motion, and the serpentine belt transmits it to all the necessary components. If one link in that chain fails (e.g., a broken belt, a seized pulley), the whole system suffers.
Real-World Use: Basic Troubleshooting
Here's how the diagram can help you diagnose common issues:
- Squealing Belt: This is often caused by a worn belt, a loose tensioner, or a misaligned pulley. Visually inspect the belt for cracks, fraying, or glazing. Check the tensioner for proper movement and spring pressure. Use the diagram to confirm the belt is routed correctly – a misrouted belt is a common cause of noise and premature wear.
- Loss of Power Steering, Alternator Failure, Overheating: These symptoms could indicate a broken or slipped belt. Immediately check the belt's condition and routing. If the belt is intact, suspect a seized pulley. Using the diagram, identify the pulley associated with the failed system (e.g., the power steering pump pulley if you've lost power steering). Try to rotate the pulley by hand (with the engine off, of course!). If it doesn't turn freely, it's likely seized and needs to be replaced.
- Belt Wear Patterns: The diagram can help you understand if the belt is rubbing on something incorrectly. Look at the edges of the belt for wear. This can indicate a misalignment, possibly a worn bearing.
If you're replacing the belt, always refer to the diagram to ensure proper routing. Incorrect routing can damage the belt and components.
Safety Precautions
Working on the serpentine belt system can be hazardous. Keep these safety tips in mind:
- Disconnect the Negative Battery Terminal: This is a must before working on any electrical components (like the alternator).
- Work on a Cold Engine: Avoid burns by allowing the engine to cool down completely before working near it.
- Keep Fingers Clear of Moving Parts: Never attempt to adjust or inspect the belt while the engine is running.
- The Tensioner is Spring-Loaded: Be extremely careful when releasing the tension on the belt. Wear safety glasses and use the correct tools to avoid injury. The tensioner can snap back with considerable force.
- Sharp Edges: Be aware of sharp edges on pulleys and brackets. Wear gloves to protect your hands.
Remember that the alternator can store a charge even after the battery is disconnected. Exercise caution when handling the alternator's terminals.
We have the serpentine belt diagram for your 2011 Mercedes-Benz ML350 available for download. Click here [link to file download]. This will provide you with a high-resolution image for easy reference during your repairs and maintenance.
By understanding the serpentine belt system and having access to the diagram, you're well-equipped to keep your 2011 ML350 running smoothly and reliably. Good luck!