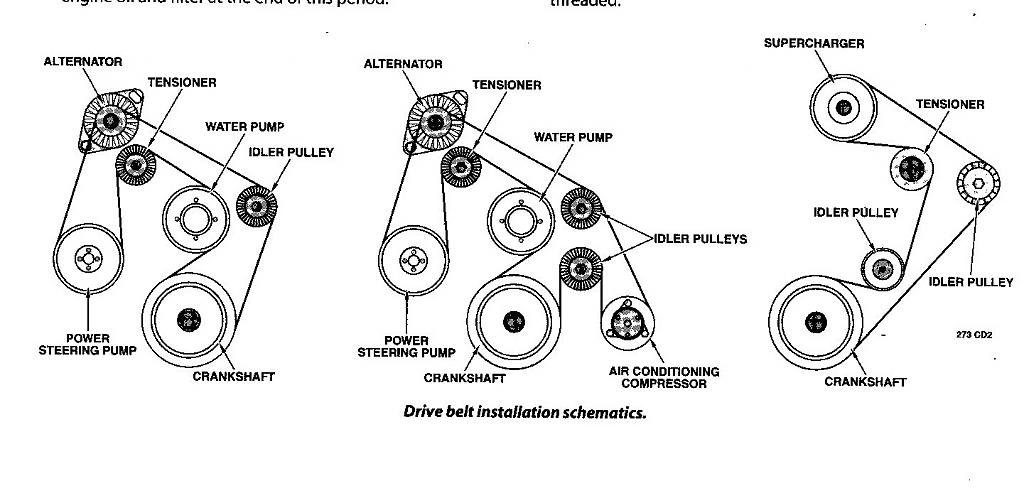
2011 Nissan Altima 2.5 Belt Diagram
Understanding the serpentine belt system in your 2011 Nissan Altima 2.5L is crucial for maintenance, troubleshooting, and repair. A clear belt diagram is your roadmap to navigating this system, preventing costly breakdowns and ensuring optimal engine performance. This article breaks down the 2011 Altima 2.5L serpentine belt diagram, equipping you with the knowledge to confidently work on your vehicle.
Purpose of the Belt Diagram
The serpentine belt diagram is an invaluable resource for several reasons:
- Repair and Replacement: When replacing a worn or damaged serpentine belt, the diagram ensures you route the new belt correctly. Incorrect routing can damage components and lead to belt slippage, reducing the efficiency of vital systems.
- Troubleshooting: If you're experiencing issues like a squealing belt, power steering failure, or A/C problems, the diagram helps you identify the components driven by the belt, narrowing down the potential causes.
- Preventive Maintenance: Regularly inspecting the belt and pulleys, using the diagram as a reference, allows you to identify potential problems early, preventing major breakdowns.
- Understanding Your Vehicle: Even if you're not actively working on your car, understanding the belt system provides a deeper insight into how your engine operates.
Key Specs and Main Parts
The 2011 Nissan Altima 2.5L uses a single serpentine belt to drive multiple engine accessories. Here are the key components involved:
- Crankshaft Pulley: This pulley is directly connected to the crankshaft and provides the driving force for the serpentine belt.
- Alternator Pulley: The alternator, responsible for charging the battery and powering the electrical system, is driven by the belt.
- Power Steering Pump Pulley: This pulley drives the power steering pump, which provides hydraulic assistance for steering.
- Air Conditioning Compressor Pulley: The A/C compressor, essential for cooling the cabin, is also belt-driven.
- Tensioner Pulley: This spring-loaded pulley maintains the correct tension on the serpentine belt. Proper tension is crucial for preventing slippage and ensuring optimal performance of all accessories.
- Idler Pulley: An idler pulley provides a smooth path for the belt, changing the direction of the belt without driving any accessory.
- Serpentine Belt: The continuous belt that connects all the pulleys, transmitting power from the crankshaft to the accessories.
The 2.5L engine usually requires a serpentine belt around 90 inches in length but it's always best to double check your manufacturer's specifications for the correct length for your vehicle. Specific belt sizes can vary slightly depending on factory options. The belt tension is also critical and is usually specified in foot-pounds or inch-pounds of torque for the tensioner pulley's adjustment bolt.
Understanding the Diagram Symbols
A serpentine belt diagram isn't just a pretty picture; it uses specific symbols to convey information:
- Solid Lines: These represent the path of the exterior (grooved) side of the serpentine belt.
- Dashed Lines: These indicate the path of the interior (smooth) side of the serpentine belt. When the belt is on the smooth side of a pulley, it is not driving it.
- Pulleys: These are represented as circles. Often, there are small icons within the circle to indicate the specific component the pulley belongs to (e.g., a battery symbol for the alternator).
- Arrows: Arrows show the direction of rotation for each pulley.
- Tensioner: This is usually marked with a spring symbol or the word "Tensioner." It may also have an arrow indicating the direction to rotate the tensioner to release belt tension.
How It Works: Power Transmission
The serpentine belt system operates on a simple principle: the rotational force from the engine's crankshaft is transferred to various accessories via the belt. The crankshaft pulley, driven by the engine, spins the serpentine belt. The belt, in turn, wraps around and spins the pulleys of the alternator, power steering pump, A/C compressor, and idler pulley. The tensioner pulley plays a crucial role by maintaining consistent tension on the belt. This ensures that the belt has sufficient grip on each pulley to prevent slippage and efficiently transfer power. Without proper tension, the accessories won't operate correctly, leading to symptoms like a dimming headlight, hard steering, or lack of air conditioning.
Real-World Use: Basic Troubleshooting Tips
Here are a few common problems and how the belt diagram can help:
- Squealing Belt: A squealing belt is often a sign of slippage. Using the diagram, check the belt's condition. Look for cracks, fraying, or glazing. Ensure the tensioner is functioning correctly and maintaining proper tension. Misalignment of pulleys can also cause squealing; visually inspect the alignment using the diagram to confirm component placement.
- Accessory Failure: If your power steering, A/C, or charging system fails, refer to the diagram to verify that the belt is properly routed and tensioned. A broken or slipped belt could be the culprit.
- Belt Wear: Regularly inspect the belt for wear and tear. The diagram helps you locate the entire belt path for a complete inspection. If you find signs of damage, replace the belt immediately.
When diagnosing, always start by visually inspecting the belt's condition and routing against the diagram. A small flashlight can be helpful for inspecting hard-to-reach areas. Listen for unusual noises while the engine is running, and compare them to the diagram to pinpoint the potential source.
Safety First
Working on the serpentine belt system involves several safety precautions:
- Disconnect the Battery: Before starting any work, disconnect the negative terminal of the battery to prevent electrical shocks.
- Hot Engine: Never work on the belt system when the engine is hot. Allow the engine to cool completely to avoid burns.
- Moving Parts: Keep your hands, hair, and clothing clear of the moving belt and pulleys when the engine is running.
- Tensioner Tool: Always use the correct tool to release the tension on the belt tensioner. Attempting to release the tension manually can be dangerous and may damage the tensioner.
- The Radiator Fan: Be extremely careful of the radiator fan, especially if it's electrically driven. It can activate even when the engine is off. Disconnect the fan's electrical connector if possible, or take extreme care to avoid contact.
Replacing the serpentine belt can be relatively simple with the right knowledge and tools, but always prioritize safety.
We have a high-resolution version of the 2011 Nissan Altima 2.5L Serpentine Belt Diagram available for download. This will provide you with a detailed visual reference for your maintenance and repair needs. Understanding and utilizing this diagram will empower you to confidently tackle various maintenance tasks on your 2011 Altima, saving you time and money.