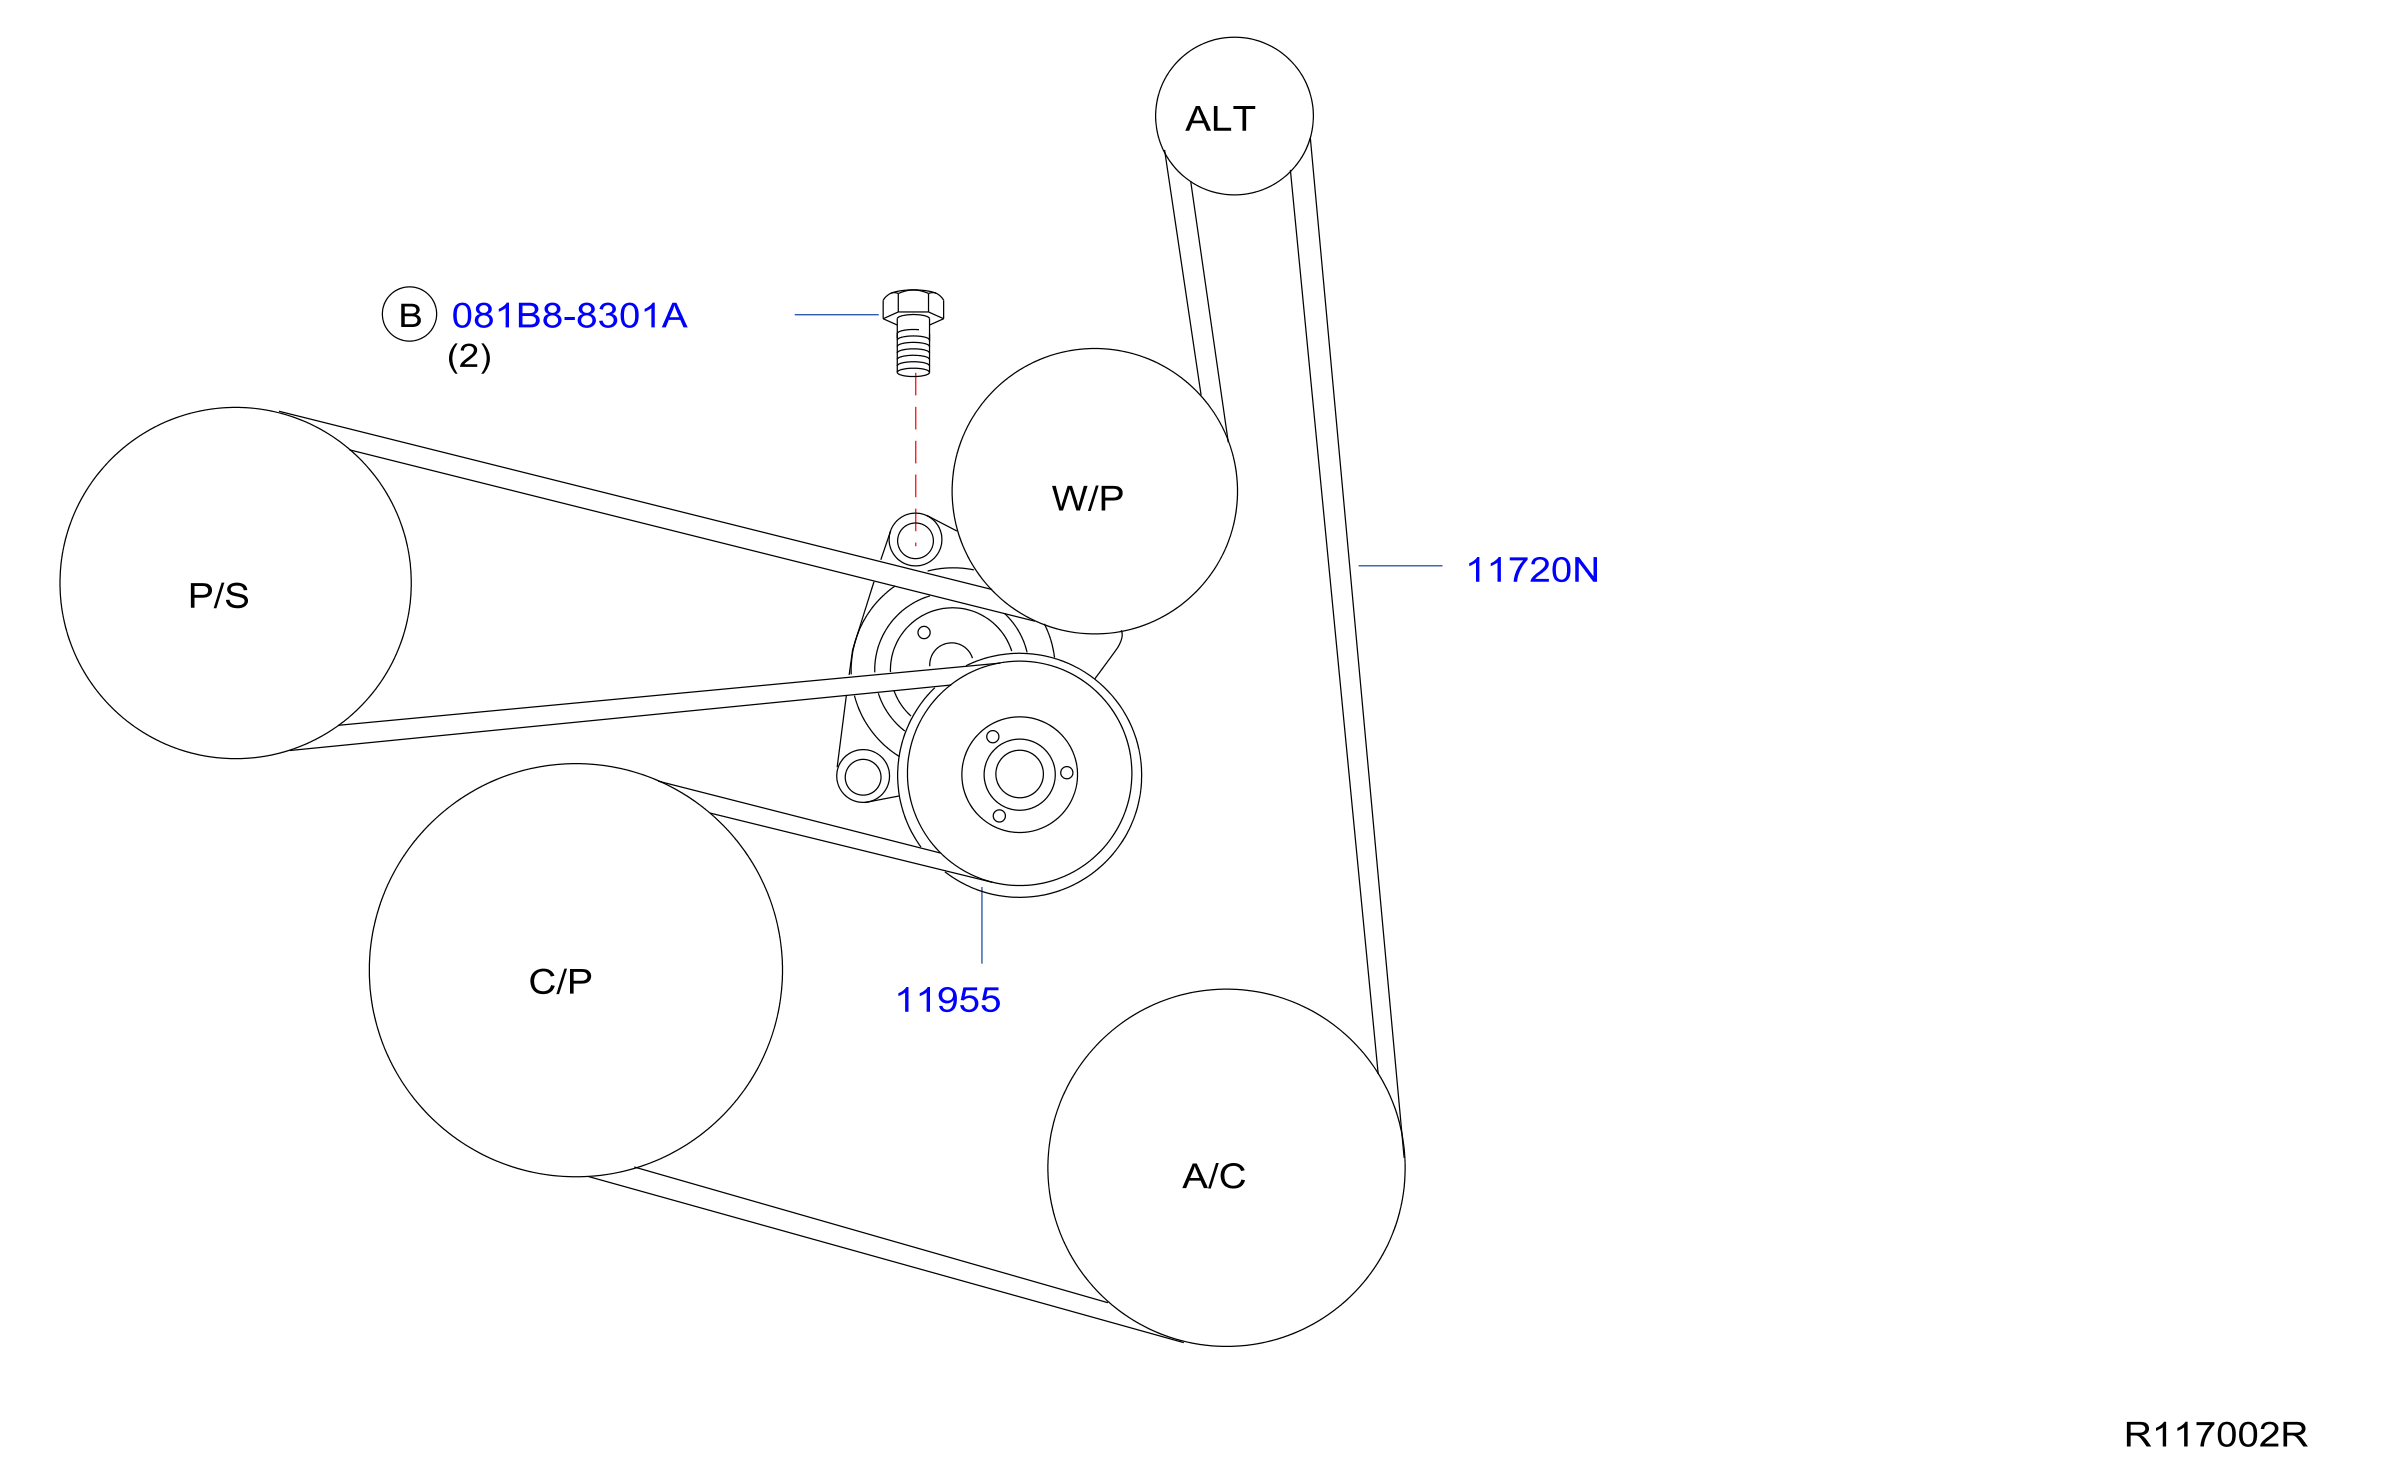
2011 Nissan Altima 2.5 Serpentine Belt Diagram
If you're tackling some maintenance or repairs on your 2011 Nissan Altima 2.5, understanding the serpentine belt system is crucial. This article provides a comprehensive guide to the 2011 Altima 2.5 serpentine belt diagram, covering everything from its purpose to real-world troubleshooting. We'll break down the diagram's components and functionality, ensuring you can confidently handle related tasks.
Purpose of the Serpentine Belt Diagram
The serpentine belt diagram is your roadmap to understanding the belt's routing around various engine components. Why is this important? Several reasons:
- Repairs and Replacements: If your serpentine belt breaks or shows signs of wear, the diagram is essential for correct installation of the new belt. Incorrect routing can damage the belt and other components.
- Troubleshooting: Identifying squealing noises, power steering issues, or charging problems often begins with inspecting the serpentine belt and its related pulleys. The diagram helps you pinpoint potential problem areas.
- Learning Engine Systems: Understanding the belt's routing offers insight into how different engine accessories are driven, enhancing your overall automotive knowledge.
Think of it as a detailed map. You wouldn't navigate a complex city without a map, and you shouldn't attempt serpentine belt work without understanding its diagram.
Key Specs and Main Parts
The serpentine belt system on the 2011 Nissan Altima 2.5 is designed to efficiently transfer power from the engine's crankshaft to various accessories. Here are the key components you'll find in the diagram:
- Crankshaft Pulley: This is the driving force. Connected directly to the crankshaft, it spins and drives the serpentine belt.
- Alternator Pulley: The alternator generates electrical power for the vehicle. The serpentine belt spins its pulley.
- Power Steering Pump Pulley: This pump provides hydraulic assistance for steering. Again, powered by the serpentine belt.
- Air Conditioning Compressor Pulley: Engages when you turn on the AC, compressing refrigerant to cool the cabin.
- Idler Pulley(s): Smooth, ungrooved pulleys that guide the belt and maintain proper tension and routing. There may be one or more idler pulleys.
- Tensioner Pulley: This pulley is spring-loaded and automatically maintains the correct tension on the serpentine belt. Crucially important for belt life and accessory function.
- Serpentine Belt: The heart of the system; a single, long belt that snakes around all the pulleys. Usually made of a durable rubber compound.
Important Note: The specific length and type of serpentine belt are critical. Consult your owner's manual or a parts catalog to ensure you purchase the correct replacement. Using the wrong belt can lead to premature wear, slippage, and damage to components.
Symbols and Diagram Conventions
Understanding the symbols used in the serpentine belt diagram is key to interpreting it correctly. Here's a breakdown of common symbols:
- Solid Lines: Represent the serpentine belt itself. Thicker lines may indicate the top surface of the belt.
- Dotted Lines: May indicate the backside (smooth side) of the belt, or a hidden portion of the belt behind a pulley.
- Arrows: Indicate the direction of belt travel and pulley rotation.
- Pulley Symbols: Pulleys are typically depicted as circles. Some diagrams may label each pulley with its function (e.g., ALT for Alternator, P/S for Power Steering).
- Tensioner Symbol: The tensioner is usually shown with an arrow indicating its range of movement and a spring symbol to denote its spring-loaded action.
- Component Abbreviations: Diagrams often use abbreviations for engine components. Refer to a key or legend if the diagram includes one.
The diagram is usually drawn in a simplified, 2D format, so it might not perfectly represent the 3D arrangement of the components in the engine bay. Always cross-reference the diagram with the actual layout in your vehicle.
How It Works
The serpentine belt system is relatively simple in its operation. The crankshaft pulley, powered by the engine, rotates and drives the serpentine belt. The belt, in turn, wraps around the pulleys of the alternator, power steering pump, AC compressor, and any idler pulleys. As the crankshaft spins, the belt transfers rotational force to these accessories, enabling them to function.
The tensioner pulley plays a vital role in maintaining the correct belt tension. Over time, belts stretch, and the tensioner automatically adjusts to compensate, ensuring consistent performance. If the tensioner fails or the belt becomes excessively worn, slippage can occur, leading to reduced accessory performance (e.g., dim headlights, weak power steering, poor AC performance).
The serpentine belt is designed to be a durable component, but it's subject to wear and tear due to heat, friction, and exposure to the elements. Regular inspection and timely replacement are essential to prevent breakdowns and maintain optimal vehicle performance.
Real-World Use: Basic Troubleshooting Tips
Here are some common issues related to the serpentine belt system and how the diagram can help:
- Squealing Noise: A squealing noise, especially during cold starts or when turning the steering wheel, is often a sign of a slipping serpentine belt. Use the diagram to check the belt's routing and condition. Look for cracks, glazing, or fraying. Also, inspect the tensioner for proper function. A weak or seized tensioner can cause slippage.
- Accessory Malfunctions: If you notice a specific accessory is not working correctly (e.g., the AC is blowing warm air), check the serpentine belt routing and condition. If the belt is broken or severely damaged, it may not be driving the accessory pulley.
- Battery Charging Issues: A failing alternator can lead to a dead battery. Check the serpentine belt to ensure it's properly driving the alternator pulley. A loose or slipping belt can prevent the alternator from generating sufficient power. Use a multimeter to test the output voltage of the alternator with the engine running.
- Visual Inspection: Regularly inspect the serpentine belt for signs of wear, such as cracks, fraying, or missing chunks. Pay close attention to the grooves on the belt; they should be sharp and defined. Round or worn grooves indicate a belt that needs replacement.
Remember: Always consult your vehicle's repair manual for specific troubleshooting procedures and diagnostic information. The serpentine belt diagram provides a valuable reference, but it's just one piece of the puzzle.
Safety Precautions
Working on the serpentine belt system can be risky if proper precautions are not taken:
- Disconnect the Battery: Before working on any electrical components, disconnect the negative terminal of the battery to prevent accidental shocks or short circuits.
- Engine Off and Cool: Never work on the serpentine belt system with the engine running or hot. Allow the engine to cool completely before starting any repairs.
- Rotating Parts: Be extremely cautious around rotating engine components. Keep your hands, clothing, and tools clear of the serpentine belt and pulleys when the engine is running (for diagnostic purposes only).
- Tensioner Spring: The tensioner pulley is spring-loaded and can snap back forcefully if released improperly. Use the correct tool to relieve tension on the belt before removing it. Consult your repair manual for the proper procedure.
- Eye Protection: Wear safety glasses to protect your eyes from debris or flying objects.
High-Risk Components: The crankshaft pulley and the area around the spinning belt are the riskiest. Keep your distance when the engine is running.
By following these safety guidelines and using the serpentine belt diagram as a reference, you can safely and effectively perform maintenance and repairs on your 2011 Nissan Altima 2.5.
We have the full resolution diagram available as a download. Please reach out if you'd like to have a copy.