2011 Nissan Maxima Serpentine Belt Diagram
Hey there, fellow gearheads! Today, we're diving deep into the serpentine belt system of a 2011 Nissan Maxima. This article is your comprehensive guide to understanding the serpentine belt diagram, a crucial tool for any DIY mechanic or car enthusiast looking to maintain or repair their ride. Whether you're planning to replace a worn belt, diagnose a squealing noise, or simply want to understand how your engine accessories are powered, this guide will walk you through everything you need to know.
Purpose of the Serpentine Belt Diagram
The serpentine belt diagram is essentially a roadmap for your engine's accessory drive system. It shows the routing of the serpentine belt around various pulleys connected to essential components. Why is this important? Well, imagine trying to reassemble a puzzle without the picture on the box! That's what it's like trying to replace a serpentine belt without a diagram. Here’s why you need it:
- Correct Installation: The primary purpose is to ensure the belt is installed correctly. Incorrect routing can lead to the belt slipping, damaging components, or even complete engine failure.
- Troubleshooting: The diagram helps you identify potential issues within the system. By referencing the diagram, you can pinpoint which accessory might be causing a problem, such as a failing power steering pump or a seized AC compressor.
- Maintenance: Regular inspection of the belt and pulleys, guided by the diagram, can help you identify wear and tear early on, preventing costly repairs down the line.
- Learning and Understanding: It allows you to understand the relationship between different parts of the engine, which in turn helps to diagnose problems more effectively.
Key Specs and Main Parts (2011 Nissan Maxima)
The 2011 Nissan Maxima utilizes a 3.5L VQ35DE engine, a robust and reliable powerplant. The serpentine belt system is designed to efficiently drive several crucial engine accessories. Here's a breakdown of the key components:
- Crankshaft Pulley (Damper): This is the driving pulley, connected directly to the engine's crankshaft. It's responsible for transferring the engine's rotational force to the serpentine belt.
- Alternator Pulley: The alternator generates electrical power for the vehicle. The serpentine belt spins this pulley, allowing the alternator to charge the battery and power electrical components.
- Air Conditioning (AC) Compressor Pulley: The AC compressor is responsible for cooling the cabin. The serpentine belt powers the compressor, circulating refrigerant through the AC system.
- Power Steering Pump Pulley: The power steering pump provides hydraulic assistance to the steering system. The serpentine belt drives the pump, making it easier to turn the steering wheel.
- Idler Pulleys: These pulleys are strategically placed to guide the belt and maintain proper tension. They don't drive any accessories but are essential for ensuring the belt runs smoothly and efficiently.
- Tensioner Pulley: This pulley maintains the correct tension on the serpentine belt. It typically includes a spring-loaded mechanism that automatically adjusts for belt stretch and wear. A functional tensioner is crucial for preventing belt slippage and damage.
- Serpentine Belt: The heart of the system. It's a single, continuous belt that wraps around all the aforementioned pulleys, transmitting power from the crankshaft to the accessories. Made of reinforced rubber, it's designed to withstand high temperatures and constant flexing.
Understanding the Symbols on the Diagram
The diagram isn't just a picture; it's a coded representation of the serpentine belt system. Let's decipher the common symbols you'll encounter:
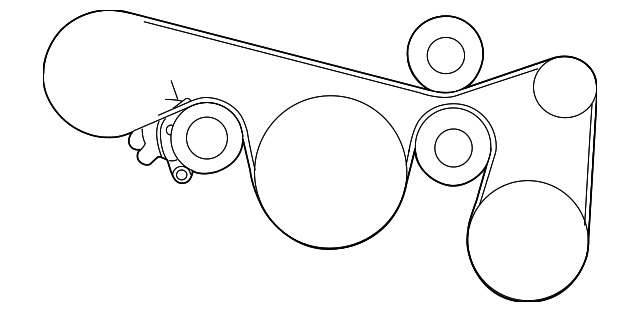
- Solid Lines: These represent the serpentine belt itself, illustrating its path around the various pulleys.
- Circles: These indicate pulleys. The size of the circle might give you a sense of the pulley's relative size, although this isn't always to scale.
- Arrows: Arrows along the belt indicate the direction of belt travel. This is crucial for ensuring you route the belt correctly.
- Labels: Each pulley will be labeled with an abbreviation or symbol indicating which component it's connected to (e.g., "ALT" for alternator, "AC" for air conditioning compressor, "P/S" for power steering).
- Tensioner Symbol: The tensioner pulley is often represented by a unique symbol, sometimes resembling a spring or a lever. This indicates the location of the tensioner and how to release the tension for belt removal and installation.
How It Works: Powering the Accessories
The serpentine belt system works on a simple principle: rotational force transfer. The engine's crankshaft rotates, turning the crankshaft pulley. The serpentine belt, tightly wrapped around this pulley, is driven by its rotation. As the crankshaft pulley turns, it pulls the serpentine belt, which in turn spins the other pulleys connected to the various accessories. Because the belt is a continuous loop, all accessories are driven simultaneously.
The tensioner plays a critical role in maintaining the correct amount of tension on the belt. Too little tension, and the belt will slip, causing the accessories to function poorly (e.g., weak power steering, poor AC performance, battery not charging). Too much tension, and it can put undue stress on the bearings of the accessories and even cause the belt to break prematurely.
Real-World Use: Basic Troubleshooting
Let's talk about putting this knowledge to practical use. Here are some common serpentine belt-related issues and how the diagram can help you diagnose them:
- Squealing Noise: A squealing noise, especially when the engine is first started or under heavy load (e.g., turning the steering wheel sharply), is a common sign of a slipping serpentine belt. Refer to the diagram to check the belt's condition. Look for cracks, glazing (a shiny appearance), or missing chunks. Also, check the tensioner; if it's not maintaining proper tension, the belt may be slipping.
- Accessory Malfunction: If one of your accessories isn't working correctly (e.g., the AC isn't cooling, the power steering is weak), the serpentine belt could be the culprit. Use the diagram to verify that the belt is properly routed around the affected accessory's pulley. Also, inspect the pulley itself for damage or excessive play, which could indicate a failing accessory bearing.
- Belt Slippage Warning: If you see small pieces of rubber underneath your engine bay, you might have serpentine belt degradation. The diagram will assist in identifying the path of the belt in order to inspect it properly.
- Visual Inspection: Use the diagram to guide your visual inspection of the belt and pulleys. Look for signs of wear, damage, or misalignment. Check the tensioner for proper function.
Safety: Handling with Care
Working on the serpentine belt system involves working around moving engine components, so safety is paramount. Here are some crucial safety precautions:
- Disconnect the Battery: Before working on any electrical components, disconnect the negative terminal of the battery to prevent accidental shocks.
- Work on a Cool Engine: Never work on the serpentine belt system when the engine is hot. Allow the engine to cool down completely before starting any work.
- Keep Hands and Clothing Clear: Be extremely careful to keep your hands, fingers, and loose clothing away from the serpentine belt and pulleys, especially when the engine is running.
- Use Proper Tools: Use the correct tools for the job, including a serpentine belt tool for releasing the tensioner. Using the wrong tools can damage components and increase the risk of injury.
- Eye Protection: Wear safety glasses or goggles to protect your eyes from debris.
- Be Aware of Moving Parts: Even with the engine off, the belt and pulleys can move slightly due to stored energy in the tensioner. Be mindful of this when working around the system.
Specifically, the tensioner pulley stores a significant amount of energy in its spring mechanism. When releasing the tensioner, be prepared for it to snap back quickly. Always use a proper serpentine belt tool to control the tensioner and prevent injury.
By understanding the serpentine belt diagram and following proper safety precautions, you can confidently tackle basic maintenance and repairs on your 2011 Nissan Maxima. Remember to always consult your vehicle's service manual for specific instructions and torque specifications.
We have the 2011 Nissan Maxima serpentine belt diagram file available for download. It's a valuable resource to keep on hand for all your maintenance and repair needs!