2011 Nissan Rogue Fuse Box Diagram
Welcome, fellow gearheads! Let's dive into the often-overlooked but critically important component of your 2011 Nissan Rogue: the fuse box. Understanding your vehicle's fuse layout is akin to knowing the circulatory system of a human body. It's vital for diagnostics, repairs, and even performing certain modifications. This article will serve as your comprehensive guide to deciphering the 2011 Rogue's fuse box diagram, equipping you with the knowledge to confidently tackle electrical issues. We'll break down the key specs, symbols, and functionalities, ensuring you're ready to troubleshoot like a pro.
Purpose of the Fuse Box Diagram
Why bother with a fuse box diagram? The answer is simple: it's your roadmap to the electrical system. Whether you're troubleshooting a malfunctioning headlight, a faulty window motor, or planning to install aftermarket accessories, the diagram provides essential information. Specifically, it enables you to:
- Identify faulty fuses: Quickly locate and replace blown fuses, preventing further damage to electrical components.
- Understand circuit protection: Learn how each fuse protects specific circuits from overcurrent and short circuits.
- Plan modifications: Properly tap into existing circuits or add new ones without overloading the system.
- Diagnose electrical problems: Use the diagram to trace circuits and pinpoint the root cause of electrical issues.
Without a diagram, you're essentially guessing, which can lead to wasted time, incorrect repairs, and even potentially damaging your vehicle's electrical system.
Key Specs and Main Parts
The 2011 Nissan Rogue actually has two main fuse boxes: one located inside the cabin, typically under the dashboard on the driver's side, and another in the engine compartment, usually near the battery. We'll focus primarily on the cabin fuse box, as it's often the first point of access for troubleshooting. Let's cover some important components:
- Fuse Box Housing: This is the physical enclosure that houses the fuses and relays. It is labeled with a diagram, although the diagram can sometimes be faded or difficult to read.
- Fuses: These are the sacrificial components designed to protect electrical circuits from overcurrent. They come in various amperage ratings, indicated by numbers printed on the fuse itself (e.g., 5A, 10A, 15A, etc.). Fuses come in different physical sizes and standards; the 2011 Rogue uses mostly blade-type fuses.
- Relays: Relays are electromechanical switches that control high-current circuits using a low-current signal. They are often used for headlights, power windows, and other high-draw components.
- Fuse Puller: A small plastic tool, usually found inside the fuse box, used to safely remove fuses without damaging them or your fingers.
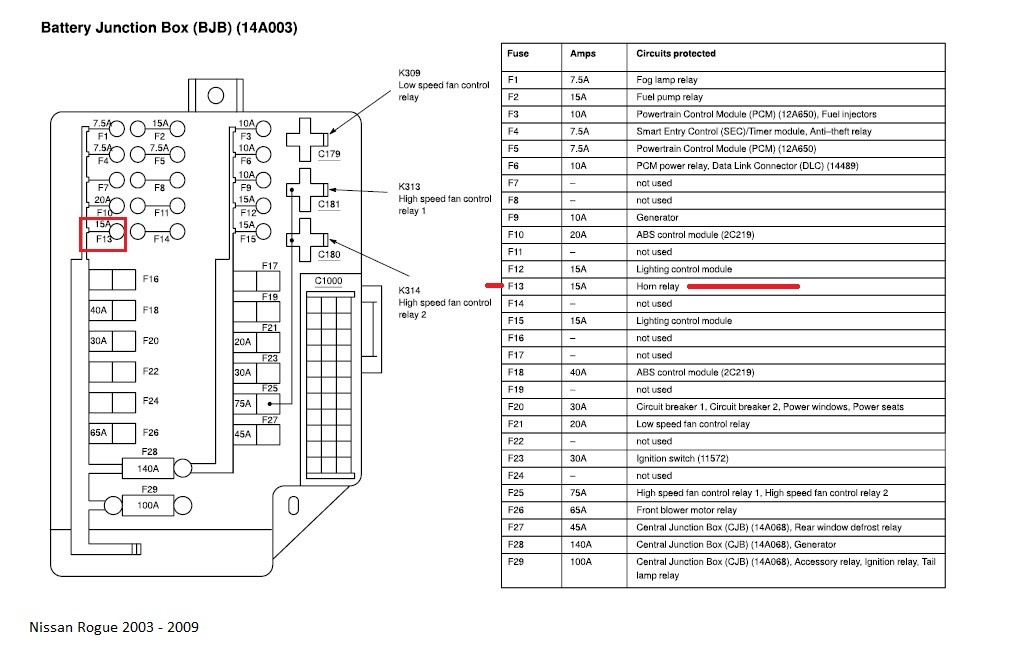
Key specs you'll find on the diagram itself include: circuit name/description, fuse amperage rating, and fuse location (identified by a number or letter-number combination).
Symbols and Diagram Interpretation
The fuse box diagram is essentially a symbolic representation of the electrical circuits in your car. Understanding the symbols is crucial for accurate interpretation. Let's break down the common symbols you'll encounter:
- Lines: Lines represent electrical wires connecting different components. Solid lines typically indicate a direct connection, while dashed lines may indicate a shared ground or a less direct connection.
- Colors: Wire colors are often indicated on the diagram (e.g., BLU for blue, RED for red, GRN for green). Knowing the wire color can help you trace the circuit physically within the car.
- Icons: Specific icons represent different electrical components, such as headlights (a stylized lightbulb), wipers (a stylized wiper blade), the audio system (a speaker symbol), and so on. These icons help you quickly identify the circuit associated with each fuse.
- Amperage Ratings: These are denoted by a number followed by "A" (e.g., 10A, 20A). It's crucial to replace a blown fuse with one of the same amperage rating. Using a higher amperage fuse can bypass the intended protection and potentially cause a fire.
Pay close attention to the legend or key that should be included with the diagram. This legend will explain any less common symbols or abbreviations used in the diagram. Be aware that diagrams found online may not perfectly match the physical layout of your specific vehicle, so always double-check the fuse location before removing or replacing a fuse. Also, sometimes the legend is on the fuse box itself, printed on the underside of the cover.
How It Works: The Electrical Circuit
To fully appreciate the role of the fuse box, it's helpful to understand the basics of an electrical circuit. An electrical circuit is a closed loop that allows electricity to flow from a power source (e.g., the battery) to a load (e.g., a headlight) and back to the power source. The fuse is placed in this circuit as a safety device. When the current flowing through the circuit exceeds the fuse's amperage rating (due to a short circuit or an overload), the fuse's internal element melts, breaking the circuit and stopping the flow of electricity. This prevents damage to the wiring, components, and potentially the vehicle itself.
Think of a fuse as a weak link in a chain. It's designed to break first, protecting the stronger, more expensive links (the wires and components) from damage. When a fuse blows repeatedly, it's a sign that there's a problem in the circuit that needs to be investigated, rather than simply replacing the fuse with a higher amperage one (which is a very bad idea!).
Real-World Use: Basic Troubleshooting Tips
Let's say your 2011 Rogue's interior lights suddenly stop working. Here's how you can use the fuse box diagram to troubleshoot the problem:
- Consult the Diagram: Locate the fuse box diagram (we have it available for download!). Identify the fuse labeled "Interior Lights" or a similar description.
- Locate the Fuse: Find the corresponding fuse in the cabin fuse box, using the diagram as your guide.
- Inspect the Fuse: Visually inspect the fuse. A blown fuse will typically have a broken filament or a blackened appearance. You can also use a multimeter to test the fuse for continuity. A good fuse will show continuity (a reading of 0 ohms or a beep), while a blown fuse will show no continuity.
- Replace the Fuse: If the fuse is blown, replace it with a new fuse of the same amperage rating.
- Test the Circuit: After replacing the fuse, test the interior lights to see if they are working again. If the new fuse blows immediately, there's likely a short circuit in the wiring or a faulty component that needs further investigation.
Remember, if you're uncomfortable working with electrical systems, it's always best to consult a qualified mechanic. Electrical issues can be complex and potentially dangerous.
Safety First
Working with automotive electrical systems involves inherent risks. It's crucial to take precautions to ensure your safety:
- Disconnect the Battery: Before working on any electrical component, disconnect the negative (-) terminal of the battery. This prevents accidental short circuits and electrical shocks.
- Use Proper Tools: Use insulated tools designed for automotive electrical work.
- Never Bypass a Fuse: Never attempt to bypass a fuse by using a wire or other conductive material. This can overload the circuit and cause a fire.
- Work in a Well-Ventilated Area: Some electrical components may contain flammable materials.
- Be Aware of Airbags: The SRS (Supplemental Restraint System) or airbag system has its own fuse. Do not tamper with this system unless you are specifically trained to do so. Accidental activation of an airbag can cause serious injury. If you are replacing a fuse associated with the SRS, it is highly recommended to disconnect the battery and wait at least 3 minutes before proceeding. This allows the system's capacitors to discharge.
Special caution should be taken around the starter and alternator circuits, as these carry very high currents.
Finally, remember to always consult your vehicle's owner's manual for specific information about your 2011 Nissan Rogue's fuse box layout and electrical system. While this article provides general guidance, the owner's manual contains the most accurate and up-to-date information for your specific vehicle.
We have the 2011 Nissan Rogue Fuse Box Diagram available for download. Armed with this knowledge and the diagram, you're well-equipped to tackle minor electrical issues and understand the intricate electrical network of your trusty Rogue!