2011 Nissan Sentra Serpentine Belt Diagram
For the seasoned DIY enthusiast or the budding mechanic tackling a 2011 Nissan Sentra, understanding the serpentine belt system is crucial. This article dives deep into the 2011 Nissan Sentra serpentine belt diagram, providing you with the knowledge to diagnose, troubleshoot, and even replace this essential component. Whether you're performing routine maintenance, tackling a squealing belt, or simply expanding your automotive know-how, this guide will be your trusted resource.
Purpose of the Serpentine Belt Diagram
The serpentine belt diagram is more than just a pretty picture; it's your roadmap to understanding how the various engine accessories in your 2011 Nissan Sentra receive power. Specifically, the diagram serves several vital functions:
- Repair and Replacement: When replacing a worn or broken serpentine belt, the diagram ensures you route the new belt correctly. Improper routing can lead to accessory failure, belt damage, and even engine damage.
- Troubleshooting: If your Sentra experiences issues like a weak power steering, non-functioning air conditioning, or a dead alternator, the diagram helps you trace the belt's path and identify potential problems with the belt itself or the driven accessories.
- Learning and Understanding: Studying the diagram provides a deeper understanding of how the engine's various components are interconnected and powered.
- Preventative Maintenance: Regular inspection using the diagram to identify the belt path helps you spot signs of wear or misalignment early, preventing costly breakdowns.
Key Specs and Main Parts of the 2011 Nissan Sentra Serpentine Belt System
The 2011 Nissan Sentra typically utilizes a single serpentine belt to drive multiple engine accessories. Here's a breakdown of the key components involved:
Components:
- Crankshaft Pulley: This pulley is connected directly to the crankshaft, the engine's main rotating shaft. It's the driving force behind the serpentine belt.
- Alternator Pulley: The alternator generates electricity to power the car's electrical system and charge the battery. The serpentine belt spins the alternator pulley.
- Power Steering Pump Pulley: The power steering pump provides hydraulic assistance to make steering easier. The belt turns this pulley.
- Air Conditioning Compressor Pulley: The A/C compressor is responsible for circulating refrigerant in the air conditioning system. The serpentine belt drives this pulley.
- Idler Pulley(s): Idler pulleys are smooth pulleys that guide the belt and maintain proper tension. They don't drive any accessories.
- Tensioner Pulley: This spring-loaded pulley applies the correct tension to the serpentine belt, preventing slippage and ensuring efficient power transfer. It's crucial for proper operation.
- Serpentine Belt: The belt itself is a rubber composite belt with multiple V-shaped ribs. These ribs grip the grooves on the pulleys, allowing it to transfer power efficiently.
Belt Specifications:
While the exact length and rib count of the serpentine belt can vary slightly, it's imperative to use the correct belt specified for your 2011 Nissan Sentra's engine (usually a 2.0L engine). This information can be found in your owner's manual, on the belt itself (if it's still legible), or by consulting an auto parts retailer. Using the wrong belt can cause improper tension, accessory failure, and premature belt wear.
Understanding Symbols and Lines in the Diagram
The serpentine belt diagram uses specific conventions to represent the components and belt routing:
- Solid Lines: Solid lines represent the path of the serpentine belt. Follow these lines carefully when routing a new belt.
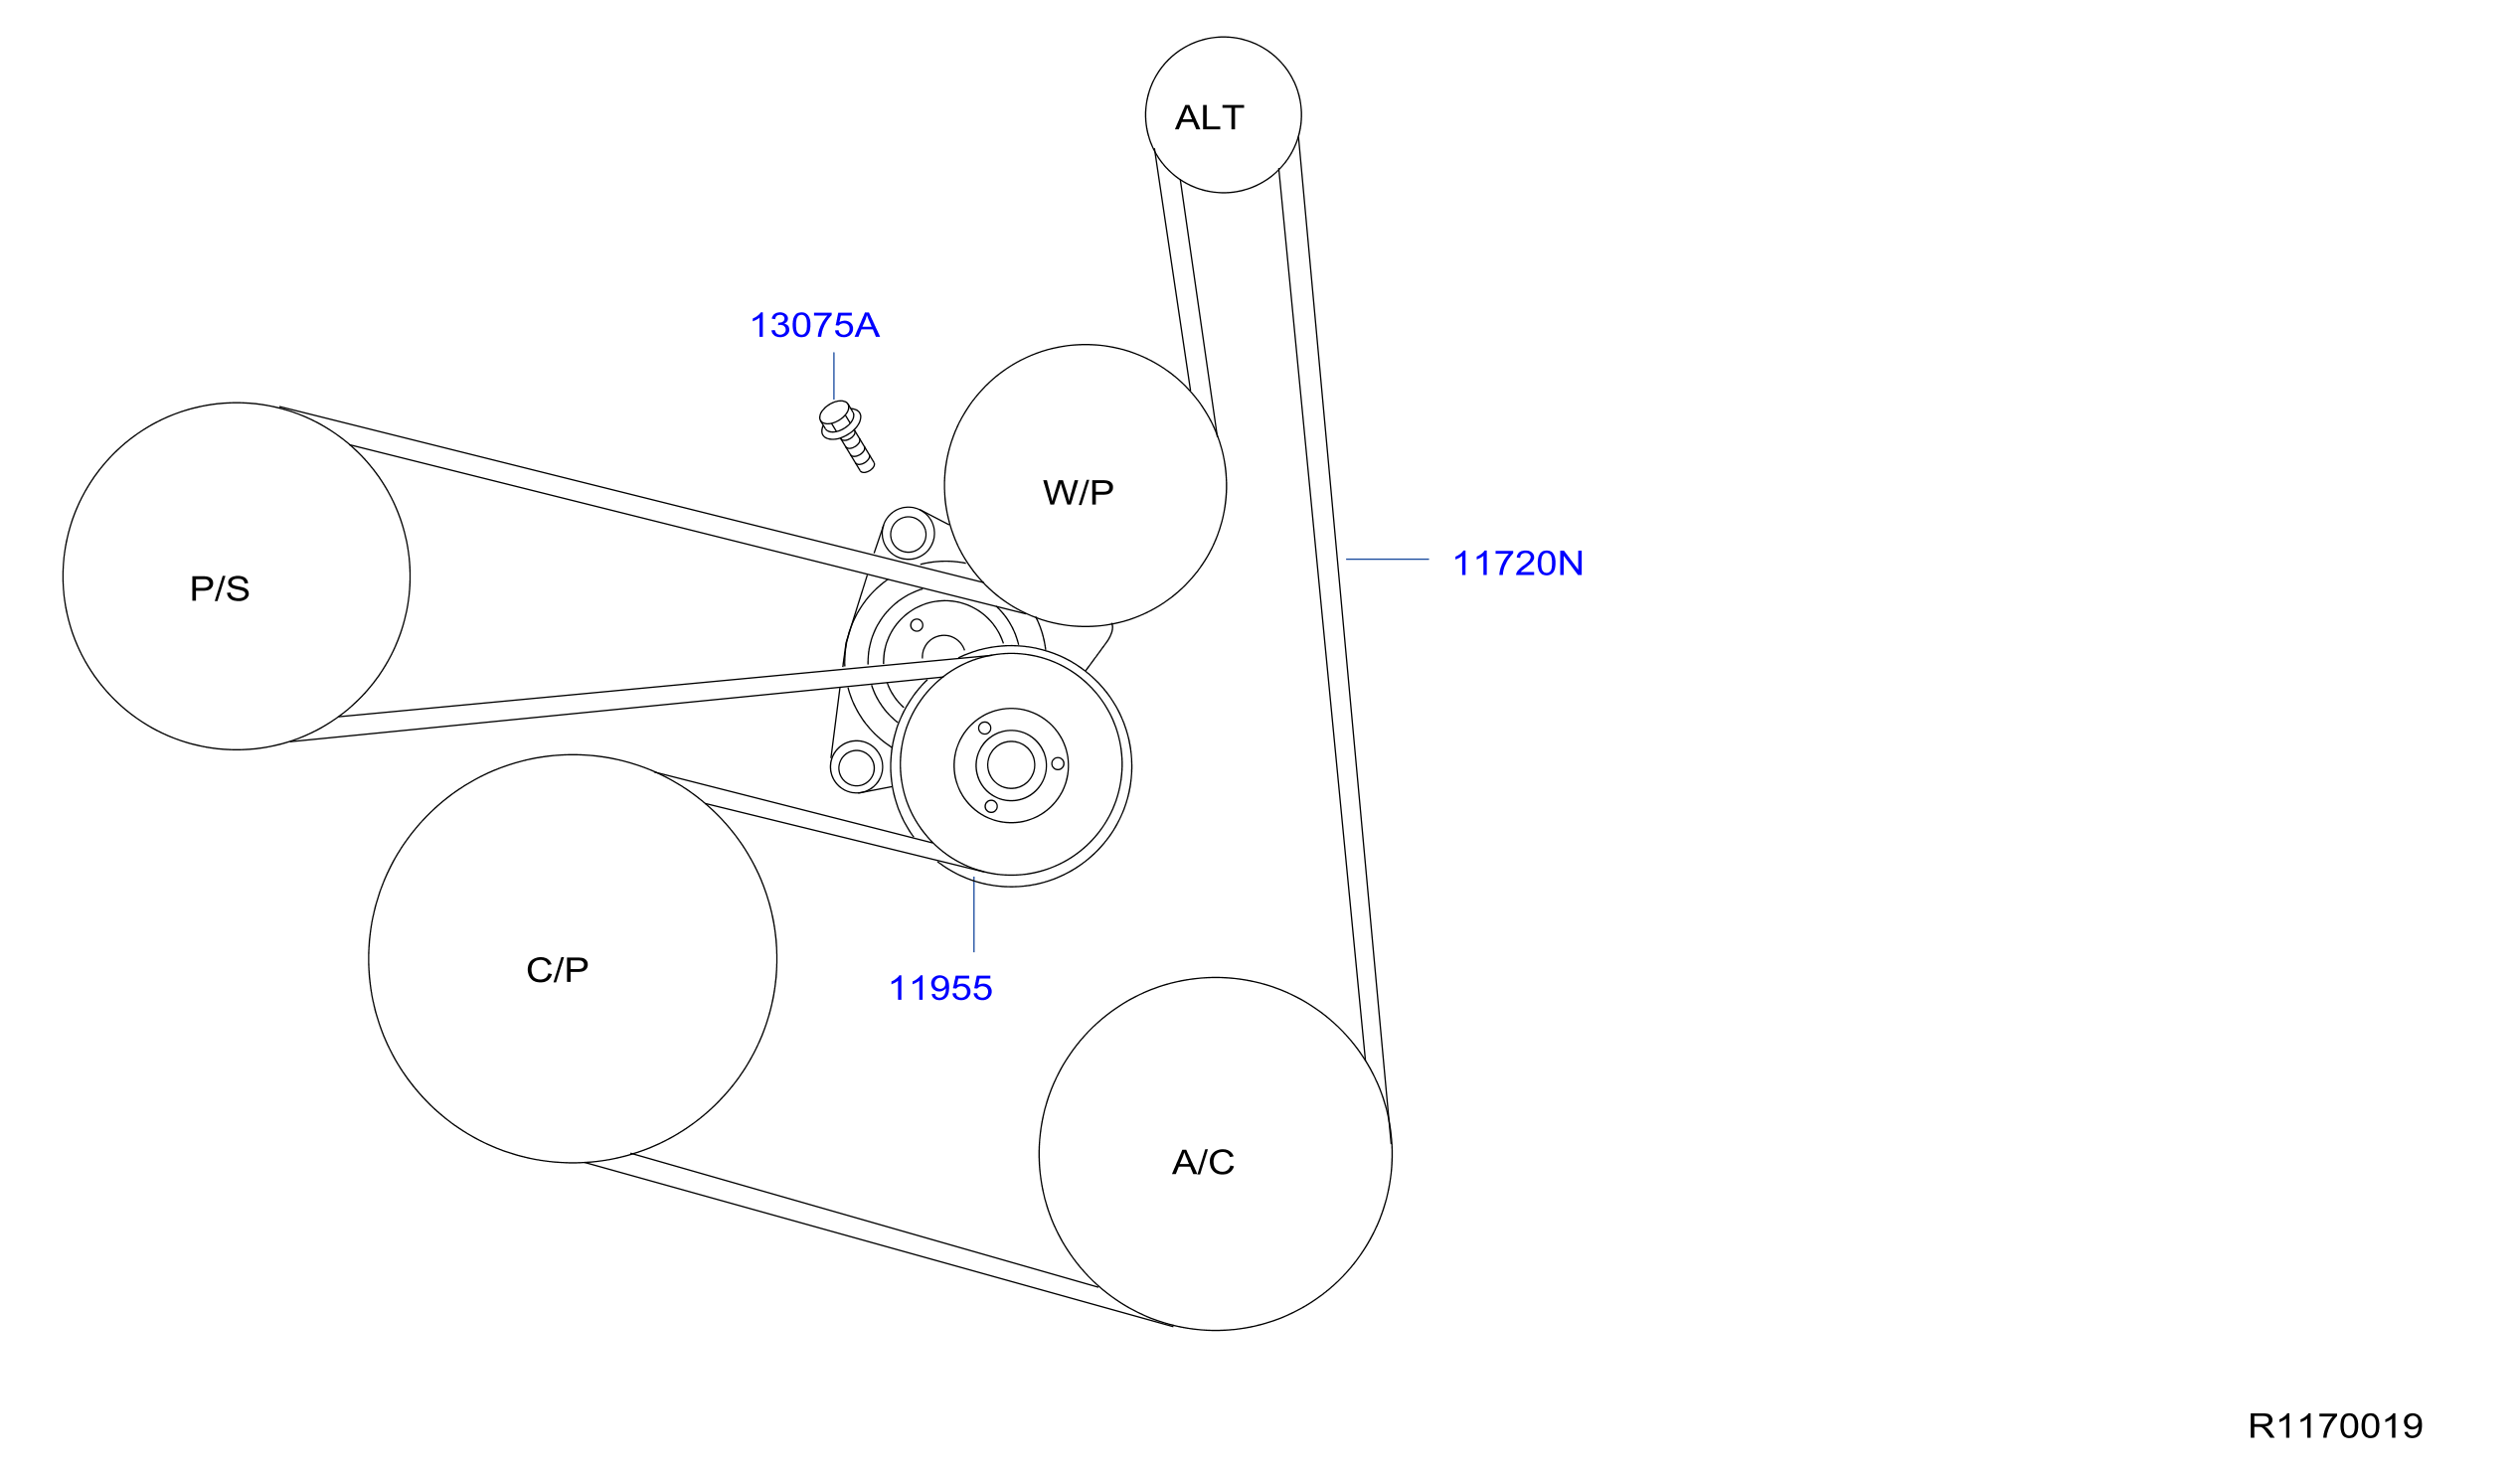
- Pulleys: Pulleys are typically depicted as circles. Some diagrams might label the pulley with abbreviations (e.g., "ALT" for alternator, "P/S" for power steering).
- Arrows: Arrows indicate the direction of belt travel around the pulleys. This is particularly important for ensuring the belt is oriented correctly.
- Tensioner: The tensioner pulley is often distinguished by a symbol representing its spring-loaded mechanism. This might be a coiled spring or a similar icon.
- Component Labels: The diagram will usually label each component clearly, either with full names or abbreviations.
Color coding is not usually used in simple serpentine belt diagrams. Everything is normally in Black and White.
How the Serpentine Belt System Works
The serpentine belt system is a relatively simple but ingenious design. The crankshaft pulley, driven by the engine's rotation, acts as the primary driver. The serpentine belt wraps around the crankshaft pulley and then snakes its way around the pulleys of the various engine accessories. The tensioner pulley maintains consistent tension on the belt, preventing it from slipping. As the crankshaft turns, it drives the belt, which in turn spins the pulleys of the alternator, power steering pump, A/C compressor, and other accessories. This rotational energy is then used by each accessory to perform its specific function. A healthy serpentine belt system ensures that all engine accessories operate efficiently and reliably.
Real-World Use and Basic Troubleshooting
Here's how you can use the serpentine belt diagram for troubleshooting common issues:
- Squealing Belt: A squealing belt often indicates slippage. Use the diagram to check the belt's routing and tension. The tensioner pulley may be failing, or the belt might be worn.
- Accessory Failure: If your alternator, power steering, or A/C stops working, use the diagram to trace the belt's path to that component. A broken or misrouted belt could be the cause.
- Visual Inspection: Regularly inspect the belt for cracks, fraying, or missing ribs. Use the diagram to ensure the belt is properly aligned on all pulleys.
- Belt Routing After Replacement: After replacing the belt, double-check the routing against the diagram. Even a slight misalignment can cause problems.
To troubleshoot a serpentine belt issue, start by visually inspecting the belt for wear and tear. Look for cracks, fraying, or missing chunks. Next, check the tensioner pulley to ensure it's functioning correctly. If the belt is loose, the tensioner may be failing. Finally, inspect each pulley for signs of damage or misalignment. Remember, safety first!
Safety Precautions
Working on the serpentine belt system can be dangerous if proper precautions are not taken. Here are some important safety guidelines:
- Disconnect the Battery: Always disconnect the negative battery cable before working on the serpentine belt system to prevent electrical shocks.
- Engine Cool Down: Ensure the engine is cool before working around the belt. The engine components can get very hot, and you could get burned.
- Moving Parts: The serpentine belt system contains moving parts. Keep your hands, clothing, and tools clear of the belt and pulleys when the engine is running.
- Tensioner Tool: Use the correct tool to relieve tension on the belt tensioner. Improvising can be dangerous and damage the tensioner.
- Eye Protection: Wear safety glasses to protect your eyes from debris.
Important Note: The crankshaft pulley, alternator, and other rotating components can cause serious injury if contacted while the engine is running. Exercise extreme caution when working around these parts.
We have the 2011 Nissan Sentra Serpentine Belt Diagram available for download. It will help to enhance your understanding and make your maintenance work safer.