2011 Silverado Radio Wiring Harness Adapter
Alright, let's dive into the nitty-gritty of the 2011 Silverado radio wiring harness adapter. Whether you're swapping out your factory head unit for something with more bells and whistles, trying to diagnose a frustrating audio issue, or just expanding your knowledge of automotive electronics, understanding this wiring harness is crucial. This guide aims to be your comprehensive resource, breaking down everything from the purpose and components to troubleshooting and safety.
Purpose: Why You Need to Know This
The wiring harness adapter is the unsung hero of aftermarket radio installations. Imagine trying to connect a shiny new aftermarket radio to your 2011 Silverado's existing wiring. Without an adapter, you'd be facing a messy snarl of cut wires, potential shorts, and a whole lot of frustration. The adapter acts as an intermediary, providing a clean, plug-and-play solution. It's designed to connect directly to the factory wiring harness in your Silverado, and on the other end, provides standardized connectors for the aftermarket radio. This makes installation significantly easier, less prone to errors, and allows you to easily revert to the factory radio if needed.
Beyond installation, understanding the wiring harness is invaluable for:
- Troubleshooting audio issues: Knowing which wire controls which function allows you to isolate problems quickly.
- Adding aftermarket accessories: Connecting amplifiers, subwoofers, or other audio enhancements often requires tapping into specific wires within the harness.
- Learning automotive electronics: Familiarizing yourself with the wiring harness is a great starting point for understanding the electrical systems in your vehicle.
Key Specs and Main Parts
Let's break down the core components and specifications of a typical 2011 Silverado radio wiring harness adapter.
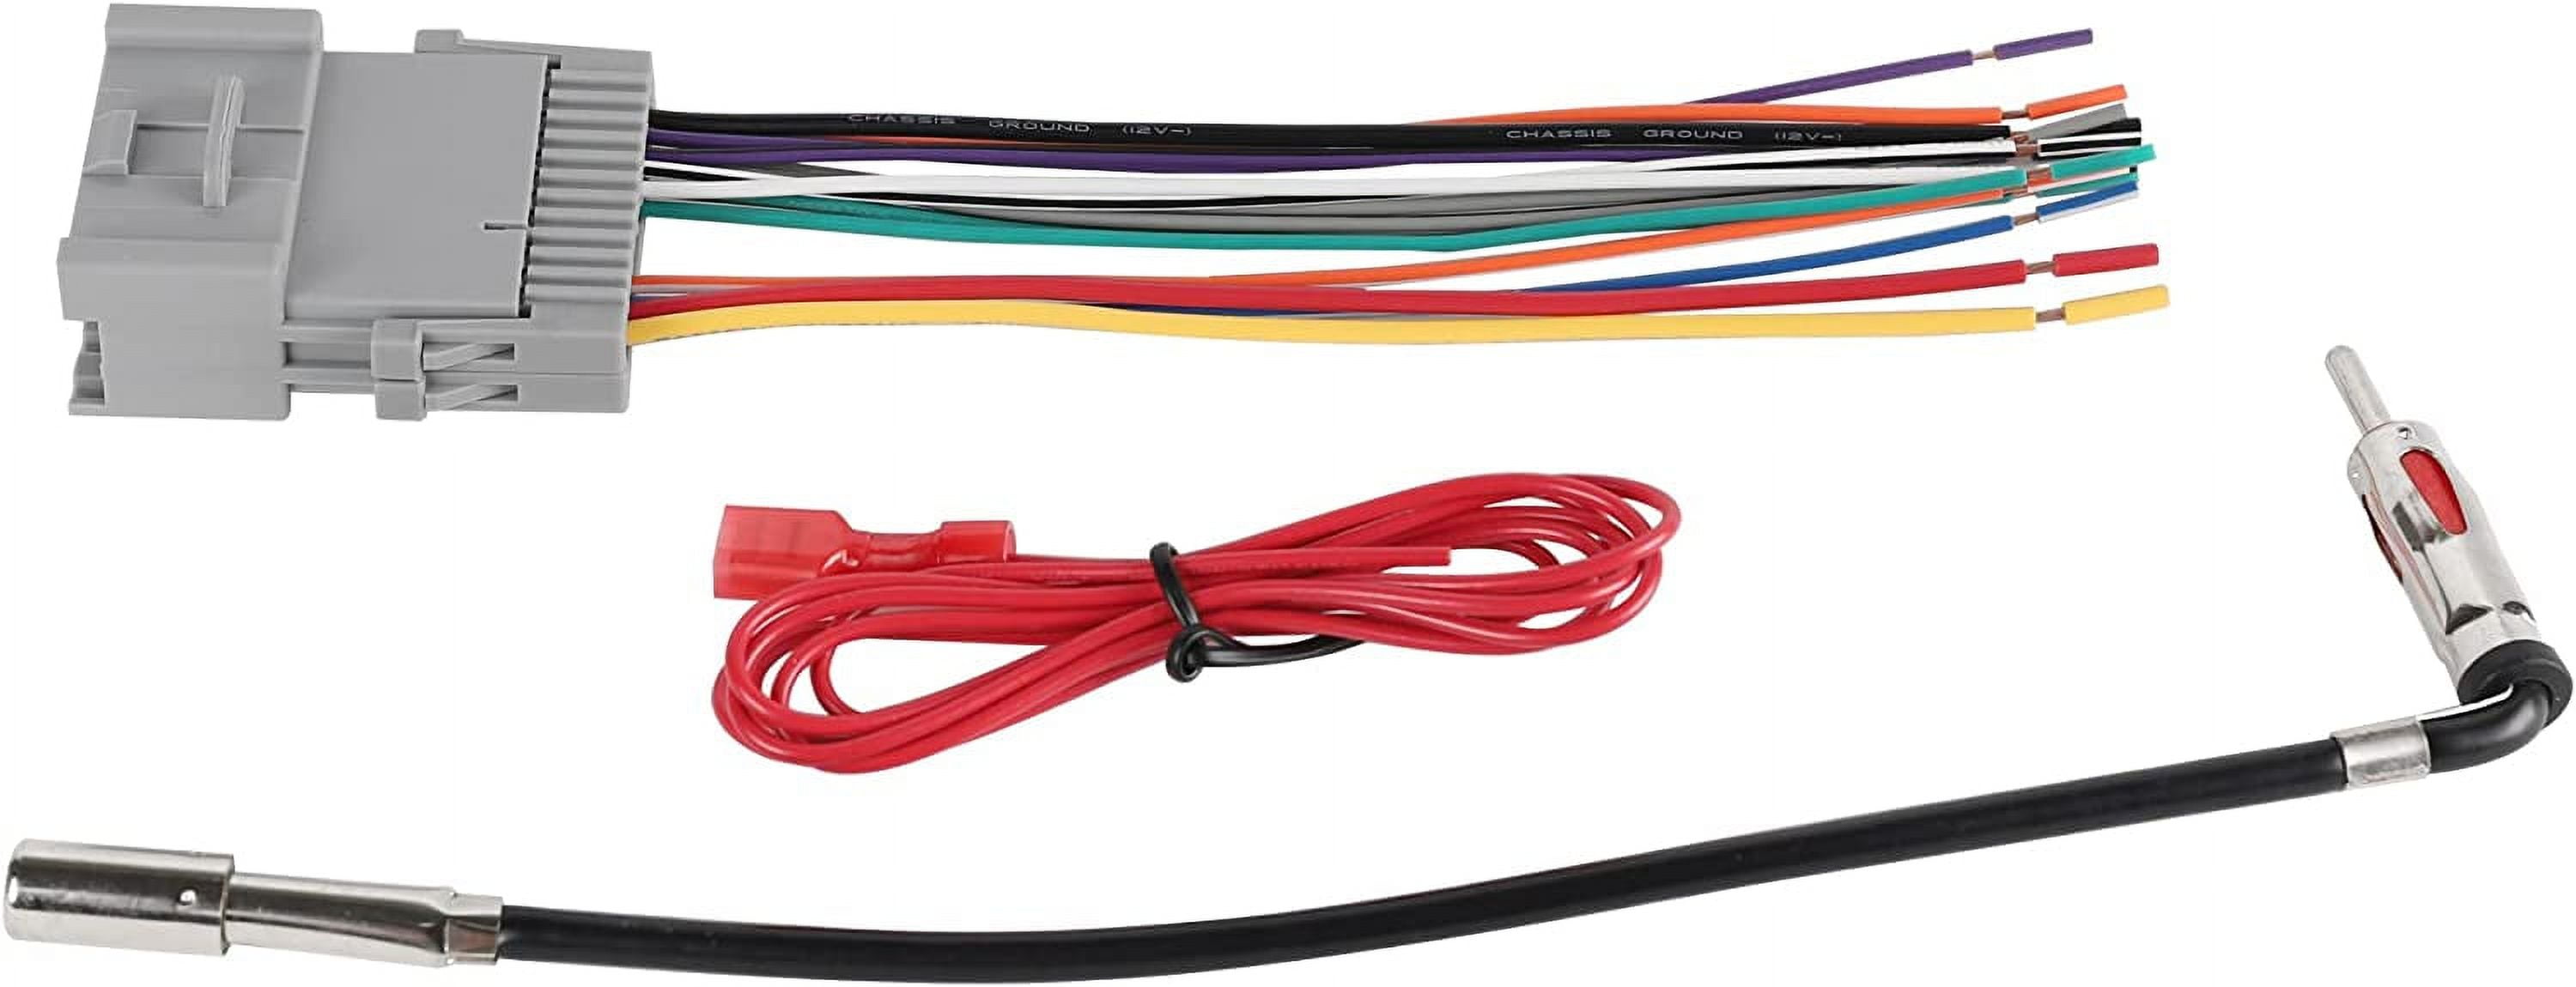
Harness Connectors:
The adapter consists of two main connectors:
- Vehicle-Specific Connector: This connector is designed to plug directly into the factory radio harness in your 2011 Silverado. The pinout (arrangement of wires) is specific to your vehicle's year and trim level.
- Aftermarket Radio Connector: This end typically features a standardized connector, often conforming to the ISO 10487 standard. This allows you to plug directly into the back of your new aftermarket radio.
Wiring:
The wires connecting the two connectors are color-coded and perform specific functions. Here's a breakdown of some common wires and their functions:
- Power (12V Constant): This wire provides constant power to the radio, even when the ignition is off. It's usually yellow.
- Ground: Provides the return path for the electrical current. It's typically black.
- Ignition (12V Switched): This wire only provides power when the ignition is turned on. It's usually red.
- Illumination: Dims the radio's display when the headlights are turned on. Often orange or orange with a white stripe.
- Speakers (Front Left +, Front Left -, Front Right +, Front Right -, Rear Left +, Rear Left -, Rear Right +, Rear Right -): These wires carry the audio signal to the speakers. They are typically paired with different colors for positive and negative connections. For example, a front left speaker might use white (+) and white/black (-) wires.
- Antenna Power: Provides power to the vehicle's antenna amplifier (if equipped). Usually blue.
- Remote Turn-On (Amp Remote): Sends a 12V signal to turn on external amplifiers when the radio is powered on. Often blue with a white stripe.
Important Note: While color codes are generally standardized, it's always best to verify the function of each wire with a wiring diagram specific to your adapter and your vehicle's trim level. Variations can occur.
Symbols: Deciphering the Diagram
A wiring diagram can seem daunting at first, but understanding the symbols makes it much easier to interpret. Here's a quick rundown:
- Lines: Lines represent wires. A solid line indicates a direct connection. Dotted or dashed lines might indicate shielded wires or signal paths.
- Colors: Wire colors are typically indicated by abbreviations, such as "YEL" for yellow, "BLK" for black, "RED" for red, etc. Some diagrams use full color coding.
- Connectors: Connectors are usually represented by rectangular or circular symbols with pins or slots indicating the connection points.
- Components: Other symbols might represent components like fuses, relays, capacitors, or resistors.
- Ground Symbol: The ground symbol is usually a series of downward-pointing lines.
The diagram will also likely include text labels indicating the function of each wire and the pin number within the connector.
How It Works: From Signal to Sound
The adapter works by relaying electrical signals from the Silverado's factory wiring to the aftermarket radio, and vice versa. When you turn on the ignition, the "Ignition" wire on the adapter receives power, which in turn powers on the aftermarket radio. The radio then sends audio signals through the speaker wires to the speakers. If you have an amplifier, the "Remote Turn-On" wire signals the amplifier to power on as well. The adapter essentially translates the Silverado's electrical language into a language the aftermarket radio can understand.
Here's a simplified signal flow:
- Ignition is turned on.
- 12V Switched power flows through the ignition wire in the adapter.
- Aftermarket radio powers on.
- Radio generates audio signals.
- Audio signals travel through the speaker wires in the adapter to the speakers.
Real-World Use: Basic Troubleshooting Tips
Here are some common issues you might encounter and how the wiring harness adapter can help you troubleshoot them:
- No Power to Radio: Check the "Power" and "Ignition" wires with a multimeter to ensure they're receiving 12V. Also, check the ground connection. A faulty adapter or a blown fuse in the Silverado's fuse box could be the culprit.
- No Sound from Speakers: Verify the speaker wire connections are secure. Check the speaker wires with a multimeter for continuity. A damaged adapter wire or a faulty speaker could be the problem. Make sure the aftermarket radio's fader and balance settings are correctly configured.
- Radio Turns Off Intermittently: Could indicate a loose connection on the "Power" or "Ignition" wires. Check the connections at both the adapter and the radio.
- Dimming Issues: If the radio's display isn't dimming correctly when the headlights are turned on, check the "Illumination" wire connection.
Tip: Use a multimeter to check for voltage, continuity, and shorts in the wiring. This will help you pinpoint the source of the problem.
Safety: Know the Risks
Working with automotive electrical systems can be dangerous. Here are some key safety precautions:
- Disconnect the Battery: Always disconnect the negative terminal of the battery before working on any electrical components. This will prevent accidental shorts and potential electrocution.
- Avoid Cutting Wires: Use the wiring harness adapter to avoid cutting the factory wiring. Cutting the factory wiring can damage your vehicle's electrical system and void your warranty.
- Use Proper Tools: Use crimping tools, wire strippers, and a multimeter designed for automotive electrical work.
- Be Careful with Exposed Wires: Exposed wires can cause shorts and fires. Make sure all connections are properly insulated.
- Airbags: Exercise extreme caution when working near airbags. Incorrect wiring can cause them to deploy unexpectedly, resulting in serious injury. If you're unsure about any part of the process, consult a qualified technician. The airbag system is a high-risk component.
Remember, when dealing with any electrical work on your vehicle, if you're not completely comfortable, it's always best to consult a professional.
We have access to a comprehensive wiring diagram for the 2011 Silverado radio wiring harness adapter. Feel free to reach out, and we can provide it to you for download. This diagram will offer even more detailed information and help you navigate your installation or troubleshooting process.