2011 Toyota Highlander Serpentine Belt Diagram
For the intermediate DIY mechanic or car enthusiast tackling repairs or maintenance on a 2011 Toyota Highlander, understanding the serpentine belt system is crucial. This article provides a detailed breakdown of the 2011 Toyota Highlander serpentine belt diagram, covering its purpose, components, function, and troubleshooting, equipping you with the knowledge to confidently handle this vital system. We have the diagram available for download, ensuring you have a reliable visual aid throughout your work.
Purpose of the Serpentine Belt Diagram
The serpentine belt diagram serves as a roadmap for the accessory drive system. It is indispensable for several key tasks:
- Belt Replacement: The most common use is guiding the proper routing of a new serpentine belt. Incorrect routing can damage components or lead to belt failure.
- Component Diagnosis: The diagram allows you to identify each component driven by the belt, aiding in diagnosing issues like alternator failure, power steering pump problems, or air conditioning malfunctions.
- Learning the System: Even if you're not currently performing a repair, studying the diagram provides a deeper understanding of how the various accessories in your Highlander are driven by the engine.
- Troubleshooting Belt Issues: If you're experiencing squealing, slippage, or belt breakage, the diagram helps you visually inspect the alignment and condition of each pulley.
Key Specs and Main Parts of the 2011 Highlander Serpentine Belt System
The 2011 Toyota Highlander is available with several engine options, and each engine has a slightly different serpentine belt routing. We'll focus on the most common, the 3.5L V6 (2GR-FE). While there might be minor variations across model years, this overview will provide a solid foundation.
Main Components:
- Crankshaft Pulley (Harmonic Balancer): This pulley is directly attached to the engine's crankshaft and provides the driving force for the entire system. Its diameter is crucial for calculating belt speed and accessory RPMs.
- Alternator Pulley: The alternator charges the battery and powers the vehicle's electrical system. The alternator pulley is directly driven by the serpentine belt.
- Power Steering Pump Pulley: The power steering pump provides hydraulic pressure to assist with steering. Its pulley is connected to the serpentine belt.
- Air Conditioning Compressor Pulley: The A/C compressor circulates refrigerant in the air conditioning system.
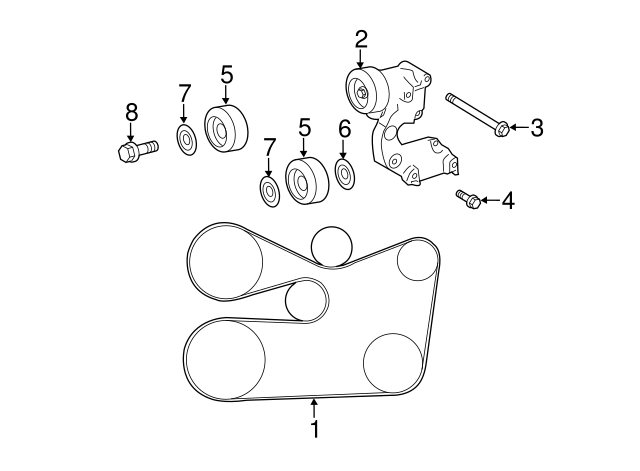
- Idler Pulley(s): These smooth, bearing-mounted pulleys provide belt tension and routing without driving any specific accessory. They guide the belt along the optimal path.
- Tensioner Pulley: This is a spring-loaded pulley that maintains constant tension on the serpentine belt, preventing slippage and extending belt life. The tensioner assembly includes both the pulley and the spring mechanism.
- Serpentine Belt: The continuous belt that wraps around all the pulleys, transferring rotational force from the crankshaft to the accessories.
Key Specs (3.5L V6):
- Belt Length: Approximately 85-86 inches. Always consult the specific part number for your Highlander's VIN.
- Belt Width: Typically around 0.8 inches (20mm).
- Rib Count: Usually 6 ribs.
Understanding Diagram Symbols
Serpentine belt diagrams use a standardized set of symbols to represent components and belt routing:
- Solid Lines: Represent the serpentine belt itself. The thickness of the line may vary, but it always indicates the belt's path.
- Arrows: Indicate the direction of belt rotation. Pay close attention to these to ensure you route the belt correctly.
- Circles/Ovals: Represent pulleys. The shape can sometimes indicate the type of pulley (e.g., a pulley with a center hub might represent an idler pulley).
- Component Icons: Each accessory (alternator, power steering pump, A/C compressor) is typically represented by a simplified icon resembling the actual component.
- Tensioner Icon: The tensioner is often represented by a pulley symbol with an arrow indicating the direction the tensioner arm moves to release tension.
- Text Labels: Each component is clearly labeled with its name (e.g., "Alternator," "P/S Pump," "Tensioner").
The diagram will typically have only one color, which is black, to keep the diagram clear. If a color is used in the diagram, then the belt is usually represented by a thick black line. The pulleys are represented by circles and ovals. When looking at the diagram, it is critical to note where the belt travels around each of the pulleys to ensure proper installation.
How the Serpentine Belt System Works
The serpentine belt system is a relatively simple but critical system. Here's how it functions:
- The engine's combustion process rotates the crankshaft.
- The crankshaft's rotational force is transferred to the crankshaft pulley (harmonic balancer).
- The serpentine belt, tightly wrapped around the crankshaft pulley, is driven by its rotation.
- As the serpentine belt rotates, it turns the pulleys of the various accessories (alternator, power steering pump, A/C compressor).
- Each accessory performs its specific function (charging the battery, providing power steering assist, cooling the cabin).
- The tensioner pulley maintains constant tension on the belt, preventing slippage and ensuring efficient power transfer.
The serpentine belt snakes around all the different pulleys using the crankshaft to apply torque. The tensioner keeps the belt tight so that it won't slip and cause the accessories from working.
Real-World Use and Basic Troubleshooting
Here's how you can use the serpentine belt diagram in real-world scenarios:
- Squealing Noise: A common symptom is a squealing noise, often loudest when the engine is first started or under heavy load (e.g., turning the steering wheel at low speeds). The diagram helps you visually inspect the belt for cracks, glazing (a shiny surface), or signs of wear. Check the tensioner to ensure it's applying adequate tension. If a pulley is misaligned, that can also cause the belt to squeal.
- Belt Slippage: If the belt is slipping, the accessories may not function properly. For example, the alternator might not charge the battery adequately, leading to a low battery warning light. The diagram helps you check the belt routing and tension.
- Belt Breakage: A broken belt will immediately disable all accessories. The diagram is crucial for routing the new belt correctly. Before installing a new belt, carefully inspect all pulleys for damage or excessive wear, as this could have contributed to the original belt failure.
- Component Failure: If you suspect a specific accessory is failing (e.g., the power steering pump is making noise), the diagram confirms its location and allows you to visually inspect the belt and pulley associated with that component.
To troubleshoot, start by visually inspecting the belt for damage, cracks, and fraying. The belt should be seated properly in all pulleys. Check the tensioner to ensure it's moving freely and applying adequate tension. If the belt is old, replace it even if it doesn't show obvious signs of wear. Always use the correct belt specified for your Highlander model year and engine.
Safety Precautions
Working on the serpentine belt system involves certain risks:
- Engine Heat: Always allow the engine to cool completely before working on the serpentine belt system. Exhaust manifolds and other engine components can reach extremely high temperatures.
- Moving Parts: Never work on the serpentine belt system with the engine running. The belt and pulleys can cause serious injury if they come into contact with your hands or clothing.
- Tensioner Spring: The tensioner spring is under considerable tension. Use the correct tool to release the tension safely. Avoid using makeshift tools, as they can slip and cause injury.
- Battery Disconnect: While not always necessary for simple belt replacement, disconnecting the negative battery terminal can provide an extra margin of safety, especially if you're working near electrical components like the alternator.
Wear safety glasses to protect your eyes from debris. If you are unsure how to perform any of these steps safely, consult a qualified mechanic.
Having the correct diagram and understanding the serpentine belt system is crucial for safe and effective repairs on your 2011 Toyota Highlander. By following these guidelines, you can confidently tackle serpentine belt replacement and related troubleshooting tasks.
As mentioned earlier, we have the 2011 Toyota Highlander Serpentine Belt Diagram. Download the diagram, and use it as your guide as you work on your car.