2012 Chevy Cruze 1.4 Serpentine Belt Diagram
The serpentine belt in your 2012 Chevy Cruze with the 1.4L turbocharged engine is a critical component. It’s responsible for driving several vital engine accessories, and understanding its routing is crucial for maintenance, troubleshooting, and repairs. This guide provides a comprehensive breakdown of the serpentine belt diagram for your specific Cruze model, equipping you with the knowledge needed for successful DIY work.
Purpose of the Serpentine Belt Diagram
Why bother with a diagram? Simple: it’s your roadmap. The serpentine belt weaves a complex path around various pulleys. If the belt breaks or needs replacement, knowing the correct routing is essential for proper installation. Incorrect routing can lead to:
- Accessory Malfunction: Power steering failure, alternator not charging, A/C not working.
- Belt Slippage: Causing noise, reduced accessory performance, and accelerated belt wear.
- Engine Damage: In extreme cases, a misrouted belt can interfere with engine components.
The diagram also helps in identifying potential issues. By visually inspecting the belt's path, you can spot misalignment, pulley damage, or improper tension.
Key Specs and Main Parts
Before diving into the diagram, let's familiarize ourselves with the key components involved. The 2012 Chevy Cruze 1.4L utilizes a single serpentine belt to drive the following accessories:
- Crankshaft Pulley (Crank Pulley): This is the driving force, connected directly to the engine's crankshaft. It transfers the engine's rotational energy to the belt.
- Alternator Pulley: The alternator generates electricity to power the car's electrical system and charge the battery.
- Power Steering Pump Pulley: The power steering pump provides hydraulic assistance for steering.
- Air Conditioning (A/C) Compressor Pulley: The A/C compressor circulates refrigerant for cooling the cabin.
- Water Pump Pulley: The water pump circulates coolant through the engine to prevent overheating.
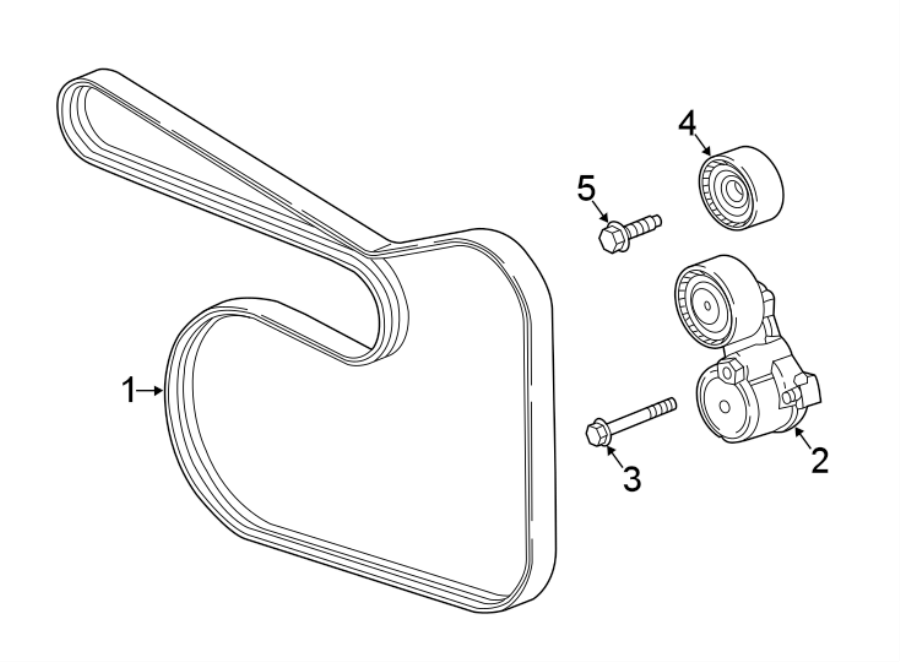
- Tensioner Pulley: This spring-loaded pulley maintains proper tension on the belt, preventing slippage and ensuring optimal accessory performance. It's a critical component for belt longevity.
- Idler Pulley: Some configurations may include an idler pulley, which simply guides the belt and helps maintain the correct wrap angle around other pulleys.
Belt Length: While a diagram shows the routing, you'll need to know the correct belt length for replacement. Refer to your owner's manual or a parts catalog for the specific belt length for your 2012 Chevy Cruze 1.4L. A common replacement belt for this application is a multi-ribbed belt, often referred to as a "poly-v" belt. The specific part number will vary depending on the manufacturer (e.g., Gates, Goodyear, Dayco). Always verify compatibility before purchasing.
Understanding Serpentine Belt Diagram Symbols
Serpentine belt diagrams utilize a standardized set of symbols to convey information concisely. Here's a breakdown of the common symbols you'll encounter:
- Solid Lines: Represent the path of the serpentine belt. The thicker the line, the easier it is to see.
- Arrows: Indicate the direction of belt rotation. Follow the arrows to understand which way each pulley is spinning.
- Pulley Icons: Each pulley is represented by a circle. The name of the component (e.g., ALT, P/S, A/C) is typically labeled next to the circle. Some diagrams may include a shaded area inside the circle to indicate the pulley's contact surface with the belt.
- Tensioner Icon: The tensioner is often depicted with a spring symbol to indicate its spring-loaded mechanism. The diagram should clearly show the direction the tensioner moves to release tension on the belt.
- Idler Pulley Icon: Idler pulleys are usually shown as plain circles, sometimes with a smaller circle inside to indicate a bearing.
Color-coding is less common on serpentine belt diagrams, but if present, it might differentiate between the smooth (backside) and grooved (ribbed) sides of the belt in contact with the pulleys.
How It Works: The Serpentine Belt System
The serpentine belt system is relatively simple in concept. The crankshaft pulley, driven by the engine, provides the power to rotate all other pulleys connected by the belt. The belt is designed with multiple ribs that fit into the grooves of the pulleys, ensuring a secure grip and efficient transfer of power.
The tensioner pulley is crucial for maintaining the correct belt tension. Too little tension and the belt will slip, reducing accessory performance and causing wear. Too much tension and you can damage the belt, pulleys, or even the accessories themselves. The tensioner automatically adjusts to compensate for belt stretch and wear, maintaining optimal tension throughout the belt's lifespan.
The water pump is indirectly driven by the serpentine belt. The engine's cooling system relies on this. If the belt breaks, the water pump will stop circulating coolant, leading to rapid engine overheating and potentially catastrophic damage.
Real-World Use: Troubleshooting Tips
Here are some common problems and how the serpentine belt diagram can help with troubleshooting:
- Squealing Noise: Often indicates a slipping belt. Check the belt for wear, cracks, or glazing. Also, inspect the tensioner to ensure it's functioning correctly. The diagram helps you visually inspect the belt's path for potential obstructions or misalignment.
- Accessory Failure: If the power steering, A/C, or charging system stops working, the serpentine belt is a prime suspect. Check the belt's condition and routing. Make sure the belt is properly seated on all pulleys. The diagram confirms whether the belt is even making contact with the problematic accessory's pulley.
- Belt Damage: Cracks, fraying, or missing ribs indicate a worn belt that needs replacement. Use the diagram to ensure you route the new belt correctly.
Before replacing a serpentine belt, always inspect the pulleys for damage. A damaged pulley can quickly destroy a new belt. Spin each pulley by hand (engine off, of course!) and listen for unusual noises or feel for roughness. Replace any damaged pulleys along with the belt.
Safety Precautions
Working with the serpentine belt system involves inherent risks. Here are some important safety precautions:
- Disconnect the Battery: Always disconnect the negative battery cable before working on the serpentine belt system. This prevents accidental starting of the engine while your hands are near moving parts.
- Hot Engine: Never work on the serpentine belt system when the engine is hot. Allow the engine to cool completely before starting any repairs.
- Moving Parts: Be extremely cautious around moving parts. Keep your hands, hair, and clothing clear of the belt and pulleys when the engine is running.
- Tensioner Spring: The tensioner pulley is spring-loaded and can snap back with considerable force. Use the correct tool to relieve tension on the belt and carefully control the tensioner's movement.
- Sharp Edges: Pulleys and belt tensioners can have sharp edges. Wear gloves to protect your hands from cuts and abrasions.
The crankshaft pulley is particularly dangerous due to its direct connection to the engine and high rotational speed. Avoid contact with this pulley at all costs when the engine is running. The alternator also poses an electrical hazard; disconnecting the battery is crucial.
Replacing a serpentine belt is a relatively straightforward task, but proper safety precautions are essential to prevent injury and ensure a successful repair. A mistake here can lead to serious damage and personal injury.
We have a high-resolution, printable diagram of the 2012 Chevy Cruze 1.4L serpentine belt routing readily available for download. This diagram provides a clear visual reference for your repairs, ensuring accurate belt installation and optimal accessory performance.