2012 Chevy Cruze Thermostat Housing Diagram
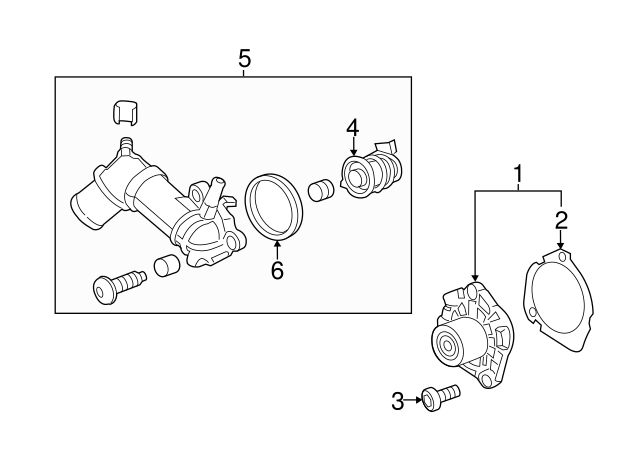
The 2012 Chevy Cruze, despite its popularity, is known for potential issues with its cooling system, particularly the thermostat housing. Understanding the thermostat housing diagram is crucial for troubleshooting leaks, replacing faulty components, and preventing more serious engine damage. This article provides a detailed look at the diagram, its components, and how it relates to the overall cooling system functionality. We'll equip you with the knowledge to confidently tackle common issues and potentially save money on repairs. We also have the diagram available for download, which you can access later.
Purpose of the 2012 Chevy Cruze Thermostat Housing Diagram
The thermostat housing diagram serves several important purposes:
- Repair and Maintenance: It allows you to accurately identify components for replacement during repairs. Whether you’re dealing with a leaking thermostat housing, a faulty thermostat, or damaged hoses, the diagram helps you select the correct parts.
- Troubleshooting: By understanding the layout and function of each component, you can more effectively diagnose cooling system problems. For example, if you see coolant leaking from a specific area shown on the diagram, you can pinpoint the likely culprit.
- System Understanding: The diagram provides a visual representation of the cooling system's flow path around the thermostat. This helps you understand how the coolant circulates and how the thermostat regulates engine temperature.
- Modification and Customization: While less common, some enthusiasts might use the diagram as a reference for modifying the cooling system for performance upgrades or to address chronic issues.
Key Specs and Main Parts
The 2012 Chevy Cruze uses a specific thermostat and housing design that differs slightly between engine variants (1.8L and 1.4L turbo). However, the core components and principles remain the same. Here are the key parts you'll find in the diagram:
- Thermostat Housing: The main component; typically made of plastic or aluminum, it houses the thermostat and provides connection points for coolant hoses. The Cruze's thermostat housing is a common failure point, often cracking or leaking.
- Thermostat: A temperature-sensitive valve that regulates coolant flow to the radiator. It opens when the engine reaches a specific temperature (typically around 180-195°F or 82-90°C), allowing coolant to circulate and cool the engine.
- Coolant Temperature Sensor (CTS): This sensor measures the coolant temperature and sends that information to the engine control unit (ECU). The ECU uses this data to adjust fuel injection, ignition timing, and other engine parameters. The diagram will indicate its location within the housing, or nearby in the coolant path.
- Inlet Hose: Connects the thermostat housing to the engine block, allowing coolant to flow into the thermostat housing.
- Outlet Hose: Connects the thermostat housing to the radiator, allowing coolant to flow out of the thermostat housing.
- Bleeder Valve/Screw: A small valve or screw used to release air from the cooling system after refilling. Air pockets can prevent proper coolant circulation and cause overheating. Not all housings have this on the housing itself.
- Gaskets/O-rings: Seals between the thermostat housing and the engine block, and between housing components. These are crucial for preventing coolant leaks.
Important Note: The torque specifications for the bolts securing the thermostat housing are critical. Over-tightening can crack the housing, especially if it's made of plastic. Refer to the service manual for the correct torque values.
Understanding Symbols in the Diagram
The diagram will use various symbols to represent different components and connections. Understanding these symbols is essential for accurate interpretation.
- Solid Lines: Typically represent coolant hoses or pipes. The thickness of the line may indicate the diameter of the hose.
- Dashed Lines: Can represent electrical wiring or vacuum lines connected to sensors within or near the housing.
- Arrows: Indicate the direction of coolant flow. Pay attention to these to understand how the coolant circulates through the system.
- Circles or Ovals: Often represent sensors (like the CTS) or the thermostat itself.
- Rectangles or Squares: Might represent the thermostat housing or other mounting brackets.
- Color Coding: Some diagrams use color to differentiate between different types of fluids (e.g., blue for coolant, red for oil). However, color coding is less common in basic thermostat housing diagrams.
The legend or key accompanying the diagram will define all the symbols used. Always refer to the legend if you're unsure about a particular symbol.
How the Thermostat Housing Works
The thermostat housing plays a central role in regulating engine temperature. Here's how it works:
- Cold Engine: When the engine is cold, the thermostat is closed, preventing coolant from flowing to the radiator. Coolant circulates only within the engine block, allowing it to warm up quickly.
- Warm-up Phase: As the engine temperature rises, the thermostat begins to open gradually.
- Operating Temperature: Once the engine reaches its optimal operating temperature (around 195°F), the thermostat fully opens, allowing coolant to flow freely to the radiator.
- Cooling Process: The radiator dissipates heat from the coolant, and the cooled coolant returns to the engine block, completing the cycle.
- Temperature Regulation: The thermostat continuously adjusts its opening based on engine temperature, maintaining a stable operating temperature.
The coolant temperature sensor monitors the coolant temperature and sends this information to the ECU. The ECU uses this data to adjust engine parameters such as fuel injection and ignition timing, optimizing engine performance and fuel efficiency.
Real-World Use and Troubleshooting Tips
Here are some common issues related to the thermostat housing and how the diagram can help with troubleshooting:
- Coolant Leaks: Leaks are a common problem with the Cruze's thermostat housing, particularly at the seams or around the gasket. The diagram allows you to pinpoint the exact location of the leak and identify the corresponding gasket or O-ring for replacement. Look for dried coolant residue (often white or orange) near hose connections or along the housing itself.
- Overheating: If the engine overheats, the thermostat might be stuck closed, preventing coolant from flowing to the radiator. The diagram helps you locate the thermostat for inspection and replacement. Alternatively, a faulty coolant temperature sensor can cause inaccurate temperature readings, leading to overheating or other engine problems. The diagram helps you locate the CTS for testing.
- Engine Running Cold: If the engine doesn't reach its operating temperature, the thermostat might be stuck open, allowing coolant to flow to the radiator constantly. Again, the diagram helps you locate the thermostat for inspection and replacement.
- Erratic Temperature Gauge: A fluctuating temperature gauge can indicate a faulty coolant temperature sensor or a problem with the wiring. The diagram helps you locate the CTS and trace its wiring to the ECU.
When troubleshooting, always start with a visual inspection. Look for leaks, damaged hoses, and corroded electrical connections. Use the diagram as a reference to identify components and their connections. A multimeter can be used to test the coolant temperature sensor and verify its output.
Safety Considerations
Working on the cooling system involves certain safety risks:
- Hot Coolant: Never work on the cooling system when the engine is hot. Hot coolant can cause severe burns. Allow the engine to cool completely before starting any work.
- Pressure: The cooling system is pressurized. Release the pressure by carefully opening the coolant reservoir cap (when the engine is cool) before disconnecting any hoses.
- Electrical Components: Be cautious when working with electrical components such as the coolant temperature sensor. Disconnect the battery before working on any electrical wiring.
- Sharp Edges: The thermostat housing and surrounding components may have sharp edges. Wear gloves to protect your hands.
- Coolant Disposal: Coolant is toxic. Dispose of used coolant properly at a designated recycling center.
Always wear appropriate safety gear, including gloves and eye protection, when working on the cooling system. And never work under a vehicle that is only supported by a jack; use jack stands.
Understanding the 2012 Chevy Cruze thermostat housing diagram is a valuable skill for any DIY mechanic. By familiarizing yourself with the components, their functions, and potential issues, you can confidently tackle cooling system repairs and maintenance. Remember to always consult the service manual for specific instructions and torque specifications. With the diagram and some basic tools, you can keep your Cruze running smoothly and avoid costly repairs. As promised, we have the 2012 Chevy Cruze thermostat housing diagram available for you to download. It provides a visual guide to all the key components we've discussed, making your repair and maintenance tasks even easier.