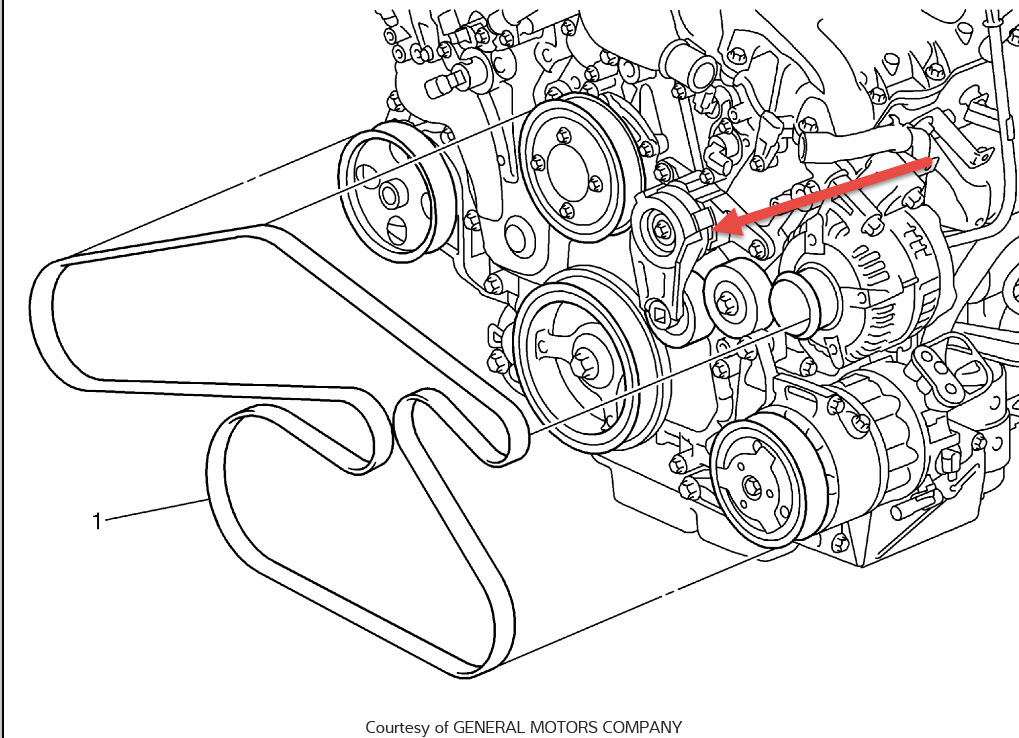
2012 Chevy Traverse Serpentine Belt Diagram
The serpentine belt diagram for your 2012 Chevy Traverse is a crucial resource for anyone looking to perform routine maintenance, diagnose engine problems, or simply understand how the various engine accessories are driven. Having a clear understanding of this diagram allows you to tackle jobs like belt replacement, tensioner inspection, and pulley alignment with confidence. This article breaks down the diagram, its components, and how to use it effectively. We even have a downloadable copy available for you!
Purpose of the Serpentine Belt Diagram
The serpentine belt diagram serves several vital purposes:
- Repair and Maintenance: When replacing a worn or damaged serpentine belt, the diagram provides the correct routing path, ensuring all accessories are properly driven. Incorrect routing can lead to accessory failure or belt slippage.
- Troubleshooting: By visually tracing the belt's path, you can quickly identify which components are driven by it. If you notice a specific accessory isn't working (e.g., the AC compressor), the diagram helps you pinpoint the belt and its related components as potential sources of the problem.
- Component Identification: The diagram clearly identifies each pulley and its corresponding component (alternator, power steering pump, AC compressor, etc.). This is especially useful when diagnosing noises or issues related to a specific accessory.
- Learning and Understanding: For the mechanically inclined, the diagram offers a clear visual representation of how the engine accessories are interconnected and driven by a single belt. This promotes a better understanding of the engine's overall operation.
Key Specs and Main Parts
The 2012 Chevy Traverse uses a single serpentine belt to drive multiple engine accessories. Understanding the key specs and components is essential for effective use of the diagram. Here's a rundown:
Key Specs
- Belt Length: This is a crucial specification. The correct belt length ensures proper tension and prevents slippage. The belt length for the 2012 Traverse typically ranges from 90 to 92 inches, but it can vary slightly depending on the engine configuration (e.g., with or without rear AC). Always verify the correct belt length for your specific VIN!
- Belt Width: The belt width must also be correct to properly fit the pulleys. Most Traverse models use a belt width of approximately 0.83 inches (21mm).
- Belt Type: Serpentine belts are typically made of a reinforced rubber compound designed to withstand high temperatures and constant flexing. EPDM (Ethylene Propylene Diene Monomer) rubber is a common material known for its durability and resistance to cracking.
Main Parts and Pulleys
The diagram will typically depict the following components and their corresponding pulleys:
- Crankshaft Pulley: This is the driving pulley, connected directly to the engine's crankshaft. It transmits the engine's rotational force to the serpentine belt.
- Alternator Pulley: The alternator is responsible for generating electrical power to recharge the battery and run electrical accessories.
- Power Steering Pump Pulley: The power steering pump provides hydraulic assistance to reduce steering effort.
- Air Conditioning (AC) Compressor Pulley: The AC compressor circulates refrigerant to cool the vehicle's cabin.
- Water Pump Pulley: The water pump circulates coolant throughout the engine to regulate its temperature.
- Idler Pulley(s): Idler pulleys are smooth pulleys used to guide the belt around the engine and ensure proper wrap on the driven pulleys. They do not drive any accessories.
- Tensioner Pulley: The tensioner pulley, attached to the tensioner assembly, maintains the correct tension on the serpentine belt. It's spring-loaded to automatically adjust for belt stretch and wear. A faulty tensioner can cause belt slippage, noise, and premature belt failure.
Symbols and Diagram Conventions
Understanding the symbols and conventions used in the diagram is key to interpreting it correctly. While the exact symbols can vary slightly between diagrams, here are some common elements:
- Solid Lines: Solid lines typically represent the main path of the serpentine belt. The thickness of the line may indicate the "front" of the belt.
- Dotted Lines: Dotted lines may be used to indicate the back side of the belt, showing where it wraps around the pulley.
- Arrows: Arrows indicate the direction of belt travel. Follow the arrows to understand the belt's routing path.
- Component Labels: Each pulley will be labeled with the corresponding component (e.g., "ALT" for alternator, "P/S" for power steering, "A/C" for air conditioning).
- Pulley Direction: The diagram may indicate the direction of rotation for each pulley, usually with a curved arrow. Note if it's rotating clockwise or counter-clockwise.
- Tensioner Location: The tensioner will be clearly marked, often with a symbol indicating its spring-loaded mechanism.
How It Works: The Serpentine Belt System
The serpentine belt system is relatively simple in concept. The crankshaft pulley, driven by the engine's rotation, turns the serpentine belt. The belt, in turn, wraps around the pulleys of various accessories, transferring the rotational force to drive those accessories. The tensioner maintains the proper tension on the belt, ensuring adequate grip and preventing slippage. The idler pulleys guide the belt along the correct path. Proper belt tension is critical for the efficient operation of all driven accessories. Too loose, and the belt will slip, causing reduced accessory performance and potential overheating. Too tight, and you risk premature wear on the belt and accessory bearings.
Real-World Use: Basic Troubleshooting Tips
Here are some basic troubleshooting tips using the serpentine belt diagram:
- Squealing Noise: A squealing noise from the engine bay often indicates a slipping serpentine belt. Check the belt for signs of wear (cracks, fraying, glazing). Also, inspect the tensioner to ensure it's maintaining proper tension. Use the diagram to verify the belt is routed correctly.
- Accessory Failure: If you notice that an accessory isn't working (e.g., the AC is not cooling), consult the diagram to determine if it's driven by the serpentine belt. If so, check the belt's condition and tension. Also, inspect the pulley on the affected accessory for damage or signs of seizure.
- Belt Wear: Regularly inspect the serpentine belt for signs of wear. Cracks, fraying, or glazing (a shiny, hardened surface) indicate that the belt needs to be replaced. Refer to the diagram to ensure you route the new belt correctly.
- Visual Inspection: Before starting any work, visually inspect the entire belt path. Look for obstructions, misaligned pulleys, or any other anomalies.
Safety Considerations
Working on the serpentine belt system involves several safety considerations:
- Engine Off: Always ensure the engine is turned off and the key is removed from the ignition before working on the serpentine belt system.
- Hot Components: Be aware that the engine components, including the pulleys and belt, can become very hot during operation. Allow the engine to cool down completely before touching them.
- Moving Parts: The serpentine belt system involves rapidly moving parts. Keep your hands and fingers clear of the belt and pulleys when the engine is running.
- Tensioner Spring: The tensioner spring is under significant tension. When releasing the tension on the belt, use the correct tools and follow the manufacturer's instructions to avoid injury.
- Battery Disconnect: It's generally good practice to disconnect the negative terminal of the battery before performing any work on the electrical system, including components driven by the serpentine belt.
Replacing the serpentine belt isn't overly complicated, but always prioritize safety. Take your time, consult the diagram frequently, and double-check your work.
We have the 2012 Chevy Traverse serpentine belt diagram available for download. With this diagram and the information in this article, you'll be well-equipped to tackle serpentine belt-related maintenance and repairs with confidence. Remember, if you're not comfortable performing these tasks yourself, consult a qualified mechanic.