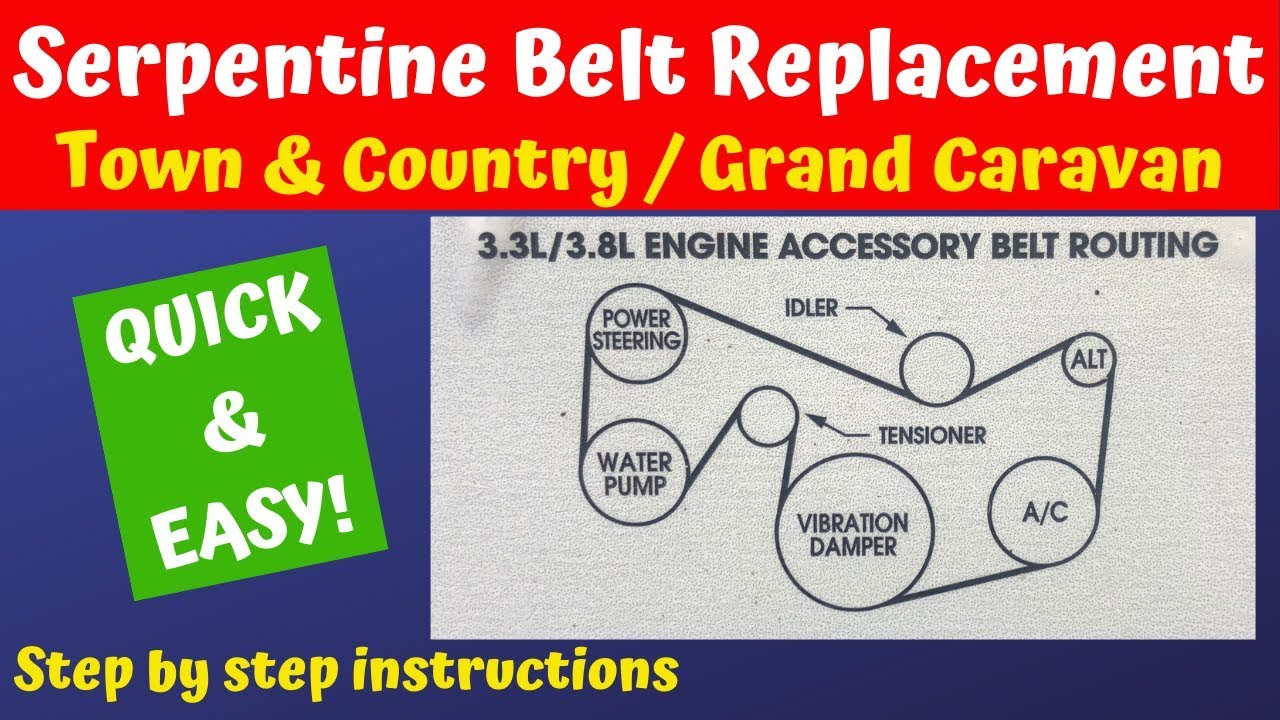
2012 Dodge Grand Caravan Serpentine Belt Diagram
For the experienced DIY mechanic or the car owner tackling their own maintenance, understanding the serpentine belt system on your 2012 Dodge Grand Caravan is crucial. This article provides a detailed breakdown of the serpentine belt diagram, its function, and practical applications for repairs and troubleshooting.
Purpose of Understanding the Serpentine Belt Diagram
The serpentine belt diagram is your roadmap to the accessory drive system of your 2012 Dodge Grand Caravan. It's not just a pretty picture; it's essential for:
- Repairs: Replacing a worn or broken serpentine belt requires you to know the correct belt routing. An incorrect routing can damage the belt, pulleys, and potentially other engine components.
- Maintenance: Inspecting the belt and pulleys for wear and tear becomes easier when you understand the system's layout. You'll be able to identify potential issues before they lead to breakdowns.
- Troubleshooting: Squealing noises, power steering failure, or a non-charging battery are often related to the serpentine belt system. The diagram helps you pinpoint the components involved.
- Learning: Understanding the system improves your overall automotive knowledge, allowing you to perform more complex repairs and maintenance tasks yourself.
Key Specs and Main Parts
The 2012 Dodge Grand Caravan typically comes with a 3.6L Pentastar V6 engine. This engine utilizes a single serpentine belt to drive multiple accessories. Here are the key components driven by the serpentine belt and some important specs:
- Crankshaft Pulley: The engine's rotational force originates here. The belt wraps around this pulley to receive the initial power.
- Alternator: This component generates electricity to power the vehicle's electrical system and charge the battery. A slipping belt here can lead to a dead battery and electrical malfunctions.
- Power Steering Pump: Provides hydraulic pressure to assist steering. A failing or slipping belt will result in hard steering.
- Air Conditioning Compressor: Circulates refrigerant to cool the cabin. If the belt slips, the A/C won't function correctly.
- Water Pump: Circulates coolant through the engine to prevent overheating. This is a critical component; a belt failure here can quickly lead to severe engine damage.
- Idler Pulley(s): Smooth, unpowered pulleys that guide the belt and maintain proper tension and wrap angle around other pulleys.
- Tensioner Pulley: This spring-loaded pulley automatically maintains the correct tension on the serpentine belt. A faulty tensioner can cause belt slippage or premature belt wear.
- Serpentine Belt: The continuous belt that transmits power from the crankshaft to all the accessories. The 3.6L engine typically uses a multi-ribbed belt, and the exact length and rib count will be specified in your vehicle's repair manual or parts catalog.
Symbols and Markings on the Serpentine Belt Diagram
Understanding the symbols used in the diagram is essential for accurate interpretation. Here's a breakdown of common symbols:
- Solid Lines: Represent the path of the serpentine belt as it travels around the pulleys.
- Arrows: Indicate the direction of belt rotation around each pulley. Pay close attention to these, as they are crucial for proper routing.
- Pulley Icons: Usually, a simplified representation of the pulley, often with a label indicating its function (e.g., ALT for alternator, P/S for power steering). The size of the icon might not perfectly reflect the actual pulley size.
- Tensioner Symbol: A distinct symbol, often showing a spring or an arrow indicating the direction of tension. Knowing which pulley is the tensioner is vital for belt replacement.
- Routing Labels: Some diagrams include labels like "Outside" or "Inside" to indicate which side of the belt (ribbed or smooth) should contact the pulley.
How It Works
The serpentine belt system is a relatively simple, yet effective, power transmission system. The crankshaft, driven by the engine's combustion process, spins the crankshaft pulley. The serpentine belt, wrapped tightly around the crankshaft pulley and the various accessory pulleys, transfers this rotational force to those accessories. The tensioner pulley maintains constant tension on the belt, ensuring sufficient grip and preventing slippage. Without proper tension, the belt will slip, reducing the efficiency of the accessories and potentially causing damage.
Think of it like a series of gears connected by a flexible band. Each accessory requires a specific amount of torque (rotational force) to operate, and the serpentine belt ensures that each component receives the necessary power from the engine.
Real-World Use and Basic Troubleshooting
Here are some practical scenarios where the serpentine belt diagram will be invaluable:
- Belt Replacement: Before removing the old belt, carefully study the diagram. Even better, take a picture or make a sketch of the belt's routing. If you forget the routing, the diagram is your only guide. After installing the new belt, double-check the routing against the diagram to ensure it's correct.
- Squealing Noise: A squealing noise, especially when the engine is cold or under load (e.g., turning the steering wheel, running the A/C), often indicates a slipping serpentine belt. Inspect the belt for wear, cracks, glazing, or missing ribs. Also, check the tensioner pulley to ensure it's applying sufficient tension. If the tensioner is weak, it needs to be replaced. Misalignment of pulleys can also cause squealing, so use a straight edge or laser alignment tool to verify proper alignment.
- Accessory Failure: If you experience power steering failure, charging problems, or A/C issues, check the serpentine belt first. A broken or severely damaged belt will prevent the affected accessory from functioning.
- Visual Inspection: Regularly inspect the belt for any signs of wear, such as cracks, fraying, or missing chunks. Also, inspect the pulleys for damage, such as bent flanges or excessive wear.
Safety Precautions
Working on the serpentine belt system involves potential hazards. Here are some crucial safety precautions:
- Disconnect the Negative Battery Cable: This prevents accidental starting of the engine while you're working.
- Hot Engine: Never work on the serpentine belt system when the engine is hot. The engine components can cause severe burns. Allow the engine to cool completely before starting any work.
- Moving Parts: The serpentine belt and pulleys are rapidly rotating components. Keep your hands, clothing, and tools clear of these parts when the engine is running.
- Eye Protection: Wear safety glasses to protect your eyes from debris.
- Tensioner Release: When removing or installing the belt, you'll need to release the tension on the tensioner pulley. Use the correct tool and follow the manufacturer's instructions to avoid injury. Incorrectly releasing the tensioner can cause it to snap back violently.
- The Water Pump: As stated earlier, the water pump is critical to the engine's health. Working on this component and the belt that drives it requires extreme caution.
Replacing the serpentine belt and diagnosing related issues is within reach of the competent DIYer. A careful assessment, the correct tools and components, and strict adherence to safety protocol will get you across the finish line. Understanding the belt's routing is paramount, so take your time and double-check your work.
To help you with your repairs and maintenance, we have a high-resolution serpentine belt diagram specifically for the 2012 Dodge Grand Caravan. You can download the file using the link below:
[Link to Downloadable Diagram Would Be Inserted Here]
With the diagram and this guide, you'll be well-equipped to tackle your serpentine belt maintenance and repairs with confidence.