2012 Dodge Journey 2.4 Serpentine Belt Diagram
Welcome, fellow gearheads! Today, we're diving deep into the serpentine belt system of the 2012 Dodge Journey with the 2.4-liter engine. This seemingly simple belt is the unsung hero powering many crucial components, and understanding its routing is essential for preventative maintenance, repairs, and even diagnosing pesky performance issues. I've seen countless Journeys sidelined due to a failed or improperly installed serpentine belt, so let's get you equipped with the knowledge to avoid that fate. We also have a printable version of the diagram available for you to download at the end of this article.
Purpose: Why This Diagram Matters
Why bother understanding the serpentine belt diagram? Well, several reasons come to mind, especially for the DIY mechanic:
- Belt Replacement: This is the most obvious. When your belt is cracked, frayed, or squealing like a banshee, you'll need to replace it. The diagram is your roadmap to proper routing.
- Component Replacement: Replacing the alternator, power steering pump, or AC compressor often requires removing the serpentine belt. Knowing how it goes back on is critical.
- Troubleshooting: A squealing belt can indicate a worn belt, a misaligned pulley, or a seized component. The diagram helps you visually inspect each component in the system.
- General Understanding: Even if you're not planning a repair, understanding how your car works is empowering.
Key Specs and Main Parts
Let's break down the key components and specifications relevant to the 2012 Dodge Journey 2.4L serpentine belt system:
- Engine: 2.4L DOHC 16V Dual VVT I4
- Serpentine Belt Length: Approximately 90-92 inches (This varies slightly based on manufacturer; always verify with your vehicle's VIN and part catalog).
- Belt Type: Multi-ribbed (typically 6 ribs)
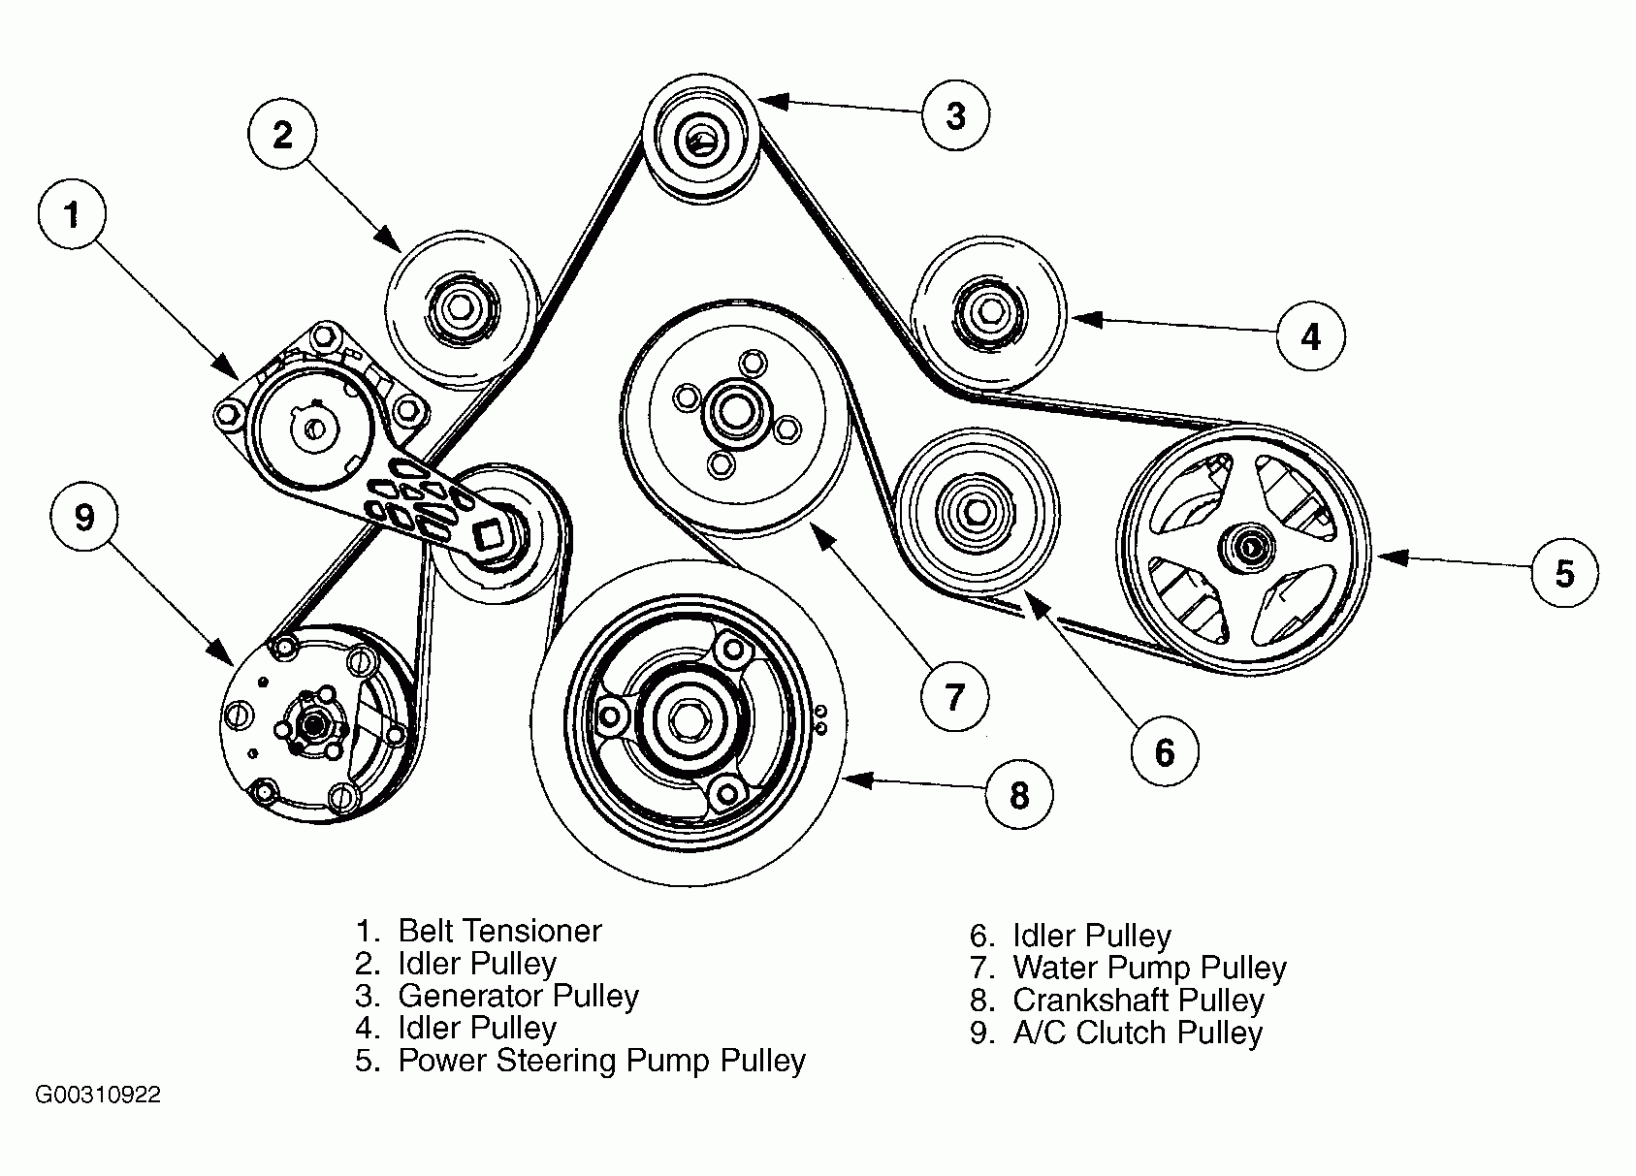
The main parts of the system are:
- Crankshaft Pulley: The driving force behind the entire system, connected directly to the engine's crankshaft.
- Alternator: Provides electrical power to the vehicle. The serpentine belt spins the alternator pulley.
- Power Steering Pump: Provides hydraulic pressure to assist with steering. It is also driven by the serpentine belt.
- Air Conditioning Compressor: Compresses refrigerant for the air conditioning system. You guessed it, powered by the belt.
- Tensioner Pulley: Maintains the correct tension on the serpentine belt. This is crucial for proper operation and preventing slippage. A spring-loaded mechanism usually provides automatic tensioning.
- Idler Pulley: Used to guide the belt around components and prevent interference. It does not drive any accessories.
Symbols: Understanding the Diagram's Language
A serpentine belt diagram isn't just a random collection of lines and shapes. It uses specific symbols to convey important information:
- Solid Lines: Represent the path of the serpentine belt. Follow these lines carefully when installing the belt.
- Arrows: Indicate the direction of rotation of each pulley. This is crucial for understanding how the belt wraps around the components.
- Component Icons: Standard symbols represent each component (alternator, power steering pump, etc.). These may be labeled with abbreviations (ALT, P/S, AC).
- Tensioner Indicator: Shows the location of the tensioner pulley and the direction it moves to tension the belt. Often, a small arrow indicates the direction to rotate the tensioner for belt removal/installation.
- Routing Direction: Sometimes diagrams will specify "Over" or "Under" to indicate whether the belt passes over or under a particular pulley. This is especially important where space is tight.
The actual diagrams use different line weights. Some heavier lines could indicate the outside of the belt and lighter lines the inside. Pay careful attention to the diagram you're referencing.
How It Works: The Symphony of the Serpentine Belt
The serpentine belt system is elegantly simple in its function. The crankshaft pulley, driven by the engine, turns. The serpentine belt, wrapped around all the pulleys, transfers this rotational force to the alternator, power steering pump, and AC compressor. The tensioner pulley keeps the belt taut, ensuring proper grip and preventing slippage. Without proper tension, the belt will slip, causing reduced performance from the accessories and potentially leading to overheating (if the water pump is also driven by the serpentine belt, which is *not* the case in the 2012 Journey 2.4L).
The placement of the idler pulley is also important because it can change the angle of the belt going to a certain driven component. This optimal angle ensures that the driven component gets full contact with the belt at all times.
Real-World Use: Troubleshooting the Serpentine Belt
Okay, let's get practical. Here are some common serpentine belt issues and how the diagram can help you diagnose them:
- Squealing Belt: This is the most common symptom. It can be caused by a worn belt, a loose belt (insufficient tension), a misaligned pulley, or a failing component (e.g., a seized alternator bearing).
Inspect the belt for cracks, fraying, or glazing. Use the diagram to visually check the alignment of each pulley. Feel for play or roughness in the bearings of each component. If you find a component is difficult to turn, it may be seizing.
- Belt Slippage: Can result in dim headlights, poor AC performance, and difficulty steering.
A slipping belt often indicates a lack of tension. Check the tensioner pulley. If it's at the end of its travel, the belt is stretched and needs replacement. Verify you are using the correct belt size using the diagram as a reference for the accessories.
- Belt Breaking: A snapped belt is a serious issue. It means at least one of your driven components isn't working, and you need to replace the belt immediately.
Before replacing, inspect all pulleys for sharp edges or damage that may have caused the break. Also, check each component turns freely to ensure none of them seized. A seized component will likely break a new belt very quickly.
Safety First: Risky Components
Working on the serpentine belt system can be dangerous if you're not careful. Here are some key safety considerations:
- Engine Off: Always work on the serpentine belt system with the engine off and the ignition key removed.
- Coolant Temperature: Avoid working on the system immediately after running the engine. Components can be extremely hot and cause burns.
- Moving Parts: Keep your hands, clothing, and tools clear of the serpentine belt and pulleys when the engine is running. Never try to diagnose a problem with the engine running unless absolutely necessary and with extreme caution.
- Tensioner Tool: Use the correct tool to relieve tension on the serpentine belt tensioner. Using the wrong tool (or no tool) can damage the tensioner or cause injury.
- Battery Disconnect: Disconnecting the negative battery terminal before working on any electrical components (like the alternator) is generally good practice.
The spring tensioner is under quite a bit of force, so handle it with care when removing or installing a new belt.
With the information provided here, you should now be much better prepared to inspect, diagnose, and service the serpentine belt system on your 2012 Dodge Journey 2.4L. Remember, when in doubt, consult a qualified mechanic. Happy wrenching!
You can download the serpentine belt diagram for the 2012 Dodge Journey 2.4L engine [Here - Replace with Actual Download Link].