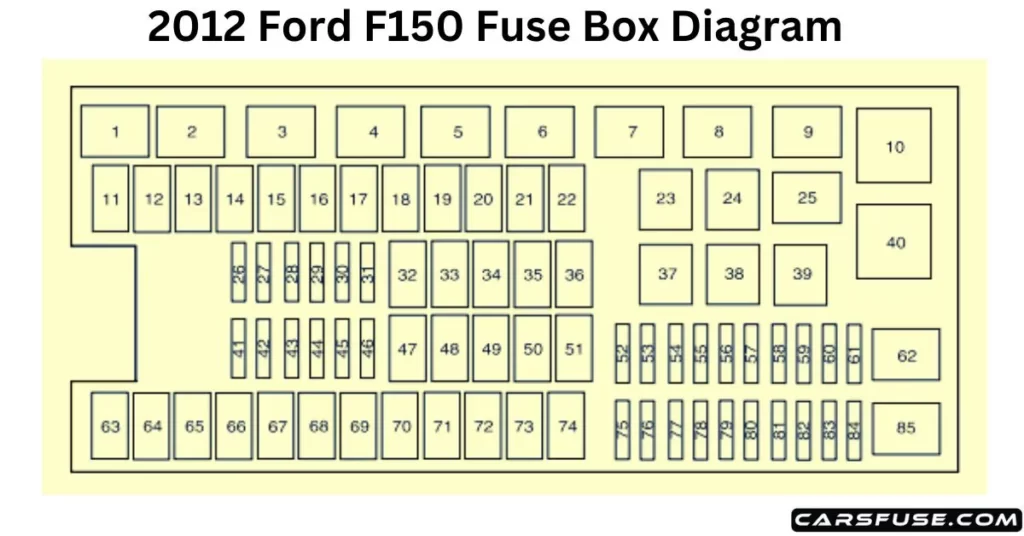
2012 F150 Fuse Box Diagram Under Hood
Alright, let's dive into the fuse box diagram under the hood of your 2012 Ford F-150. Knowing this layout is absolutely essential if you're tackling any electrical repairs, adding aftermarket accessories, or even just trying to understand how different systems in your truck function. Think of it as the electrical nervous system of your F-150; when something goes wrong, this is where you start looking.
Purpose of the Under-Hood Fuse Box Diagram
Why should you care about this diagram? Several reasons:
- Troubleshooting Electrical Issues: A blown fuse is often the culprit behind malfunctioning lights, power windows, or even a non-starting engine. The diagram pinpoints which fuse controls which circuit, saving you hours of guesswork.
- Installing Aftermarket Accessories: Want to add a new sound system, auxiliary lights, or a trailer brake controller? Knowing which fuses are available for tapping into power is crucial for a safe and reliable installation.
- Understanding Vehicle Systems: Even if you're not fixing anything, studying the diagram helps you understand how various systems in your truck are wired and protected. This knowledge can be invaluable down the road.
- Avoiding Costly Repairs: Properly diagnosing and replacing a fuse yourself is far cheaper than taking your truck to a mechanic for a simple fix.
Key Specs and Main Parts of the Fuse Box
The under-hood fuse box on a 2012 F-150 is typically located in the engine compartment, often on the driver's side, near the battery. It's a black plastic box with a hinged lid. Here are some key specifications and parts you should know about:
Main Components:
- Fuse Box Housing: The plastic enclosure that protects the fuses and relays from the elements.
- Fuses: These are sacrificial devices designed to protect electrical circuits from overcurrent. They contain a thin wire that melts and breaks the circuit when too much current flows through it. Fuses are rated in Amps (A), indicating the maximum current they can handle.
- Relays: Electrically operated switches. They use a small current to control a larger current, allowing low-current circuits to control high-current devices like headlights or the starter motor.
- Jumpers/Shunts: Sometimes, the fuse box contains removable jumpers or shunts that configure certain circuits.
- Diagnostic Connector Ports: Access points for diagnostic tools to communicate with the truck's computer systems.
Fuse Types:
You'll find various fuse types in your F-150's fuse box:
- Blade Fuses (ATO/ATC): The most common type, characterized by a plastic body with two exposed blades.
- Mini Blade Fuses: Smaller versions of blade fuses, used in circuits with lower current requirements.
- Maxi Fuses: Larger fuses designed for high-current circuits, such as the starter motor or the main power supply.
- Cartridge Fuses: Cylindrical fuses often used for high-current protection.
Understanding Fuse Box Diagram Symbols
The fuse box diagram isn't just a random assortment of numbers and lines. It's a carefully designed representation of the electrical system. Here's how to decipher it:
- Fuse Numbers: Each fuse and relay location is assigned a number, which corresponds to the listing in the diagram.
- Circuit Descriptions: Next to each fuse number, you'll find a brief description of the circuit it protects (e.g., "Headlights," "Fuel Pump," "Power Windows").
- Amp Ratings: The amperage rating of each fuse is clearly indicated (e.g., "15A," "20A"). Never replace a fuse with one of a higher amperage rating, as this can cause serious damage or even a fire. Always use the specified rating.
- Relay Symbols: Relays are typically represented by a square or rectangle with connecting lines indicating the coil and contacts.
- Line Colors (on some diagrams): Some diagrams use different colors to indicate wire gauge or circuit type. However, the 2012 F-150 diagram is typically black and white and doesn't rely heavily on color coding.
- Abbreviations: Be prepared for abbreviations. Common ones include:
- PCM: Powertrain Control Module (the engine computer)
- BCM: Body Control Module
- GEM: Generic Electronic Module
- ABS: Anti-lock Braking System
- IGN: Ignition
Pro Tip: Many diagrams are also printed on a sticker located either on the inside of the fuse box lid or somewhere nearby in the engine compartment. This is your first point of reference!
How It Works: Fuse Box in Action
The fuse box acts as a central distribution point for electrical power throughout your F-150. Power from the battery is routed to the fuse box, and then distributed to various circuits through individual fuses and relays. When a circuit experiences an overcurrent condition (e.g., a short circuit), the fuse protecting that circuit blows, interrupting the flow of electricity and preventing damage to the components in that circuit.
Relays, on the other hand, allow low-current circuits (like those controlled by switches on your dashboard) to control high-current devices (like headlights or the starter motor). This is important because running high-current circuits directly through dashboard switches could overload the switches and cause them to fail.
Real-World Use: Basic Troubleshooting Tips
Here's how to use the fuse box diagram to troubleshoot common electrical problems:
- Identify the Symptom: What's not working? (e.g., headlights, power windows, radio).
- Consult the Diagram: Locate the fuse that corresponds to the malfunctioning system.
- Inspect the Fuse: Remove the fuse and visually inspect it. Look for a broken filament (the thin wire inside the fuse). If the filament is broken, the fuse is blown.
- Test the Fuse (Recommended): Even if the fuse *looks* good, it's a good idea to test it with a multimeter set to continuity mode. If the multimeter doesn't beep or show continuity, the fuse is bad.
- Replace the Fuse: Replace the blown fuse with a new fuse of the exact same amperage rating.
- Test the System: Turn on the system that was malfunctioning to see if it now works.
- If the Fuse Blows Again: If the new fuse blows immediately, there's a short circuit in the system. This requires further diagnosis and should be handled by a qualified mechanic. Don't keep replacing fuses, or you risk causing serious damage.
Safety Precautions
Working with electrical systems can be dangerous. Keep these safety precautions in mind:
- Disconnect the Battery: Before working on the fuse box, disconnect the negative (-) terminal of the battery to prevent accidental short circuits.
- Use Proper Tools: Use insulated tools to avoid electrical shock.
- Never Replace a Fuse with a Higher Amperage Rating: This can overload the circuit and cause a fire.
- Be Careful Around High-Current Circuits: Circuits like the starter motor and alternator can carry high currents, even with the engine off. Avoid touching exposed terminals.
- Consult a Professional: If you're uncomfortable working with electrical systems, consult a qualified mechanic.
High-Risk Components: Be especially careful when working around the following components:
- Fuel Pump Relay: Mishandling this can cause fuel to be pumped when it shouldn't be, creating a fire hazard.
- Starter Relay: Activating this without the ignition engaged can be dangerous.
- Airbag Fuses: Tampering with these can cause accidental airbag deployment.
We have the complete 2012 F-150 Under-Hood Fuse Box Diagram readily available for download in a printable format. This will provide you with a detailed reference guide to keep in your glove compartment or toolbox. Armed with this knowledge and the diagram, you'll be well-equipped to tackle many electrical issues on your 2012 F-150 with confidence.