2012 Ford F150 5.0 Serpentine Belt Diagram
Alright, let's dive into the serpentine belt system on the 2012 Ford F-150 with the 5.0L V8 engine. This article will give you a solid understanding of the serpentine belt diagram, what it means, and how you can use it for maintenance and repairs. We're talking directly to you, the experienced DIYer who isn't afraid to get their hands dirty, so we’ll skip the basics but get into the nitty-gritty details.
Why This Diagram Matters
The serpentine belt diagram is more than just a pretty picture; it's your roadmap to understanding the entire accessory drive system. Knowing the correct belt routing is crucial for several reasons:
- Repairs and Maintenance: Whether you're replacing the belt itself, the tensioner, an idler pulley, or even an accessory like the alternator or power steering pump, you need to know how the belt is supposed to be routed. Incorrect routing can lead to component failure, reduced performance, and even engine damage.
- Troubleshooting: A squealing or slipping serpentine belt can be a real headache. The diagram helps you identify potential problems by confirming proper belt alignment and identifying the components driven by the belt.
- Learning the System: Even if you're not currently having problems, understanding the serpentine belt system gives you a deeper appreciation for how your engine works. It's knowledge that can save you time and money in the long run.
- Proper Accessory Function: The serpentine belt powers essential components. Incorrect routing can lead to malfunctioning power steering, alternator, A/C compressor, or water pump.
Key Specs and Main Parts
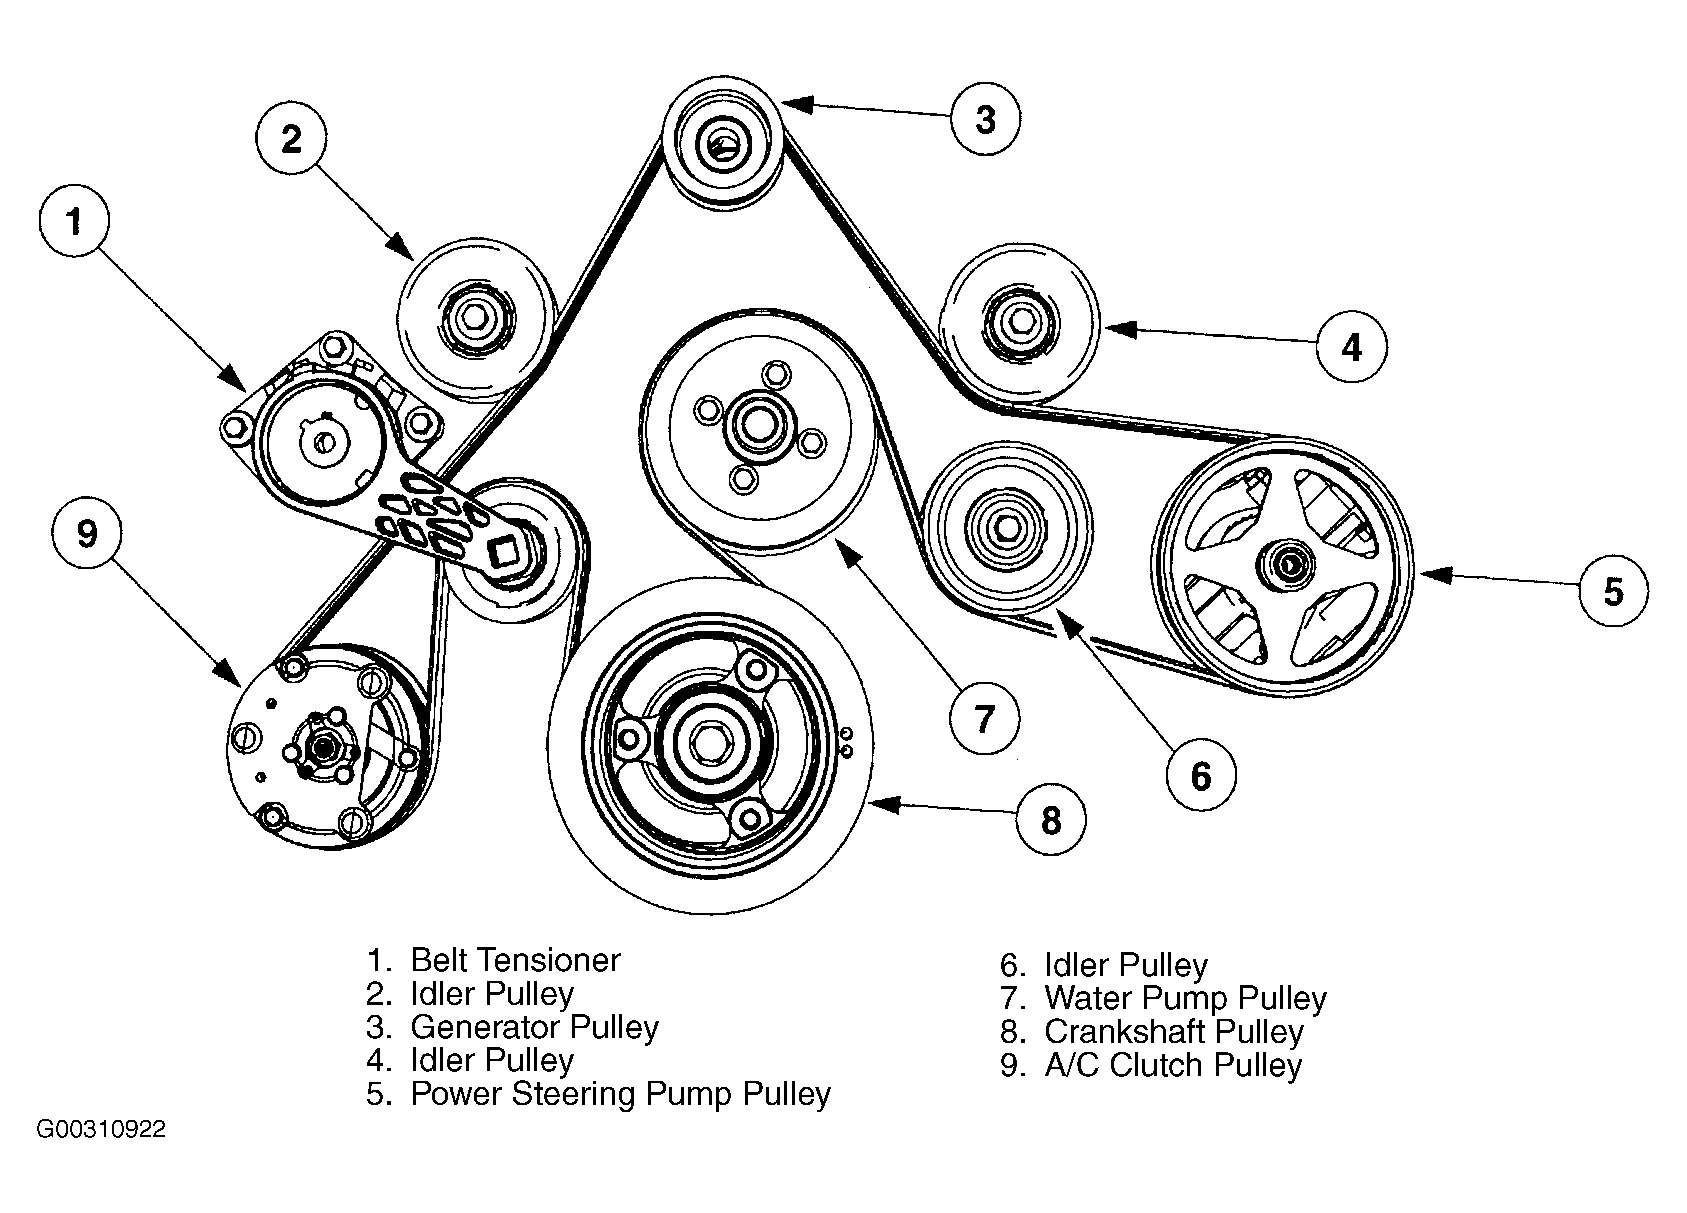
The 2012 Ford F-150 5.0L uses a single serpentine belt to drive multiple accessories. Key components in the system include:
- Crankshaft Pulley: This is the heart of the system. Driven directly by the engine, it's what transfers power to the serpentine belt.
- Alternator: Provides electrical power to the vehicle.
- Power Steering Pump: Provides hydraulic pressure to assist steering.
- Air Conditioning (A/C) Compressor: Compresses refrigerant for the A/C system.
- Water Pump: Circulates coolant through the engine to regulate temperature.
- Belt Tensioner: Maintains proper belt tension to prevent slippage and wear. This is usually a spring-loaded pulley that automatically adjusts for belt stretch.
- Idler Pulley(s): These pulleys provide additional support and guidance to the belt, helping it maintain the correct path and avoid interference. Some diagrams may label these simply as "idler".
- Serpentine Belt: A long, continuous belt made of reinforced rubber. The "serpentine" name comes from the snake-like path it follows around the various pulleys.
Important Specification: Belt Length The specific length of the serpentine belt is crucial. Using the wrong length can lead to insufficient tension or inability to properly route the belt. While the part number for the correct belt is essential, knowing the length is helpful for verification. Refer to your owner's manual or a reputable parts supplier for the correct belt length specification. The 2012 F-150 5.0L typically uses a belt around 90-92 inches in length, but always double-check the specific application.
Understanding the Serpentine Belt Diagram Symbols
Serpentine belt diagrams use a standardized set of symbols to represent the various components and the belt's path. Let's break down some common ones:
- Pulleys: Pulleys are typically represented as circles. The driven component (alternator, power steering pump, etc.) will usually be labeled within or near the circle.
- Belt Path: The serpentine belt is shown as a solid line winding around the pulleys. Arrows indicate the direction of belt travel. Pay close attention to whether the belt is routed on the grooved side or the smooth side of a pulley. This makes a huge difference!
- Tensioner: The tensioner is usually represented with a symbol indicating its spring-loaded mechanism. The direction of the arrow on the tensioner indicates the direction the tensioner arm moves to apply tension.
- Idler Pulleys: Idler pulleys are typically represented as a plain circle, often labeled "idler."
- Direction Arrows: These show the direction the belt is traveling around each pulley.
How It Works
The serpentine belt system is relatively simple in concept but requires precision in execution. The crankshaft pulley, driven by the engine, turns the serpentine belt. The belt, in turn, drives all the accessory pulleys. The belt tensioner maintains adequate tension on the belt, ensuring proper grip and preventing slippage.
Think of it like a chain reaction. The engine starts, the crankshaft turns, the crankshaft pulley spins the belt, and the belt spins all the other pulleys connected to the various accessories. If the belt is too loose, it will slip, reducing the efficiency of the accessories. If the belt is too tight, it can put excessive stress on the bearings of the accessories, leading to premature failure.
The direction in which the belt travels around each pulley is critical. The diagram clearly indicates whether the belt rides on the grooved side of a pulley (for components like the alternator and A/C compressor) or on the smooth side (often for idler pulleys and the tensioner). This configuration dictates the direction of rotation for each component.
Real-World Use and Basic Troubleshooting
Here are some common scenarios where a serpentine belt diagram can be invaluable:
- Belt Replacement: The most obvious use. Before removing the old belt, carefully note the routing. Take a picture with your phone for extra insurance! Refer to the diagram to ensure you route the new belt correctly.
- Squealing Belt: A squealing belt is often caused by slippage due to low tension or a worn belt. Use the diagram to check the tensioner for proper operation. A faulty tensioner may need replacement. Also check the belt for cracks, glazing, or missing ribs.
- Accessory Failure: If an accessory like the alternator or power steering pump fails, you'll need to remove the serpentine belt to replace it. The diagram will ensure you can reinstall the belt correctly afterward.
- Visual Inspection: Regularly inspect your serpentine belt for signs of wear and tear. Cracks, fraying, and missing chunks are all red flags. Use the diagram to ensure the belt is properly aligned and isn't rubbing against anything.
Troubleshooting Tips:
- Belt Alignment: Use a straight edge to ensure all pulleys are in proper alignment. Misalignment can cause premature belt wear and noise.
- Pulley Condition: Check pulleys for damage or excessive wear. A damaged pulley can damage the belt.
- Tensioner Operation: Check the tensioner for smooth movement and proper tension. A weak tensioner can cause belt slippage.
Safety Considerations
The serpentine belt system operates near moving engine components and can be dangerous if you're not careful. Always disconnect the negative battery cable before working on the serpentine belt system to prevent accidental starting of the engine.
High-Risk Components:
- Crankshaft Pulley: Never put your hands near the crankshaft pulley while the engine is running. It's rotating at high speed and can cause serious injury.
- Fan Blades: Be mindful of cooling fan blades, especially if they are mechanically driven by the belt. Even with the engine off, there could be some movement.
- Moving Belt: Never attempt to inspect or adjust the serpentine belt system while the engine is running.
Important Safety Tip: When releasing the tension on the belt tensioner, use the correct tool and follow the manufacturer's instructions. Releasing the tension suddenly can cause the tool to slip and potentially cause injury.
Remember to always consult your vehicle's repair manual for specific instructions and torque specifications. Using the correct tools and following proper procedures will ensure a safe and successful repair.
With the understanding of the 2012 Ford F-150 5.0L serpentine belt diagram, you're well-equipped to tackle various maintenance and repair tasks. Keep this knowledge handy, and you'll be able to keep your F-150 running smoothly for years to come. We have the actual serpentine belt diagram file. You can download the diagram for closer view.