2012 Ford Focus Radio Wiring Harness
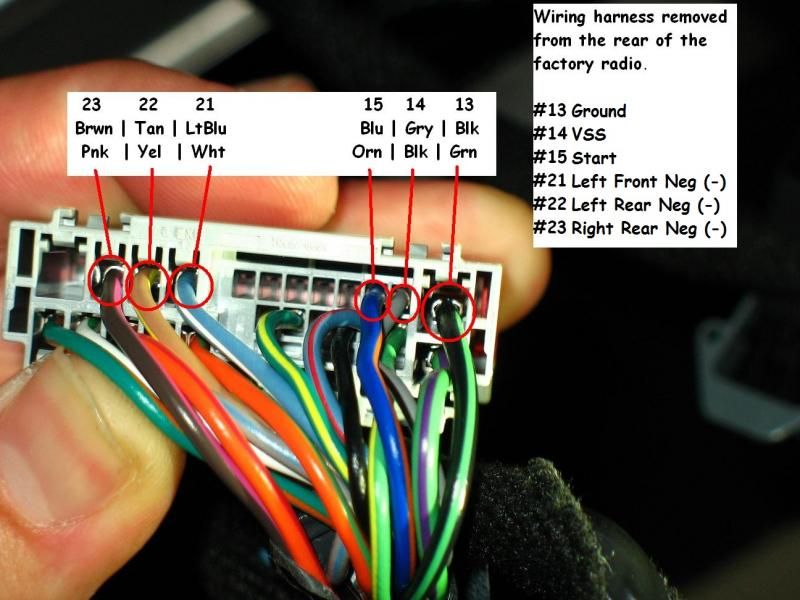
Alright, let's dive into the 2012 Ford Focus radio wiring harness. Understanding this diagram is crucial if you're planning any aftermarket stereo installations, speaker upgrades, diagnosing audio problems, or just generally getting more familiar with your car's electrical system. Whether you're adding a subwoofer, replacing a faulty head unit, or tracing a mysterious power drain, this information will be invaluable. Consider this your comprehensive guide to navigating the intricacies of the 2012 Focus's audio wiring.
Purpose of the Wiring Diagram
A wiring diagram is essentially a roadmap of your car's electrical system, specifically focused on the radio in this case. It shows you exactly where each wire originates, what component it connects to, and what its function is. Why is this important? Think of it this way: without a map, you're lost in a city. Without a wiring diagram, you're lost in a tangle of wires. You might get lucky, but you're more likely to cause damage or frustration. This diagram allows for:
- Accurate Stereo Installation: Connect aftermarket components correctly, avoiding blown fuses or damaged equipment.
- Efficient Troubleshooting: Pinpoint the source of audio problems, such as a dead speaker, no power to the radio, or distorted sound.
- Safe Modifications: Add amplifiers, equalizers, or other audio enhancements without disrupting the factory wiring.
- Educational Value: Gain a deeper understanding of your car's electrical system and how its components interact.
Key Specs and Main Parts
The 2012 Ford Focus radio wiring harness consists of several key components, each playing a specific role. Here's a breakdown:
- Head Unit Connector(s): This is where the main wiring harness plugs into the back of the radio. Typically, there are one or two connectors, depending on the trim level and factory options. These connectors carry power, ground, speaker outputs, and potentially data signals for features like steering wheel controls.
- Power Wires: These provide the necessary voltage to operate the radio. There are usually two main power wires:
- Constant Power (12V+): Provides continuous power to the radio, even when the ignition is off. This is used for memory functions, such as station presets and clock settings.
- Switched Power (12V+): Only provides power when the ignition is turned to the "Accessory" or "On" position. This is the main power source for the radio's operation.
- Ground Wire: This provides a return path for the electrical current, completing the circuit. It's typically connected to the car's chassis.
- Speaker Wires: These carry the audio signal from the radio to the speakers. There are typically eight speaker wires (two for each of the four speakers: front left, front right, rear left, rear right). Each pair consists of a positive (+) and a negative (-) wire.
- Antenna Wire: This connects to the radio antenna, allowing it to receive radio signals.
- Data Wires (CAN Bus): In many modern vehicles, including the 2012 Focus, the radio communicates with the car's computer system via a CAN (Controller Area Network) bus. These wires transmit data signals for features like steering wheel controls, vehicle speed-sensitive volume, and factory amplifier control. Understanding these wires is critical for aftermarket integration.
Understanding the Wiring Diagram Symbols
Wiring diagrams use a standardized set of symbols to represent different components and connections. Here's a breakdown of the most common symbols you'll encounter:
- Lines: Represent wires. The thickness of the line doesn't usually indicate wire gauge (size).
- Dots: Indicate a wire connection or splice. A dot where two or more lines meet means they are electrically connected. If lines cross without a dot, they are not connected.
- Rectangles: Often represent components, such as the radio head unit, speakers, or relays.
- Circles: Can represent various components, depending on the context. Consult the diagram's legend for specific meanings.
- Color Codes: Wires are typically identified by their color. The diagram will include a color code chart to tell you what each color represents (e.g., WH = White, BL = Blue, GN = Green). Pay close attention to these!
- Component Labels: Each component will have a label indicating its function or location (e.g., "Radio," "Front Left Speaker," "Fuse").
The diagram will also include information like wire gauge (AWG) and circuit numbers. This information is especially useful for troubleshooting and repairs.
How It Works: The Electrical Flow
The radio's operation relies on a simple principle: completing an electrical circuit. Here's a simplified explanation of the electrical flow:
- Power Source: The battery provides the electrical energy.
- Power Wires: The constant and switched power wires carry the voltage from the battery to the radio.
- Radio Activation: When the ignition is turned on, the switched power wire provides power to the radio, activating its internal circuitry.
- Audio Processing: The radio receives audio signals from various sources (e.g., AM/FM tuner, CD player, auxiliary input). It amplifies these signals and sends them to the speaker outputs.
- Speaker Outputs: The speaker wires carry the amplified audio signals to the speakers.
- Speakers: The speakers convert the electrical signals into sound waves.
- Ground Wire: The ground wire provides a return path for the electrical current, completing the circuit.
The CAN bus data wires allow the radio to interact with other vehicle systems, enabling features like steering wheel controls and vehicle speed-sensitive volume.
Real-World Use: Basic Troubleshooting Tips
Let's say your radio suddenly stops working. Here's how the wiring diagram can help you troubleshoot the problem:
- Check the Fuses: The first step is always to check the radio fuse. The wiring diagram will show you the location of the fuse in the fuse box and its amperage rating. A blown fuse is a common cause of radio failure.
- Verify Power and Ground: Use a multimeter to check for voltage on the constant and switched power wires. Also, verify that the ground wire has a good connection to the chassis. No power or a bad ground can prevent the radio from turning on.
- Check Speaker Connections: If the radio turns on but you have no sound, check the speaker wires for loose connections or shorts. Use the wiring diagram to identify the correct wires for each speaker.
- Inspect the Wiring Harness: Look for any signs of damage to the wiring harness, such as frayed wires, melted insulation, or corroded connectors.
- CAN Bus Issues: If steering wheel controls aren't working, or the radio is behaving erratically, suspect a CAN bus issue. These problems are more complex and may require specialized diagnostic tools.
Safety Considerations
Working with electrical systems can be dangerous. Always take the following precautions:
- Disconnect the Battery: Before working on any electrical component, disconnect the negative terminal of the battery to prevent shorts and electric shock.
- Use Proper Tools: Use insulated tools designed for automotive electrical work.
- Avoid Working in Wet Conditions: Water conducts electricity and increases the risk of shock.
- Identify High-Risk Components: Be especially cautious around the airbag system (if integrated with the radio). Never probe airbag wires with a multimeter or test light, as this could trigger the airbag.
- Double-Check Your Work: Before reconnecting the battery, double-check all your connections to ensure they are correct and secure.
Working on a car's electrical system requires caution and knowledge. If you're not comfortable with any of these procedures, it's best to consult a qualified mechanic.
We have the full, detailed wiring diagram for the 2012 Ford Focus radio available for download. It includes all the color codes, pin assignments, and component locations you'll need. This document is a valuable resource for any DIYer working on their 2012 Focus's audio system. Having the diagram on hand will save you time, prevent mistakes, and ultimately ensure a successful project.